
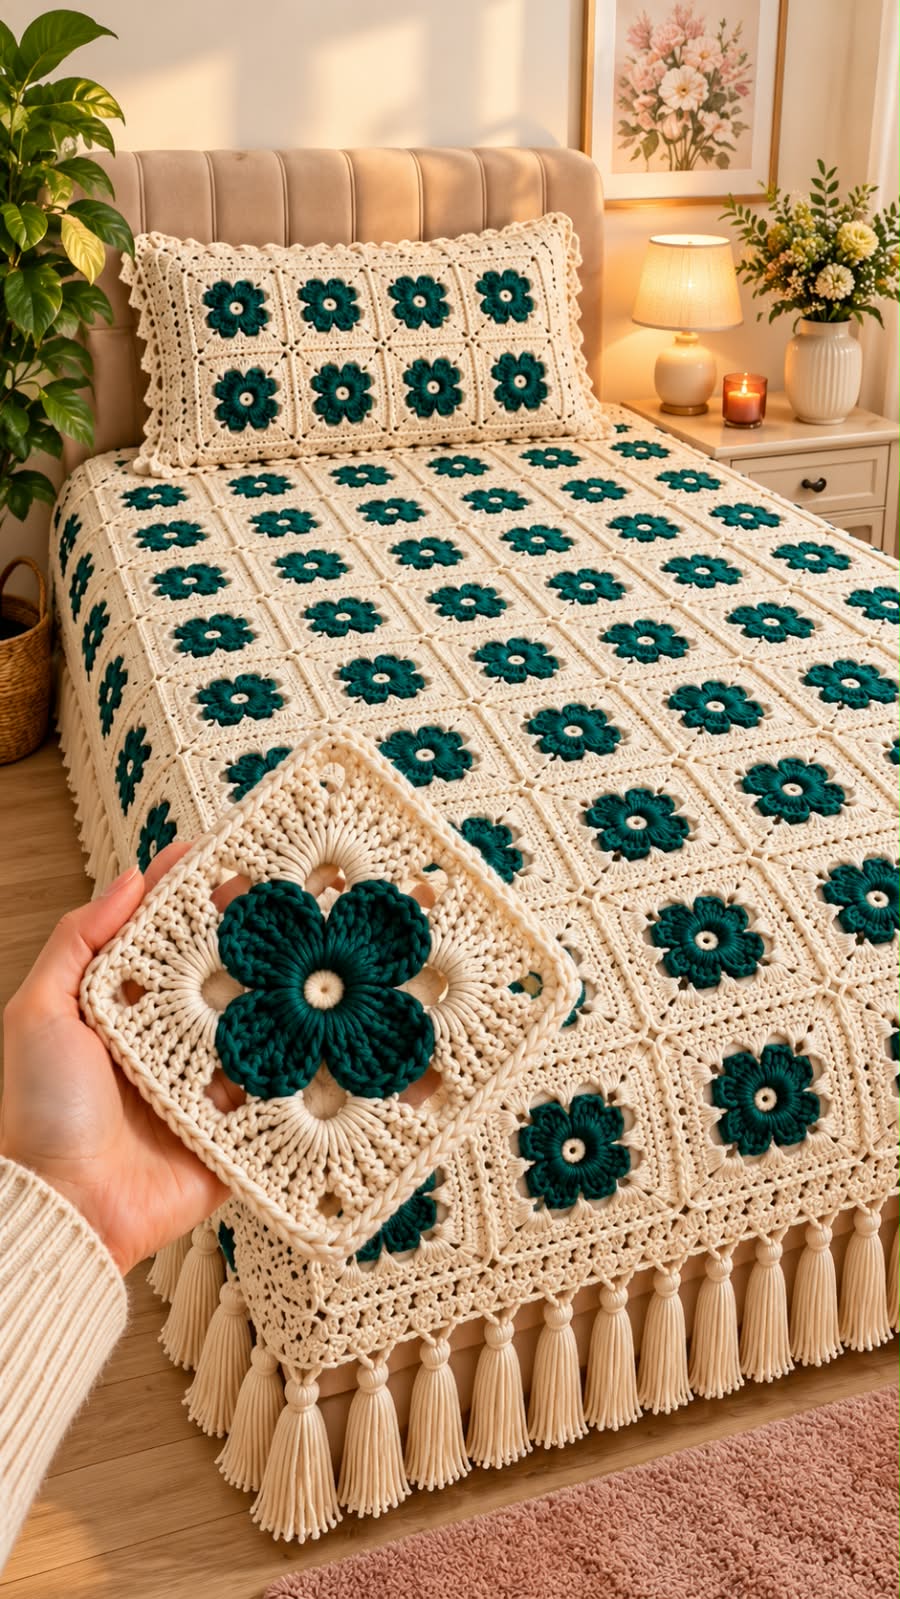
Complete Crochet Pattern with Matching Pillow Cover and Decorative Tassels
Style: Vintage Floral Granny Square
Colors: Deep Emerald Green and Warm Ivory
Skill Level: Intermediate
Terminology: US Crochet Terms
Construction: Raised five-petal flowers, ivory granny squares, joined motifs, lace edging, and handmade tassels.
This elegant crochet bedspread features beautiful emerald-green flowers with raised petals, surrounded by intricate ivory crochet squares. The matching pillow and decorative tassel fringe complete its romantic, luxurious appearance.
This is a detailed photo-inspired reconstruction, not the original designer’s exact pattern. The instructions below provide a practical way to create a similar bedspread.
1. MATERIALS REQUIRED
Yarn
- Color A: Deep Emerald Green
- Color B: Warm Ivory Cream
- Cotton or cotton-blend yarn, DK or light worsted weight
- Estimated total for a queen-size bedspread: 4,000–6,000 meters, depending on yarn thickness, motif size, and tassels
Tools
- 4.0 mm or 4.5 mm crochet hook
- Yarn needle
- Scissors
- Stitch markers
- Measuring tape
- Cardboard or tassel maker
- Blocking mats and pins
Finished Sizes
| Bed Size | Approximate Dimensions |
|---|---|
| Single | 150 × 220 cm |
| Double | 200 × 220 cm |
| Queen | 220 × 240 cm |
| King | 260 × 260 cm |
2. CROCHET ABBREVIATIONS
| Abbreviation | Meaning |
|---|---|
| CH | Chain |
| SC | Single Crochet |
| HDC | Half Double Crochet |
| DC | Double Crochet |
| TR | Treble Crochet |
| SL ST | Slip Stitch |
| ST | Stitch |
| SP | Space |
| SK | Skip |
| REP | Repeat |
| YO | Yarn Over |
| BLO | Back Loop Only |
Special Stitch – Puff Stitch: YO, insert the hook into the designated stitch, pull up a loop. Repeat three more times in the same stitch, YO and draw through all loops, then CH 1 to secure.
Special Stitch – Picot: CH 3, then SL ST into the first chain.
3. METHOD – CREATING THE EMERALD FLOWER
Round 1 – Ivory Flower Center
Using ivory yarn:
- Make a magic ring.
- CH 1.
- Work 10 SC into the ring.
- Pull the ring closed.
- Join with SL ST to the first SC.
Total: 10 SC.
Fasten off ivory yarn.
Round 2 – Emerald Petal Foundation
Attach emerald-green yarn.
- CH 1.
- Work 1 SC into the first stitch.
- CH 3.
- SK the next stitch.
- Work 1 SC into the following stitch.
- Repeat the CH 3 and SC sequence around the center.
- Join with SL ST.
Result: Five CH 3 petal spaces.
Round 3 – Creating Five Raised Petals
Work into each CH 3 space:
- SC.
- HDC.
- 5 DC.
- HDC.
- SC.
Repeat this sequence in all five petal spaces.
Join with SL ST.
Result: Five rounded emerald-green flower petals surrounding a small ivory center.
Round 4 – Adding Flower Texture
Continue with emerald yarn.
- Work SL ST along the outer edge of each petal.
- At the center of each petal, work one additional SC or HDC to define the shape.
- Continue evenly around all five petals.
- Join with SL ST.
- Fasten off.
The completed flower should have a raised, three-dimensional appearance.
4. FORMATION – IVORY LACE FOUNDATION
Round 5 – Working Behind the Petals
Using ivory yarn:
- Attach the yarn behind the flower, near the base of the first petal.
- CH 5.
- SC into the base between the next two petals.
- Repeat behind all five petals.
- Join with SL ST.
This creates a foundation of ivory chain arches behind the flower.
Round 6 – Building the Ivory Background
- SL ST into the first CH 5 space.
- Work 5 DC into the space.
- CH 2.
- Work 5 DC into each remaining chain space, separating groups with CH 2.
- Join with SL ST.
This round creates a circular ivory background around the raised flower.
Round 7 – Openwork Lace Formation
- CH 4.
- Work SC into the next available CH 2 space.
- CH 4.
- Repeat around the flower.
- Join with SL ST.
The chain arches create an open lace effect between the flower and the square border.
5. FORMATION – CONVERTING THE FLOWER INTO A SQUARE
Round 8 – Establishing Four Corners
Using ivory yarn:
- Identify four evenly spaced positions around the outer edge.
- Work (3 DC, CH 3, 3 DC) at the first corner.
- CH 2.
- Work SC into the next suitable chain space.
- Continue creating openwork sections along the sides.
- Repeat the corner formation at the other three corners.
- Join with SL ST.
Because the flower has five petals and the outer motif has four corners, adjust the chain spacing to keep the flower centered.
Round 9 – Expanding the Square
- CH 3.
- Work DC stitches evenly along the first side.
- CH 1 between small groups where an openwork effect is desired.
- At each corner, work (2 DC, CH 3, 2 DC).
- Continue on all four sides.
- Join with SL ST.
Round 10 – Decorative Square Border
- CH 1.
- Work SC along the first side.
- Work (SC, CH 2, SC) into each corner.
- Continue around the complete square.
- Join with SL ST.
Round 11 – Final Ivory Border
- CH 2.
- Work HDC evenly around the square.
- Work (2 HDC, CH 2, 2 HDC) into each corner.
- Join with SL ST.
- Fasten off.
Block the completed square to the desired size.
6. FORMATION – ASSEMBLING THE BEDSPREAD
Create identical floral squares until the desired number is reached.
Example Queen-Size Motif Arrangement
9 squares across
10 rows long
90 Floral Granny Squares
Illustrative arrangement. Actual motif count depends on your gauge and desired dimensions.
For example, if each blocked square measures 24 × 24 cm:
- Width: 9 × 24 = 216 cm
- Length: 10 × 24 = 240 cm
These dimensions exclude the final lace border and tassels.
Method – Joining the Squares
- Arrange all completed motifs in straight rows.
- Place two squares right sides together.
- Align corresponding corner and edge stitches.
- Thread a yarn needle with ivory yarn.
- Sew using mattress stitch.
- Continue joining motifs into rows.
- Join the completed rows together.
- Weave in all loose ends.
For a decorative raised join, use slip stitches instead of sewing.
7. FORMATION – DECORATIVE LACE BORDER
Round 1 – Foundation
Using ivory yarn:
- Join yarn at any outer corner.
- Work SC evenly around the bedspread.
- Work 3 SC at each corner.
- Join with SL ST.
Round 2 – Open Lace Arches
- CH 5.
- SK approximately 3 stitches.
- Work SC into the next stitch.
- Repeat around the border.
- Add extra chain spacing at the corners where necessary.
- Join with SL ST.
Round 3 – Floral Shell Edging
- Work 7 DC into the first CH 5 space.
- SC into the next anchoring stitch.
- Repeat across the entire edge.
- Adjust the corner shells to keep the fabric flat.
- Join with SL ST.
Round 4 – Final Decorative Edge
- Work SC evenly across the outer shell stitches.
- Add a picot at the center of each shell if desired.
- Continue around the entire bedspread.
- Join with SL ST.
- Fasten off.
8. FORMATION – HANDMADE IVORY TASSELS
The tassels are a distinctive feature of the photographed bedspread.
Materials
- Ivory yarn
- Cardboard measuring approximately 15 cm
- Scissors
- Yarn needle
Step 1 – Wrapping the Yarn
- Wrap ivory yarn around the cardboard 40–50 times.
- Cut a separate 25 cm strand of yarn.
- Slide the strand beneath the wrapped yarn at the top.
- Tie tightly to secure the bundle.
Step 2 – Forming the Tassel
- Slide the wrapped yarn off the cardboard.
- Cut through the loops at the bottom.
- Smooth the yarn strands into an even bundle.
- Wrap another strand around the bundle approximately 2–3 cm below the top.
- Tie securely.
Step 3 – Attaching the Tassels
- Position tassels at regular intervals along the lower edge and sides.
- Thread the top tie strands through strong border stitches.
- Secure them with several knots.
- Weave the ends into the edging.
- Trim all tassels to an even length.
A spacing of approximately 10–12 cm creates a full decorative fringe.
9. MATCHING EMERALD FLORAL PILLOW COVER
The pillow shown in the reference image features two rows of floral granny squares.
Front Panel
Create eight floral motifs.
Arrange them as follows:
4 columns × 2 rows = 8 flower squares
- Join four squares horizontally.
- Make a second row of four squares.
- Join the two rows together.
- Work SC evenly around the pillow front.
- Add a decorative lace border.
Pillow Back
- Crochet a rectangular ivory panel using HDC or DC.
- Continue until the back matches the finished front.
- Place the panels right sides together.
- Join three edges.
- Turn right side out.
- Insert the pillow.
- Close the final edge or use an envelope closure.
Pillow Lace Border
Work a narrow shell-stitch border around the pillow for a soft, romantic finish.
10. FINISHING AND BLOCKING
- Weave in all yarn ends securely.
- Gently dampen the bedspread.
- Lay it flat on a clean surface.
- Straighten the granny-square seams.
- Gently shape the raised flower petals.
- Arrange the outer lace border.
- Keep the tassels straight.
- Allow the bedspread to dry fully.
Avoid pressing the raised green flowers flat.
11. CONCLUSION
The Emerald Green Floral Crochet Bedspread combines rich green flowers, soft ivory lace, and traditional granny-square construction to create an elegant handmade bedroom accessory.
The three-dimensional flower centers provide beautiful texture, while the ivory openwork squares create a light and delicate appearance.
The matching floral pillow and long tassel fringe add decorative charm, making this design suitable for romantic, vintage, cottage-style, and classic bedrooms.
Finished Design: A luxurious ivory crochet bedspread featuring raised five-petal emerald flowers, openwork granny squares, delicate lace edging, decorative tassels, and a coordinated floral pillow.
Pattern note: The photographed square is an inspiration for these instructions. The five-petal-to-square transition and lace rounds require sampling and adjustment; they are not a verified stitch-for-stitch reproduction. Complete and block one motif before making the whole set.