
Title
Olive Green Floral Granny Square Bedspread – Full Crochet Pattern
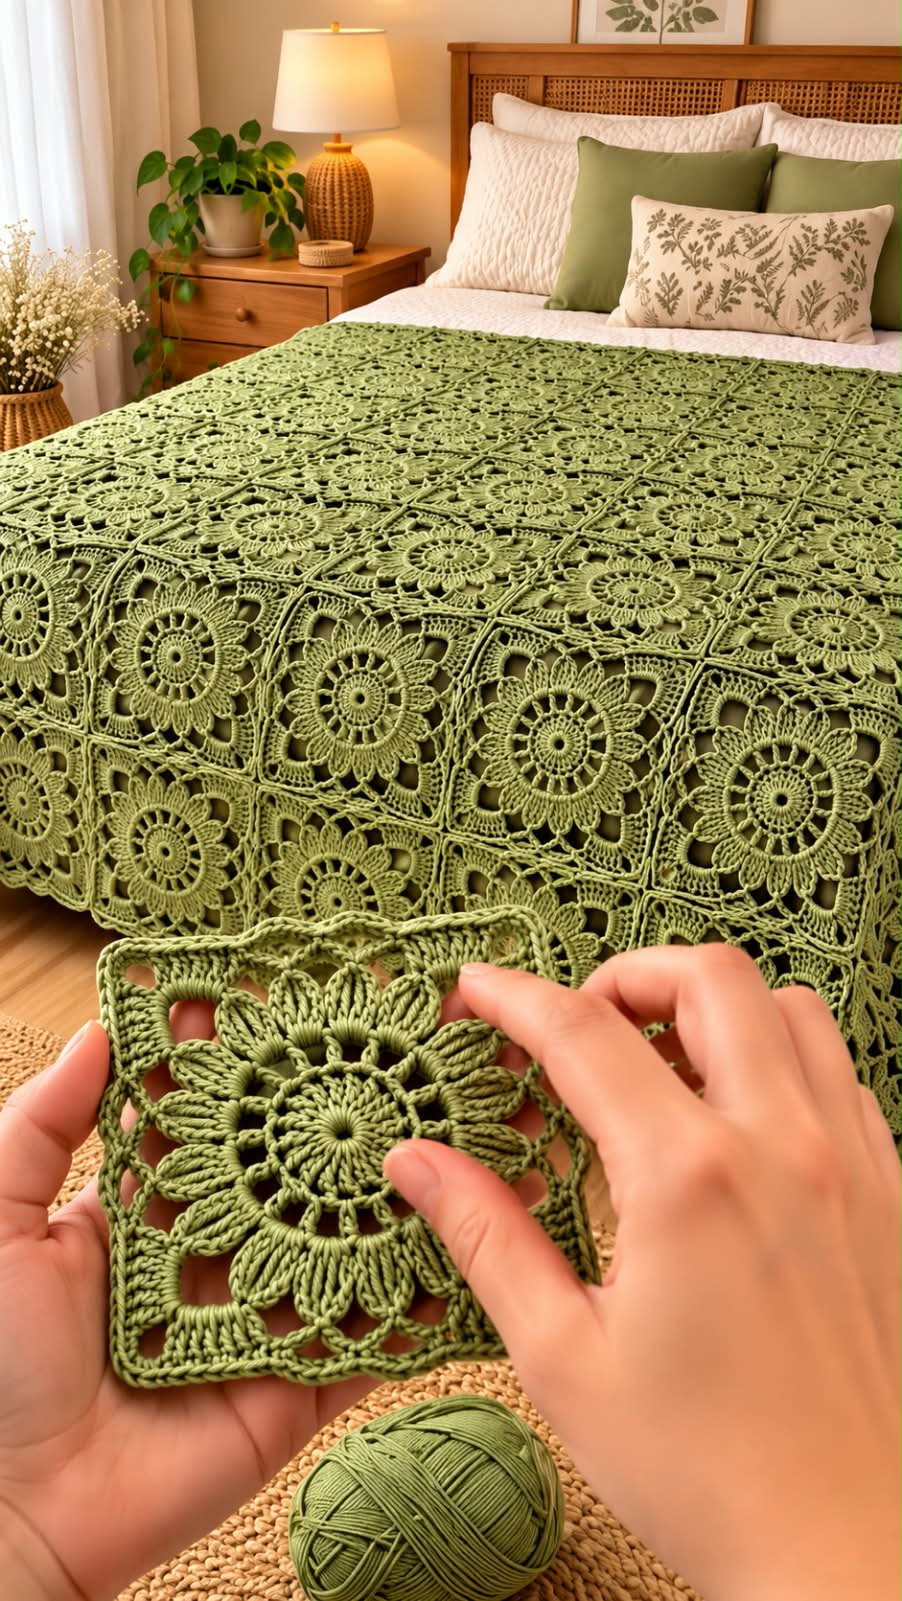
This elegant bedspread is made from repeated floral granny-square motifs in a single olive-green color.
Each square features:
- A circular flower center
- Long raised petals
- Open lace spaces around the flower
- Defined square corners
- A structured outer frame
The motifs are joined into rows to create a sophisticated botanical bedspread.
Materials
- Medium-weight cotton or cotton-blend yarn
- Olive green, sage green, or moss green
- Crochet hook: 3.5 mm to 4.5 mm
- Yarn needle
- Scissors
- Stitch markers
- Blocking mats
- Blocking pins
Skill Level
Intermediate to Advanced
Crochet Abbreviations
- CH – Chain
- SC – Single Crochet
- HDC – Half Double Crochet
- DC – Double Crochet
- TR – Treble Crochet
- DTR – Double Treble Crochet
- SL ST – Slip Stitch
- ST – Stitch
- SP – Space
- SK – Skip
- REP – Repeat
Approximate Finished Size
Individual square:
16–20 cm / 6.5–8 in
Large bedspread:
Approximately:
200 × 220 cm / 79 × 87 in
The finished dimensions depend on yarn weight, hook size, and motif count.
Method
The blanket is constructed from individual floral square motifs.
Each motif is made in five main stages:
- Circular center
- Open spoke round
- Raised flower petals
- Corner lace
- Square outer frame
All motifs are blocked to the same dimensions before being joined.
Formation
Part 1 – Flower Center
Make a magic ring.
Round 1
CH 3.
Work 15 DC into the ring.
Pull the ring closed.
Join with SL ST into the top of the beginning CH 3.
Total:
16 DC
Round 2 – Center Expansion
CH 3.
Work 1 additional DC into the same stitch.
Work 2 DC into every stitch around.
Join.
Total:
32 DC
Part 2 – Open Spoke Round
CH 5.
SK 1 stitch.
SC into next stitch.
Repeat:
CH 5, SK 1 ST, SC into next ST
around.
Join with SL ST.
You should have evenly spaced chain loops around the flower center.
Part 3 – Large Petals
SL ST into the first CH-5 space.
Into the space work:
SC, HDC, 3 DC, 2 TR, 3 DC, HDC, SC
This creates one large petal.
Repeat the same sequence into every CH-5 space.
Continue around.
Join with SL ST.
The flower should now have a full circle of raised petals.
Part 4 – Petal Definition
Work behind the petals.
Attach yarn between two petals.
CH 4.
SL ST behind the next petal.
Repeat around.
These loops help separate the petals visually.
Part 5 – Beginning the Square
Work into the back loops created behind the flower.
At four evenly spaced points, create corners.
Corner Section
Work:
3 DC, CH 3, 3 DC
into the same loop.
Between corners, work:
CH 3, SC into next loop
Repeat until all four corners are formed.
Join.
Round 2 of Square Formation
SL ST into the first corner.
Work:
3 DC, CH 3, 3 DC
into the corner.
Across the side work:
CH 3, SC into next space
Repeat toward the next corner.
At each corner work:
3 DC, CH 3, 3 DC
Continue around.
Part 6 – Open Corner Lace
In the larger open corner spaces work:
SC, CH 5, SC
In the side spaces work:
CH 3, SC
This creates the large open holes visible in the corners of the motif.
Part 7 – Solid Square Frame
CH 3.
Work DC evenly around each side.
In every corner work:
2 DC, CH 2, 2 DC
Continue around.
Join.
Final Frame Round
CH 1.
Work SC into every stitch.
At each corner work:
SC, CH 2, SC
Join and fasten off.
Final Motif Size
Block each square to approximately:
16–20 cm / 6.5–8 in
Every motif must be exactly the same size.
Part 8 – Suggested Motif Count
Throw
7 × 9 squares
Total:
63 motifs
Double Bed
9 × 11 squares
Total:
99 motifs
Queen Bed
10 × 12 squares
Total:
120 motifs
King Bed
12 × 14 squares
Total:
168 motifs
Adjust the count according to the final motif size.
Part 9 – Motif Arrangement
Lay all motifs on a flat surface.
Keep all flower centers facing the same direction.
Arrange them in straight rows.
Because the motifs are made in one color, consistent alignment is especially important.
Part 10 – Joining the Squares
Place two squares with right sides facing.
Using matching olive yarn, insert the hook through corresponding stitches.
Work SC through both motifs.
Continue across the full side.
Fasten off.
Join all motifs into horizontal rows first.
Then join the rows together.
Flat Slip-Stitch Join
For flatter seams:
Place motifs side by side.
Insert the hook through the back loops of corresponding stitches.
Work SL ST across.
This creates a narrow, defined line between motifs.
Invisible Join
Thread a yarn needle.
Use mattress stitch through the corresponding outer loops.
Pull gently after several stitches.
This gives the bedspread a smoother appearance.
Part 11 – Outer Border
Attach olive yarn at any corner.
Border Round 1
CH 1.
SC evenly around the entire blanket.
At each corner work:
3 SC
Join.
Border Round 2
CH 3.
DC in every stitch.
At each corner:
2 DC, CH 2, 2 DC
Join.
Lace Border Round
CH 5.
SK 2 stitches.
SC into next stitch.
Repeat:
CH 5, SK 2 ST, SC
around.
At the corners work:
CH 7
Scalloped Final Round
Into each CH-5 loop work:
SC, HDC, 4 DC, HDC, SC
Into each corner CH-7 loop work:
SC, HDC, 6 DC, HDC, SC
Fasten off.
Optional Picot Finish
For a more decorative edge:
At the center of each scallop work:
CH 3, SL ST into first CH
Continue around.
Matching Pillow Cover
Make:
4 or 6 floral motifs
depending on pillow size.
For example:
2 × 2 motifs
or:
3 × 2 motifs
Join them with the same method used for the blanket.
Pillow Back
Crochet a solid panel using DC stitches.
Make the back the same size as the front.
Join three sides.
Insert the cushion.
Close using:
- Buttons
- Zipper
- Crochet ties
- SC seam
Blocking
Block every motif before joining.
Lightly wet each square.
Pin all corners.
Shape the petals evenly.
Make sure:
- Flower centers are round
- Petals are evenly spaced
- Open corners are symmetrical
- All motifs have identical measurements
Allow to dry completely.
After assembly, lightly block the full bedspread again.
Finishing
Weave in all loose yarn ends.
Trim excess fibers.
Inspect every join.
Shape all petals by hand.
Straighten the border.
Make sure the blanket lies flat.
Conclusion
This olive green floral granny-square bedspread combines large dimensional flowers with airy lace corners and structured square frames.
The repeating motif creates an elegant botanical pattern that works beautifully in neutral, rustic, or nature-inspired bedrooms.
The same motif can also be used for:
- Throws
- Cushion covers
- Sofa blankets
- Bed runners
- Tablecloths
- Decorative wall panels
For the most professional finish, keep every motif exactly the same size and block the floral petals carefully before joining.