
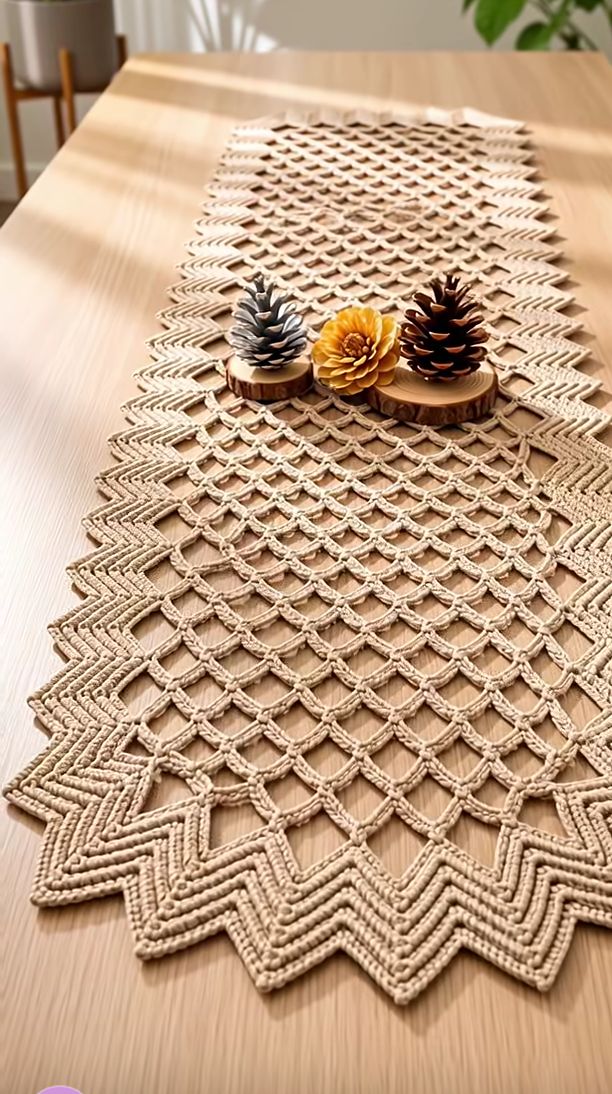
Crochet Table Runner
An original, photo-inspired construction tutorial for a sculptural neutral runner
◆ ◆ ◆
| Originality and publishing note. This tutorial is newly written from the visible design language of the supplied photograph: a long neutral runner, open diamond lattice, strong geometric side points, nested V-shaped cord lines and small raised knot-like details. A single photograph cannot reveal the original maker’s exact stitch counts, chart, hidden joins, yarn, gauge or construction sequence. The method below is therefore an independent reconstruction designed to create a similar overall look without copying or claiming to reproduce an unknown pattern. For blogging, use your own project photos or images you have permission to publish, and do not copy another designer’s written instructions, chart, watermark or product description. |
Skill level: Intermediate | Style: Rustic / Boho / Geometric | Construction: Modular crochet
Open Diamond Mesh & Chevron Border Crochet Table Runner
Design overview
The runner in the reference has two very different textures working together. The center is airy and transparent, built from repeating diamond-shaped openings. The outside is much denser: a sequence of pointed chevrons creates a saw-tooth silhouette, while parallel ridges make each point look layered and architectural. The most practical way to recreate that contrast is to crochet a flexible mesh panel first, stabilize it with narrow side bands, then add separate chevron motifs around the perimeter. This avoids forcing one stitch pattern to do two incompatible jobs and makes the finished runner easier to size.
The instructions below use chain-space mesh for the center and compact single-crochet ridges for the border. The exact number of repeats can be changed without changing the visual concept. The sample sizing is written for a dining-table runner approximately 40–44 cm wide and 115–125 cm long after blocking.
Materials
Natural, ecru or oatmeal cotton cord/yarn: approximately 700–950 g for a 40 × 120 cm runner. A firm 2.5–3.5 mm braided cotton cord gives the clearest geometry.
Crochet hook: 4.0–5.0 mm, or the size that produces a firm border without making the mesh stiff.
Yarn needle with a large eye, sharp scissors, locking stitch markers, tape measure and rust-proof blocking pins.
Blocking surface large enough for the full runner. Optional: a non-slip underlay if the runner will be used on a polished table.
Optional decorative objects for styling only; keep them off the runner while measuring and blocking.
Abbreviations
| Abbreviation | Meaning |
| ch | chain |
| sl st | slip stitch |
| sc | single crochet |
| hdc | half double crochet |
| dc | double crochet |
| sp | space |
| st/sts | stitch/stitches |
| rep | repeat |
| RS / WS | right side / wrong side |
Gauge, yarn behavior and sizing
Gauge is flexible in an open runner, but consistency matters. With medium cotton cord and a 4.5 mm hook, a useful target is about 4–5 finished mesh diamonds per 10 cm across and 4–5 diamond rows per 10 cm vertically. The dense chevron motifs should feel firm enough to hold a point when blocked. If the cord is very soft, use a smaller hook for the border than for the mesh.
| Sizing formula. Make the center mesh about 12–16 cm narrower than your desired finished width. The side stabilizing bands and chevron points supply the remaining width. For length, crochet the mesh until it is about 8–12 cm shorter than the final target; the pointed end borders add the rest. |
Part 1 — Crochet the open diamond mesh center
The center should look light and net-like rather than like solid fabric. Chain arches stacked in offset rows naturally form a field of diamonds after blocking. Because cord thickness varies, the instructions use a repeat system instead of a fixed width.
Step 1 — Make a test strip. Chain 35. Work one row of chain arches using the method in Step 2, then work four more mesh rows. Block the swatch quickly with your fingers. If the openings collapse, increase the hook size or add one chain to every arch. If the mesh looks floppy and oversized, reduce the hook size or remove one chain from each arch.
Step 2 — Foundation mesh row. For the full runner, chain a multiple of 4 plus 3 until the chain measures roughly 24–28 cm without stretching. Sc in the second chain from the hook. *Ch 5, skip 3 foundation chains, sc in the next chain.* Repeat across. Finish with an sc close to the final end of the chain. Do not worry if the first row looks like a series of arches rather than diamonds.
Step 3 — Second mesh row. Ch 3 and turn. Sc into the center of the first ch-5 space. *Ch 5, sc into the center of the next ch-5 space.* Repeat across. At the end, ch 2 and work 1 dc into the edge sc. This half-arch at the edge keeps the mesh centered and helps the rows alternate.
Step 4 — Third mesh row. Ch 1 and turn. Sc into the first partial edge space. *Ch 5, sc into the next ch-5 space.* Repeat across, ending with an sc in the last edge space. The arches now sit between the arches of the previous row, producing the first clear diamonds.
Step 5 — Repeat the mesh. Alternate the second-row and third-row logic until the panel is approximately 103–110 cm long, or about 8–12 cm shorter than the desired finished runner. Measure while the mesh is lying naturally; do not pull it lengthwise.
Step 6 — Finish the last row evenly. End on a row that has a full sc at both outer edges. Fasten off, leaving a 15 cm tail. Lay the panel flat and gently spread the diamonds so they are similar in size. Count the edge arches on both long sides; a one-arch difference can be corrected later, but a larger difference usually means an accidental missed space.
| Mesh adjustment. For smaller diamonds, use ch 4 instead of ch 5. For larger, more dramatic openings, use ch 6. Keep the same arch length throughout the entire center. Changing arch size halfway will make the runner twist during blocking. |
Part 2 — Stabilize the long edges
The photograph shows a clean structural line between the open center and the pointed border. A narrow side band prevents the mesh from stretching and gives the chevrons a reliable place to attach.
Step 7 — First stabilizing round. Join the cord at one long corner. Work 2 sc into each large edge arch and 1 sc into each smaller turning space. At the short ends, distribute sc evenly rather than forcing a fixed count. Repeat around the entire panel and join with a sl st. The work should lie flat; if the edge ruffles, remove a few stitches, and if it pulls inward, add a few.
Step 8 — Build a firm frame. Work 2 additional rounds of sc around the panel. At each corner, work 3 sc into the corner stitch. On the second of these rounds, work in the back loop only if you want a subtle raised line. Fasten off and lightly block the framed mesh before making the chevrons.
Part 3 — Make the nested chevron border motifs
The pointed border is the strongest visual feature. Instead of attempting to reverse-engineer the unknown original edge, this version uses repeated independent V motifs. Each motif is built around a center point and gains one stitch at each outer end on successive rows, producing several parallel ridges. When the motifs are joined side by side, their open ends sit against the runner and their tips point outward.
Step 9 — Chevron foundation. Ch 17. Sc in the second chain from the hook and in the next 6 chains. Work 3 sc in the next chain; mark the middle stitch of this 3-sc group because it is the point. Sc in each remaining chain. You should have a shallow V with a clearly marked center.
Step 10 — First ridge row. Ch 1 and turn. Sc in each stitch to the marked center stitch, work 3 sc in that center stitch, then sc to the end. Move the marker to the middle stitch of the new 3-sc group. This center increase sharpens the point.
Step 11 — Build the nested lines. Repeat Step 10 for 4–6 more rows. For a ridged appearance, work each row through the back loop only. The unused front loops create parallel lines that echo the layered V shapes visible in the reference. Keep the first and last stitch tight so the open top of the chevron stays neat.
Step 12 — Add the raised dot. On the final row, when you reach the center point, make a small bobble instead of a plain center stitch: yarn over, insert into the center stitch and pull up a loop three times; yarn over and pull through all loops, then ch 1 to secure. Continue the row. This creates a subtle raised detail near the tip.
Step 13 — Finish one motif. Fasten off with a long sewing tail. Block the motif so the two arms form a clean angle of roughly 80–100 degrees. The exact angle is not critical; consistency from motif to motif matters more.
Step 14 — Make enough motifs. Place the first finished motif against the framed mesh and measure how much edge it covers. Divide the runner perimeter by that measurement to estimate quantity. A 40 × 120 cm runner commonly needs around 36–50 motifs depending on cord thickness and motif size. Make 4–6 first, test the spacing, then complete the remainder.
| Faster border option. If making dozens of separate motifs feels too slow, use the same chevron idea only on the two short ends and work a simple pointed shell border along the long sides. The result will be less architectural but will still keep the open-net-and-geometric-edge contrast. |
Part 4 — Join the chevrons to the runner
Step 15 — Arrange before sewing. Lay the runner flat with the RS facing up. Position chevrons along one long side with their open ends touching the stabilizing band and their tips pointing outward. Let neighboring motifs touch or overlap by only 2–4 mm. Use locking markers to hold every third motif, then fill the spaces between them.
Step 16 — Sew the open ends. Using the long tail from each motif, whipstitch the first 3–4 stitches of each chevron arm to the outer sc round of the runner. Sew through back loops where possible so the attachment is discreet from the front. Do not sew all the way to the point; the outer part must remain free so the V keeps its sculptural shape.
Step 17 — Tack neighboring motifs. Where two chevrons meet, add one or two small stitches between adjacent arms. This prevents gaps from spreading while preserving the pointed silhouette. Do not pull the tacking yarn tight enough to make the edge curl.
Step 18 — Turn the corners. At each corner, use one chevron centered diagonally across the corner rather than trying to force two full motifs into the same space. Sew one arm to the long edge and the other to the short edge. If the corner looks crowded, make a smaller chevron with a ch-13 foundation and 4 ridge rows.
Step 19 — Complete all four sides. Repeat the arrangement and sewing process around the remaining perimeter. Frequently place the runner flat on the table to check that the motifs are evenly spaced. Correct spacing before weaving in tails; small changes are much easier at this stage.
Part 5 — Optional surface ridges for a more layered border
If you want the border to look more heavily corded, add surface slip-stitch lines after assembly. This is an original finishing technique that increases the visual depth without changing the basic motif construction.
Step 20 — Add a surface line. With RS facing, insert the hook from front to back through a visible unused front loop near the open end of one chevron. Hold the working yarn behind the piece, pull a loop to the front and surface sl st along one ridge toward the point. Keep every loop relaxed.
Step 21 — Repeat selectively. Add one surface line to every second ridge rather than covering the entire motif. Too many lines make the points stiff. At the center point, finish the line one stitch before the bobble so the raised dot remains visible.
Part 6 — Shape the short ends
The reference runner has dramatic pointed edges all around. To keep the end profile balanced, center the motif arrangement on each short edge and let the central point project slightly farther than the corner motifs.
Step 22 — Find the center. Fold the runner in half lengthwise or count the stitches across the short stabilizing band. Mark the exact center. Attach one full chevron at this mark, then work outward symmetrically to both corners.
Step 23 — Fill small end gaps. If the last space is too narrow for a full motif, crochet a half-size V using a shorter starting chain, or make a simple 5-dc shell and sew it between the final chevron and corner. Symmetry is more important than using an identical motif in every position.
Part 7 — Blocking and finishing
Step 24 — Weave in tails securely. Because the runner is open, loose ends are easy to see. Weave each tail through dense sc sections for at least 4–5 cm, reverse direction once, then trim. Avoid weaving long tails through the mesh arches.
Step 25 — Wet-block the center. Soak the runner briefly in cool water with a small amount of gentle textile wash. Press out water in a towel without twisting. Pin the central mesh first, opening the diamonds evenly and checking that the long sides remain parallel.
Step 26 — Pin every chevron point. After the center is straight, pin the outer tip of each V. Measure from the stabilizing band to several points and make the projection consistent. Pin the corner motifs last. Allow the runner to dry completely before removing pins.
Step 27 — Final inspection. Lay the dry runner on the table. The mesh should be relaxed but not saggy, the stabilizing band should lie flat, and the points should form a rhythmic geometric outline. If one motif twists, lightly damp only that motif and re-pin it.
Customization ideas
Minimal neutral: use one natural cotton shade throughout, as in the reference style.
Two-tone architecture: work the mesh in cream and the chevrons in taupe or warm brown.
Modern contrast: use black or charcoal cord for the frame and natural cord for the mesh.
Softer edge: reduce each chevron to 4 ridge rows for smaller, less dramatic points.
More sculptural edge: add one extra ridge row and a bobble at every center point.
Narrow console runner: remove 2–3 mesh repeats across and use smaller ch-13 chevrons.
Troubleshooting
| Problem | Fix |
| Mesh pulls inward at the sides | The edge sc round is too tight. Add more sc into selected mesh arches or use a hook 0.5 mm larger for the first stabilizing round. |
| Mesh diamonds look uneven | Check that every arch has the same number of chains and that each sc is placed in the center of the previous arch. Blocking will correct small variations. |
| Chevron points curl upward | The border hook is too small or the outer rows are too tight. Rework the final ridge with looser tension, then wet-block firmly. |
| Border ruffles | Too many motifs are packed onto the edge. Remove one or more motifs and redistribute the spacing. |
| Border pulls the runner into a bow | The motif spacing is too tight or the stabilizing band is too short. Detach several motifs, relax the band, and re-sew with a small gap between motif arms. |
| Runner stretches after use | Cotton mesh naturally relaxes. Re-block it, or add one additional sc round to the stabilizing frame for more control. |
| Points do not look crisp | Use firmer cotton cord, reduce the hook size for motifs, and pin every point individually during blocking. |
Care
For cotton cord, hand washing is the safest option unless the yarn label specifically allows machine washing. Use cool water, avoid bleach, press moisture out in a towel and reshape flat. Do not hang the runner while wet because the open mesh can lengthen under its own weight. Store rolled or folded loosely with the chevron points aligned.
Blog-ready article introduction
If you love table linens that feel light but still make a strong statement, this open diamond crochet runner is a beautiful project to try. The airy center keeps the wood of the table visible, while the layered chevron border adds a bold handcrafted frame. Worked in a single natural shade, the design fits rustic, bohemian, farmhouse and modern neutral interiors without needing extra color.
The project is built in manageable stages: first the mesh, then a firm frame, then repeated pointed motifs. That modular construction makes the runner easy to resize and gives you time to perfect each detail before final assembly. The finished piece is especially effective on a long dining table, console or sideboard where the geometric edge can remain visible.
Suggested SEO title and metadata
SEO title: Open Diamond Crochet Table Runner with Geometric Chevron Border — Original Tutorial
Meta description: Learn how to make an airy crochet table runner with diamond mesh, a firm frame and layered chevron points using an original photo-inspired construction method.
Suggested keywords: crochet table runner, diamond mesh crochet, geometric crochet border, boho table runner, neutral crochet decor, cotton cord crochet, openwork table runner.
Suggested image alt text for your own finished photo: Handmade neutral crochet table runner with open diamond mesh and layered pointed chevron border on a wooden dining table.
Rights-safe blogging checklist
Use this newly written text as your article base and edit it into your own voice before publishing.
Photograph the runner you make yourself, or use only images for which you hold publication rights.
Do not remove or crop another creator’s watermark and do not present another person’s photograph as your own.
Do not copy a paid or free designer pattern, stitch chart, product description or step-by-step tutorial into your post.
If a photograph is only a visual reference, describe your tutorial as photo-inspired or independently reconstructed rather than as the original maker’s exact pattern.
Keep your own notes, swatches and progress photographs; they are useful evidence of your independent construction process and make the blog post more valuable.
If you later identify the original designer or pattern, do not imply affiliation. You can choose to credit/link appropriately while keeping your independent instructions clearly separate.
| Important. Copyright rules vary by country and by the specific material involved. This document is written to avoid copying an unknown pattern, but it is not legal advice. The safest publishing workflow is to pair original writing with your own photographs of a piece you personally made. |
Quick project checklist
Swatch the mesh and choose arch size.
Crochet the center to the required length.
Add 3 firm sc rounds as a stabilizing frame.
Make and block a test chevron.
Calculate the number of border motifs from the actual test motif width.
Make the remaining chevrons and add raised center details.
Arrange and sew motifs around all four sides.
Add optional surface ridges.
Weave in tails, wet-block the center, then pin every point.
Photograph your own finished runner for the blog post.
— End of original tutorial —
I would like the pattern. This is beautiful