
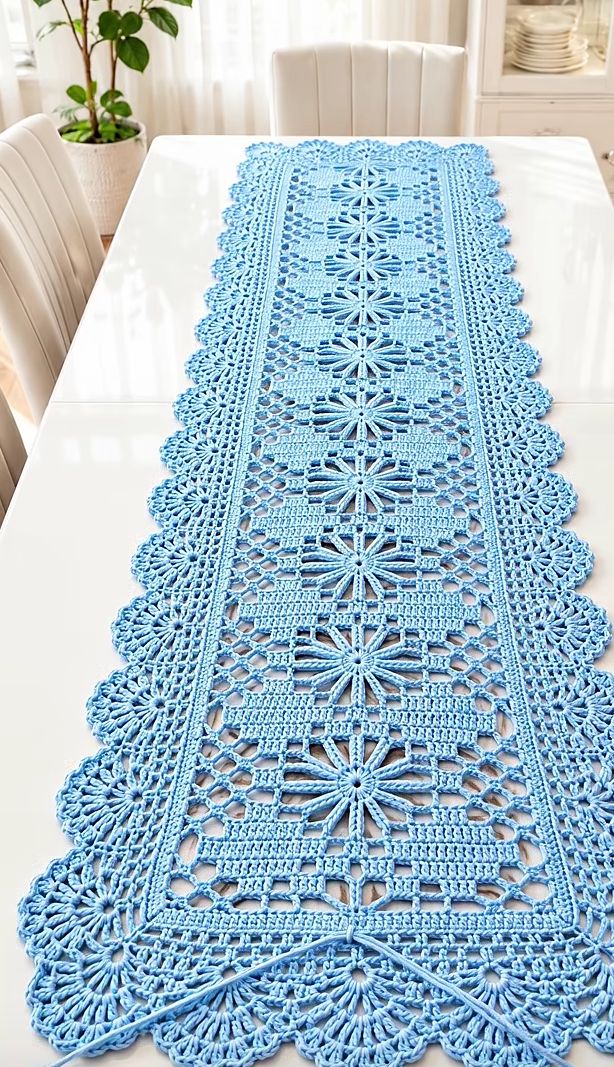
This beautiful crochet table runner features a long rectangular design decorated with openwork flowers, geometric lace sections, and an elegant scalloped floral border. The pattern below is inspired by the runner shown in the photo and can easily be adjusted to make it shorter or longer.
The finished piece works beautifully on a dining table, coffee table, sideboard, or console. A light cotton yarn is ideal because it gives the stitches good definition and helps the lace keep its shape after blocking.
Materials
You will need:
- Cotton crochet thread or lightweight cotton yarn
- Crochet hook suitable for your yarn
- Scissors
- Yarn needle
- Stitch markers
- Blocking pins
Choose any color you like. Light blue gives the runner a fresh and delicate appearance similar to the example shown.
Abbreviations
ch – chain
sl st – slip stitch
sc – single crochet
hdc – half double crochet
dc – double crochet
tr – treble crochet
st – stitch
sts – stitches
sp – space
ch-sp – chain space
rep – repeat
rnd – round
sk – skip
Pattern Notes
The runner is worked in several sections. First, crochet the rectangular center panel with repeating floral motifs. After completing the desired length, work narrow decorative bands along both long sides. Finally, crochet the large lace edging around the entire runner.
The exact finished size depends on the yarn, hook, tension, and number of flower repeats.
To make the runner longer, simply add more center flower repeats before beginning the border.
Beginning the Center Panel
Start with a foundation chain long enough for the desired width of the center panel.
Row 1: Dc in the fourth ch from the hook. Dc across the foundation chain. Turn.
Row 2: Ch 3, dc in the next sts, then begin forming open spaces by alternating groups of dc with ch spaces.
A simple mesh section can be worked as:
dc in next 3 sts, ch 2, sk 2 sts, dc in next 3 sts.
Repeat the sequence across the row while keeping the design symmetrical on both sides.
Turn at the end of each row.
Large Flower Motif
The main feature of the runner is the vertical row of large openwork flowers.
For each flower, create a central ring or small center space.
Work around the center:
(ch 8, sl st into the center) 8 times.
This creates eight long loops.
On the following round, work into each loop:
sc, hdc, 5 dc, hdc, sc.
Repeat in every loop to create eight elongated petals.
For a more open flower similar to the photograph, the petals can also be formed with long chains and tall stitches instead of filling the loops completely.
The important point is to keep all eight petals evenly spaced.
Connecting the Flower to the Rectangle
Once the flower is formed, connect its outer petals to the surrounding mesh.
Between the petals, work chains such as:
ch 5, sc into the surrounding ch-sp, ch 5, sl st into the next petal.
Continue around the flower.
The flower should sit in the center while open chain spaces connect it to the rectangular framework.
Mesh Around the Flowers
Work open mesh on both sides of each flower.
A useful repeating mesh pattern is:
Row 1: Ch 3, dc in next dc, ch 2, sk next 2 sts or corresponding space, dc in next dc. Rep across.
Row 2: Ch 3, 2 dc into next ch-2 sp, dc in next dc. Rep across.
Alternate solid dc sections and open mesh sections to create the geometric appearance visible around the flowers.
Keep the same number of stitches on the left and right sides so that the runner remains straight.
Repeating the Center Design
After completing one flower section, crochet several rows of rectangular mesh before beginning the next flower.
Repeat:
Flower section → mesh section → flower section → mesh section.
Continue until the runner reaches your desired length.
The runner in the reference image uses many flowers arranged in one straight central line. For a shorter table runner, use fewer repeats. For a long dining-table runner, continue adding motifs.
Long Side Bands
Once the central rectangle is finished, attach the yarn to one long edge.
Row 1
Work sc evenly along the entire side.
Try to keep the stitches evenly distributed. Too many stitches will cause the edge to ripple, while too few will pull the runner inward.
Row 2
Ch 3, dc in each st across.
Row 3
Work:
dc, ch 1, sk 1 st, dc in next st.
Repeat across.
Row 4
Work dc across, placing dc into both the previous stitches and chain spaces.
Repeat these rows on the opposite long side.
This creates the narrow decorative strips separating the center panel from the outer lace.
Open Lace Border
Attach the yarn at one corner.
Work a foundation round of sc around the entire runner.
At each corner, place several stitches into the same corner space so the work can turn without curling.
For the next round, work:
sc, ch 5, sk approximately 3 sts, sc in next st.
Repeat around the runner.
Adjust the skipped stitches slightly when approaching a corner so that the arches remain evenly distributed.
Large Scalloped Edging
The outer border is made from repeating fan-shaped motifs.
Into each ch-5 space work:
sc, ch 3, 5 dc, ch 3, sc.
For a fuller lace border, use:
sc, ch 4, 7 tr, ch 4, sc.
Continue around the runner.
At the corners, make a larger fan so the edging can turn naturally.
A corner fan can be:
sc, ch 5, 9 tr, ch 5, sc.
Decorative Flower Fans
To obtain a border closer to the floral appearance in the photograph, add another round.
Work into the top of each large fan:
ch 5, sc between the tall stitches.
Repeat several times across each fan to create small loops.
On the following round, work groups of tall stitches into these loops:
sc, 5 dc, sc.
These small groups create the rounded petal effect along the outside edge.
Continue around all four sides.
Corner Decoration
The corners can be made slightly larger and more decorative.
At each corner, work three adjacent fans instead of one. Join them with chain spaces so that they spread outward.
For example:
Fan, ch 3, fan, ch 3, fan.
The center fan should point diagonally outward from the corner.
This gives the runner a pronounced lace corner similar to the decorative ends of the runner in the image.
Finishing
When the final round is complete, join with a sl st.
Cut the yarn, leaving a short tail.
Pull the yarn through the final loop and weave all loose ends securely into the back of the work.
Blocking
Blocking is especially important for this pattern because it opens the lace and makes the flowers clearly visible.
Gently wet the finished runner and remove excess water without twisting it.
Lay it flat on a blocking mat or clean towel.
Stretch the runner gently until the rectangle is straight. Arrange every flower and scallop with your fingers, then pin the outer points of the lace border into position.
Allow the runner to dry completely before removing the pins.
After blocking, the center flowers will open beautifully and the decorative border will lie much flatter.
Adjusting the Size
The easiest way to change the length is to add or remove complete flower sections.
For a small coffee-table runner, make approximately 4–6 central flowers.
For a medium runner, make approximately 7–9 flowers.
For a long dining-table runner, use 10 or more flowers.
You can also make the runner wider by adding extra mesh rows on both sides of the central flowers before beginning the outer border.
The finished piece should have a balanced appearance: a strong central line of flowers, narrow geometric lace panels on each side, and a wide decorative scalloped border surrounding the entire runner.