
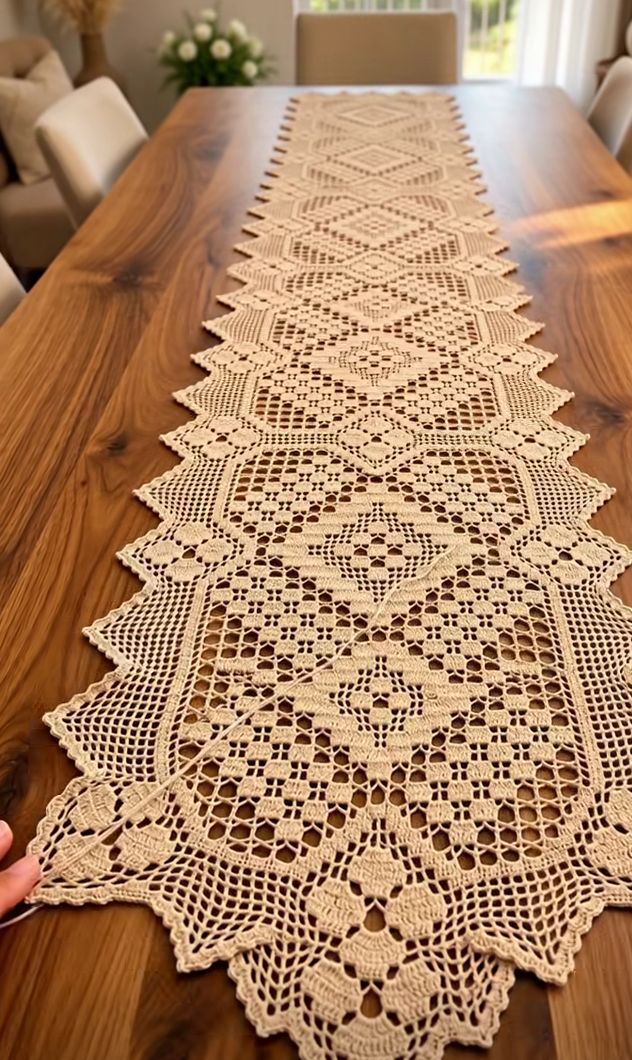
This elegant crochet table runner combines classic filet crochet with geometric diamond motifs, delicate open mesh, and pointed lace edging. The repeating design makes it especially suitable for a long dining table, while the neutral cream color gives it a traditional handmade appearance.
The pattern below is inspired by the table runner shown in the photo. Since the exact original chart cannot be recovered from a photograph alone, the instructions recreate the same overall construction and style rather than claiming to reproduce the original pattern stitch for stitch.
Materials
You will need cotton crochet thread or fine cotton yarn, a crochet hook suitable for the chosen thread, scissors, a yarn needle, stitch markers, and blocking pins.
For a delicate runner like the one pictured, mercerized crochet cotton works particularly well because it produces crisp stitches and clearly defined filet squares.
Abbreviations
ch – chain
sl st – slip stitch
sc – single crochet
hdc – half double crochet
dc – double crochet
tr – treble crochet
st / sts – stitch / stitches
sp – space
ch-sp – chain space
sk – skip
rep – repeat
RS – right side
WS – wrong side
Understanding Filet Crochet
Most of this runner is based on filet crochet. The pattern is created by alternating open and filled squares.
An open mesh is worked as:
dc, ch 2, sk 2 sts, dc
A filled mesh is worked with:
4 dc
When several filled squares are placed next to each other, the last dc of one square also becomes the first dc of the following square.
The combination of open and filled meshes creates the diamonds, leaves, crosses, and geometric shapes visible throughout the runner.
Starting the Runner
The runner is worked lengthwise as one long rectangular center panel.
Begin with a foundation chain in multiples of 3, plus the turning chains required for your first dc.
For a medium-width runner, begin with enough chains to create approximately 35–45 filet squares across.
Foundation Row
Dc in the appropriate starting chain and continue across, working one dc into each chain.
Turn.
First Filet Row
Ch 3.
Work several solid dc stitches to create the narrow frame.
Then begin the mesh:
ch 2, sk 2 sts, dc in next st.
Continue working open meshes across, finishing with the same number of solid stitches used at the beginning.
This creates the rectangular foundation for the decorative motifs.
Central Diamond Motif
The dominant feature of this runner is a sequence of diamonds positioned along the center.
Begin the diamond with one filled filet square in the middle of the row.
On the following rows, gradually increase the motif:
1 filled square
then
3 filled squares
then
5 filled squares
then
7 filled squares
Surround these filled sections with open meshes.
Once the diamond reaches its widest point, reverse the shaping:
7 filled squares
5 filled squares
3 filled squares
1 filled square
This produces a symmetrical diamond.
Keep the remaining spaces on both sides in open mesh.
Diamond Inside a Diamond
For a more decorative motif like those visible in the runner, leave open spaces inside the larger diamond.
Instead of filling the entire shape, work a combination such as:
filled – open – filled
and gradually expand it on subsequent rows.
The outer filled meshes form the outline while the center remains open.
This creates the characteristic layered diamond appearance.
Leaf Motifs
The runner also contains elongated leaf-like sections.
Begin with a small filled section beside the central diamond.
Increase the leaf gradually over several rows by adding one filled mesh toward the outside.
For example:
Row 1: 1 filled mesh
Row 2: 2 filled meshes
Row 3: 3 filled meshes
Row 4: 4 filled meshes
Maintain open mesh around the leaf.
After reaching the widest point, decrease in reverse order:
3 filled meshes → 2 filled meshes → 1 filled mesh.
Make another leaf on the opposite side to maintain symmetry.
Central Cross Motif
Some sections can be decorated with a small cross or plus-shaped figure.
Begin with one central filled mesh.
On the following row work:
1 filled mesh – 3 filled meshes – 1 filled mesh
with open meshes separating the surrounding areas.
Continue for several rows, then reduce the motif again.
The exact placement can be adjusted according to the width of your runner.
Repeating the Main Panel
After completing one large motif, work several rows of simpler open mesh.
Then begin another geometric section.
A pleasing sequence is:
Large diamond → open mesh → leaf motif → small diamond → open mesh → large diamond.
Repeat this sequence until the runner reaches the desired length.
The design does not need to be identical throughout. Alternating large and small motifs gives the piece the traditional sampler-style appearance seen in the photograph.
Side Frame
Keep a narrow solid border running along both sides of the center panel.
A simple frame can consist of:
3 dc, filet pattern, 3 dc
on every row.
This solid edge strengthens the delicate mesh and provides a stable foundation for the decorative outer border.
First Border Round
When the center panel reaches the desired length, do not fasten off.
Work sc evenly around all four sides.
Along the row ends, distribute the stitches carefully so the runner remains flat.
At each corner work:
sc, ch 2, sc
into the same corner space.
Join with a sl st.
Mesh Border
The wide open border gives this runner much of its delicate appearance.
Round 1
Work:
sc, ch 5, sk approximately 3 sts, sc in next st.
Repeat around.
At each corner make a slightly larger loop:
sc, ch 7, sc.
Round 2
Sl st into the first ch-5 sp.
Work:
ch 5, sc in next ch-5 sp.
Repeat around.
At the corners work additional chains so the border lies flat.
Round 3
Continue creating chain arches, gradually increasing the number of chains where necessary.
This produces the net-like lace visible around the center panel.
Pointed Side Motifs
The distinctive outer edge is formed by triangular points.
Choose several consecutive chain spaces for each point.
Begin increasing the height of the stitches toward the center:
sc, hdc, dc, tr, dc, hdc, sc.
On the following round, extend the center of the point with additional chain spaces.
For a larger point, work:
sc, ch 3, dc, ch 3, tr, ch 3, dc, ch 3, sc.
The tallest stitch should always sit at the center of the triangle.
Repeat the same construction evenly along both long sides.
Decorative Three-Petal Motifs
Between the larger points, add small floral or leaf clusters.
Into one suitable chain space work:
(3 dc, ch 2, 3 dc).
In the next round, work into the ch-2 space:
sc, hdc, 3 dc, hdc, sc.
Repeat similar groups around the border.
These small solid motifs contrast beautifully with the surrounding open mesh.
Large End Points
The two short ends of the runner can be more elaborate than the sides.
At the center of each end, create one large triangular point.
Gradually increase the chain arches as you approach the center.
For example:
ch 5 → ch 6 → ch 7 → ch 8
and then decrease symmetrically:
ch 7 → ch 6 → ch 5.
Fill selected spaces with dc groups to create solid leaf shapes inside the open lace.
This produces the dramatic pointed end characteristic of traditional filet crochet runners.
Picot Edging
Finish the entire runner with a delicate picot edge.
Work:
sc in next space, ch 3, sl st into first ch, sc in next space.
Repeat around.
At the tip of each triangular point, make a slightly larger picot:
ch 5, sl st into first ch.
This emphasizes each point and gives the border a neat finished appearance.
Finishing
Fasten off and weave in all yarn ends carefully with a yarn needle.
Because filet crochet contains many open spaces, weave each tail through several solid stitches rather than through the chain mesh.
Trim the excess thread only after the ends are completely secure.
Blocking the Runner
Blocking is essential for this style of crochet.
Soak the finished runner briefly in cool or lukewarm water. Gently press out the excess water without twisting.
Lay the runner flat and stretch it carefully into a straight rectangle.
Pin the central panel first.
Next, straighten the side borders and pin every triangular point individually. Pay particular attention to the large points at both ends.
Arrange the open meshes so they are approximately square and make sure the central motifs are aligned.
Leave the runner pinned until completely dry.
Once blocked, the geometric designs become much clearer, the mesh opens evenly, and the pointed lace border keeps its elegant shape.
Changing the Length
One advantage of this construction is that the runner can be made almost any length.
For a shorter runner, work fewer central motif repeats. For a long dining table, continue repeating the diamond and leaf sections until the center panel reaches the required measurement.
Remember to stop after completing an entire motif so that both ends of the runner remain visually balanced.
For the most symmetrical result, place a large central diamond at the midpoint of the runner and mirror the surrounding motifs toward both ends.