
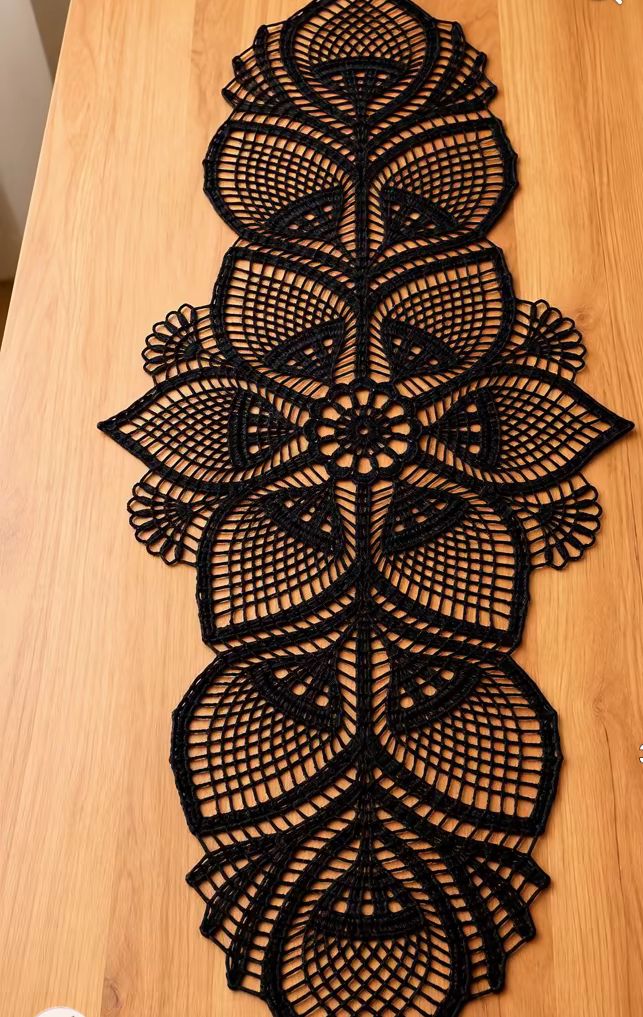
This striking crochet table runner combines large leaf-shaped motifs, open mesh work, a central flower, and dramatic pointed ends. The black thread gives the piece a modern look while the construction is inspired by traditional Irish and Romanian-style decorative crochet.
The runner is built from repeating leaf and fan shapes joined together as you work. Because the design relies heavily on shaping, the finished piece should be blocked carefully to open the mesh and define every curve.
The instructions below recreate the construction and appearance of the photographed runner rather than an exact original pattern.
Materials
Use mercerized cotton crochet thread or a smooth fine cotton yarn. You will also need a crochet hook appropriate for your thread, scissors, a yarn needle, stitch markers, and blocking pins.
A firm cotton thread is recommended because the large open sections need enough structure to hold their shape.
Abbreviations
ch – chain
sl st – slip stitch
sc – single crochet
hdc – half double crochet
dc – double crochet
tr – treble crochet
dtr – double treble crochet
st / sts – stitch / stitches
sp – space
ch-sp – chain space
sk – skip
rep – repeat
rnd – round
Construction
The runner is formed around a central flower. Large pointed leaves extend to the left and right, while pairs of rounded leaves continue toward both ends.
Smaller triangular motifs sit inside many of the large leaves. Decorative looped fans are added beside the central section.
The motifs can be joined during the final round or sewn together afterward.
Central Flower
Begin with:
Ch 8, join with sl st to form a ring.
Round 1
Ch 1 and work 16 sc into the ring.
Join with sl st.
Round 2
Work:
sc in next st, ch 7, sk 1 st
Repeat around until you have 8 loops.
Join with sl st.
Round 3
Into each ch-7 loop work:
sc, hdc, 5 dc, hdc, sc.
Repeat around.
You should now have an eight-petal flower.
Round 4
Work around the flower with sc, placing ch 3 between petals.
Fasten off.
This flower becomes the center from which the surrounding leaves are arranged.
Basic Large Leaf Motif
Most of the runner is created from variations of the same large leaf.
Begin with:
Ch 25.
This chain forms the central spine of the leaf.
Row 1
Starting in the second ch from the hook, work sc along the foundation chain.
At the last chain work:
3 sc in the same ch.
Continue along the opposite side of the foundation chain.
This creates a narrow oval around the central spine.
Row 2
Ch 4.
Work:
dc, ch 2, dc
into successive stitches around the leaf.
Near the pointed end, place several increases so the work turns smoothly.
For example:
dc, ch 2, dc, ch 2, dc
around the tip.
Continue down the opposite side.
Building the Open Mesh
The following rows create the characteristic curved grid visible inside each leaf.
Work:
dc in next dc, ch 2, dc in next dc.
Repeat around.
On each new row, gradually increase the chain spaces:
ch 2 → ch 3 → ch 4
as the leaf becomes wider.
Keep the stitches along the central spine close together so the leaf maintains its strong center line.
Shaping the Leaf
The leaf should become widest around the middle and then narrow toward the tip.
At the widest section, the mesh can be worked as:
dc, ch 4, dc in next dc.
Toward the pointed end, reduce the chains:
ch 4 → ch 3 → ch 2.
Finish the outer edge with a firm round of sc.
For extra definition, work another round of sl st or reverse sc around the edge.
This creates the heavy outline visible around each motif.
Inner Triangular Motif
Many of the large leaves contain a small solid triangle near the base.
Attach the thread near the lower center of the leaf.
Row 1
Ch 3, work 5 dc into the selected space.
Turn.
Row 2
Ch 3, dc across, increasing at both ends.
Row 3
Repeat the increases.
Continue until the triangle reaches approximately one-third of the width of the leaf.
Finish with a row of:
sc, ch 2, sk 1 st, sc
across the upper edge.
Fasten off.
The triangle should remain visually separate from most of the surrounding open mesh.
Paired Leaf Section
To create the repeating body of the runner, make two large leaves and position them as mirror images.
The pointed ends face outward while their inner edges meet along the center line.
Join the two leaves at several points using:
sc, ch 2, sc
or small groups of slip stitches.
Do not join every stitch. Small open spaces between the motifs help preserve the lace appearance.
Center Spine
The strong vertical line running through the runner can be reinforced after joining the leaves.
Attach the thread at one end and work sc along the joining line.
Return with another row of sc or sl st.
This produces a raised central cord and also strengthens the runner.
Repeating the Motifs
After completing one pair of leaves, add another pair above it.
Join the bottom of the new pair to the top of the previous pair.
Continue in this manner:
paired leaves → paired leaves → paired leaves.
For a medium runner, use approximately 3–4 pairs on each side of the central flower.
For a longer runner, simply add more pairs.
Side Leaves Around the Flower
The center section uses longer pointed leaves extending horizontally from the flower.
Make two elongated leaves using the basic leaf instructions, but begin with approximately:
ch 30–35
instead of ch 25.
Increase the open mesh until each leaf reaches the desired width.
Position one leaf on each side of the flower with the pointed tips facing outward.
Join the bases to the central flower.
These horizontal leaves create the widest part of the runner.
Decorative Side Fans
Small looped fans appear beside the central section.
Attach the thread to an outer joining point.
Work approximately:
ch 10, sc into next attachment point
several times.
On the next row, work into each loop:
sc, hdc, 5 dc, hdc, sc.
Alternatively, leave the loops unfilled for a lighter appearance.
Arrange the loops so they spread outward like a small hand fan.
Repeat on the opposite side.
Rounded Upper and Lower Leaves
Toward the ends, the motifs become slightly rounder.
Use the same basic leaf construction but shorten the starting chain.
Begin with approximately:
ch 20–22.
Use larger chain spaces through the widest section to produce a broad rounded shape.
For example:
dc, ch 4, dc
or
dc, ch 5, dc.
Finish with smaller chain spaces near the tip.
Pointed End Motif
The final motif at each end should create a dramatic tapered finish.
Begin with:
ch 28.
Work around the chain as for the basic leaf.
Continue the mesh while keeping one end broad and the opposite end sharply pointed.
Use increasingly tall stitches around the widest section:
dc → tr → dtr → tr → dc.
This helps the motif spread outward without becoming too tight.
Finish the pointed tip with:
sc, ch 3, sc
in the same space.
Layered End Sections
To reproduce the layered appearance at the ends, add two narrow leaves behind the final central motif.
Make each leaf with a shorter foundation chain.
Place one diagonally to the left and one diagonally to the right.
Join their inner edges to the main motif while leaving their outer edges free.
This creates the overlapping, feather-like finish visible at both ends.
Joining the Runner
Lay all finished motifs on a flat surface before making the final joins.
Arrange them symmetrically around the central flower.
Start with the flower, then position the horizontal leaves. Add the paired leaves above and below the flower and finish with the end motifs.
Use small joins such as:
sc, ch 1, sc
between neighboring motifs.
For wider spaces use:
sc, ch 3, sc.
Avoid joining too many points because the motifs need enough freedom to open during blocking.
Outer Edging
Once all pieces are connected, work around the entire runner.
Round 1
Work sc evenly around every outer edge.
At pointed tips work:
sc, ch 2, sc
into the same space.
Round 2
Work sl st around the entire piece for a firm corded outline.
For an even heavier border, replace the slip stitches with another round of sc.
This thick outer line provides contrast against the open mesh.
Optional Picot Finish
For a slightly more decorative edge, add small picots only at the main points.
Work:
sc, ch 3, sl st into first ch, sc.
Continue normally until the next point.
Keeping the picots limited to selected areas prevents the border from becoming too busy.
Finishing
Fasten off all yarn securely.
Use a yarn needle to weave the ends through solid sections of crochet rather than through the open mesh.
Check every joining point and reinforce any areas that feel loose.
Blocking
Blocking is essential for this runner.
Wet the finished piece gently and remove excess water without twisting.
Place it on a large blocking surface.
Begin by pinning the central flower. Make sure it is perfectly centered.
Next, stretch the horizontal leaves equally to the left and right.
Continue pinning each pair of leaves along the center line.
Pull each pointed tip outward and pin it individually. Shape the curved sides of every leaf so that both halves are symmetrical.
Finally, arrange the small side fans and layered end motifs.
Allow the runner to dry completely before removing the pins.
Proper blocking transforms the loose crochet into a crisp architectural lace design and makes the open mesh much more visible.
Adjusting the Length
The runner can easily be shortened or lengthened because the main body consists of repeating paired leaves.
For a shorter centerpiece, use the central flower with two or three pairs of leaves on each end.
For a dining-table runner, continue adding paired motifs until the desired length is reached.
Always add the same number of motifs to both ends so that the central flower remains exactly in the middle of the finished runner.