
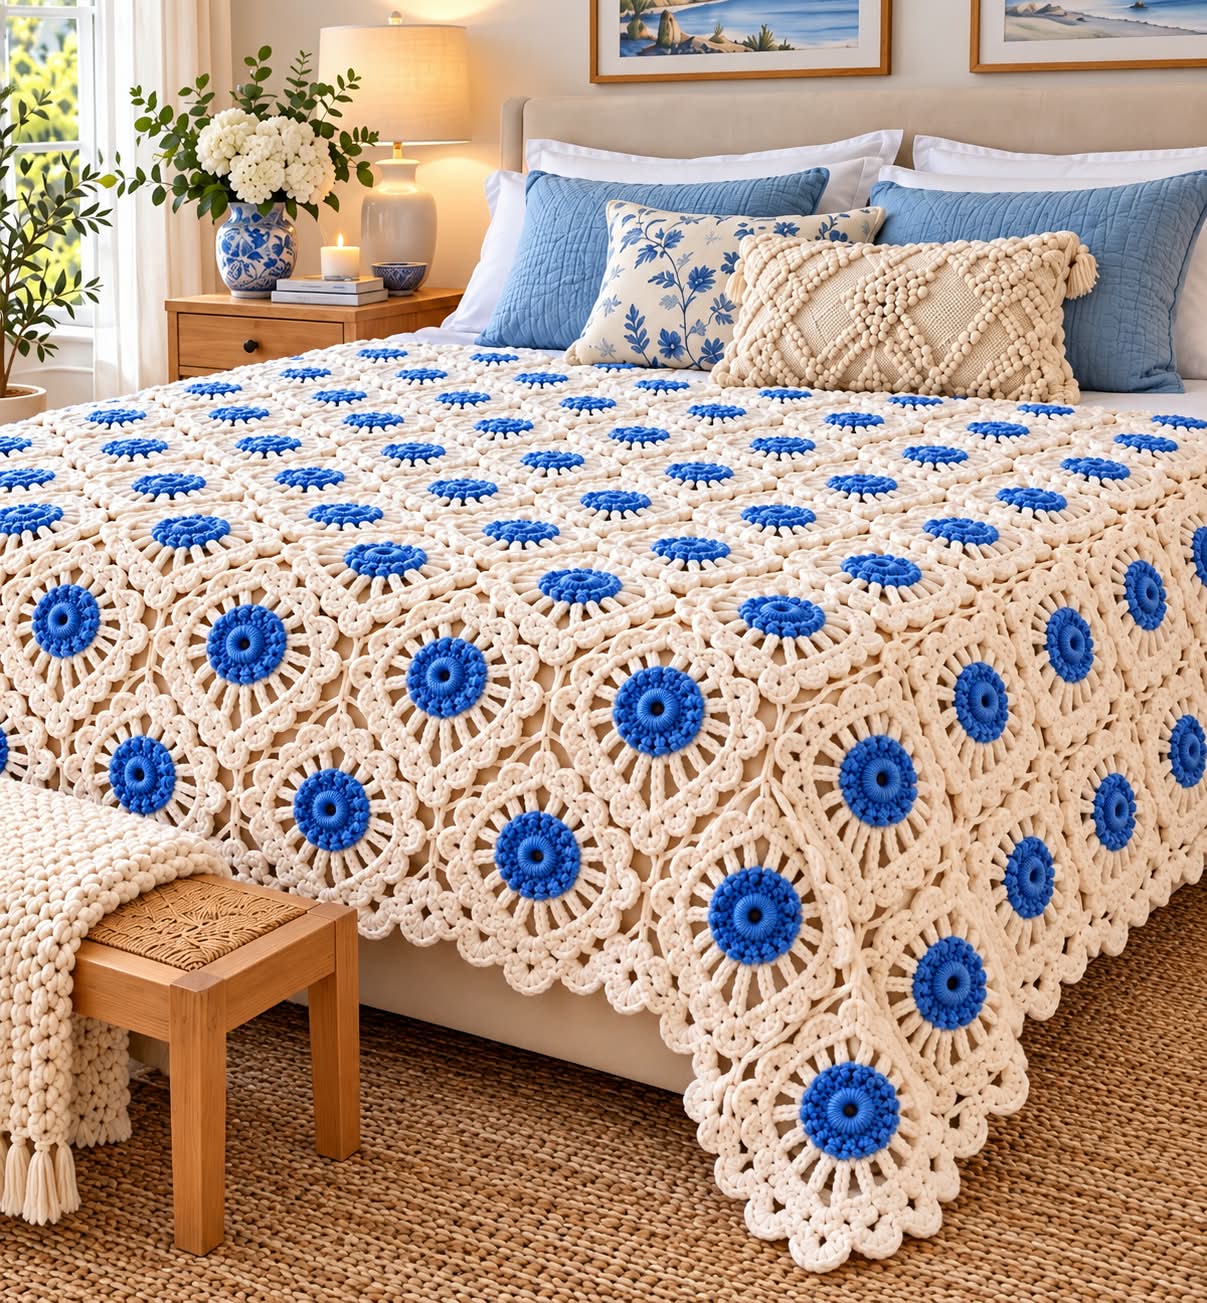
Complete Photo-Inspired Crochet Pattern – Blue Floral Medallions with Ivory Lace
Style: Elegant Floral Lace / Vintage Coastal
Skill Level: Intermediate to Advanced
Terminology: US Crochet Terms
Construction: Individual round flower motifs, squared with openwork lace, joined into a complete bedspread.
This beautiful crochet bedspread features vibrant royal-blue flower centers surrounded by soft ivory petals, raised decorative stitches, and delicate scalloped lace. The repeating medallions create a luxurious, textured design.
This pattern is a practical reconstruction inspired by the photograph. The original designer’s exact stitch counts are not available, so the instructions below create a similar effect rather than an exact replica.
1. MATERIALS REQUIRED
Yarn
- Color A: Royal Blue
- Color B: Warm Ivory / Cream
- Recommended weight: Worsted (Category 4) cotton-blend yarn
- Approximately 4,000–6,000 meters total for a queen-size bedspread, depending on motif size, tension, and yarn thickness
Tools
- 5.0 mm crochet hook
- 5.5 mm crochet hook, if needed for the foundation chains
- Yarn needle
- Scissors
- Stitch markers
- Measuring tape
- Blocking mats and pins
Recommended gauge: One blocked completed square motif approximately 20 × 20 cm.
2. CROCHET ABBREVIATIONS
| Abbreviation | Meaning |
|---|---|
| CH | Chain |
| SC | Single Crochet |
| HDC | Half Double Crochet |
| DC | Double Crochet |
| TR | Treble Crochet |
| SL ST | Slip Stitch |
| ST | Stitch |
| SP | Space |
| SK | Skip |
| REP | Repeat |
| YO | Yarn Over |
| BLO | Back Loop Only |
| PICOT | CH 3, SL ST into first CH |
Special Stitch – Puff Stitch
YO, insert the hook into the indicated stitch, pull up a loop. Repeat this process four times into the same stitch. YO and draw through all loops. CH 1 to secure.
Special Stitch – Popcorn Stitch
Work 5 DC into the same stitch. Remove the hook from the working loop, insert it into the top of the first DC, pick up the dropped loop, and pull through. CH 1 to close.
3. METHOD – CROCHETING THE BLUE FLOWER CENTER
Round 1 – Central Ring
Using Royal Blue Yarn
- CH 6.
- Join with SL ST to form a ring.
- CH 1.
- Work 16 SC into the center of the ring.
- Join with SL ST to the first SC.
Total: 16 SC.
Round 2 – Raised Blue Flower
- CH 3 (counts as first DC).
- Work 1 DC into the same stitch.
- Work 2 DC into each remaining stitch.
- Join with SL ST.
Total: 32 DC.
Round 3 – Decorative Blue Petals
- CH 1.
- Work 1 SC into the first stitch.
- Work 1 Puff Stitch into the next stitch.
- Repeat SC and Puff Stitch around the ring.
- Join with SL ST.
Result: 16 raised blue petals.
Round 4 – Outer Blue Border
- CH 1.
- Work 1 SC into each stitch and each available space around, maintaining an even circular edge.
- Join with SL ST.
- Fasten off the blue yarn.
The royal-blue floral center is complete.
4. FORMATION – IVORY DAISY PETALS
Round 5 – Connecting the Ivory Yarn
Change to Warm Ivory Yarn
- Attach the ivory yarn to the back of the blue flower at a position between two raised petals.
- CH 5.
- SC into the corresponding space between the next two petals.
- Repeat around the entire flower.
- Join with SL ST.
Create approximately 16 evenly spaced chain arches.
Round 6 – Long Ivory Petals
- SL ST into the first CH 5 space.
- CH 3.
- Work 3 TR into the same space.
- CH 3.
- Work 1 SC into the next CH 5 space.
- Repeat around the flower, alternating petal groups and anchoring spaces.
- Join with SL ST.
The ivory stitches form elongated petals radiating outward from the blue center.
Round 7 – Decorative Puff Details
- CH 1.
- Work 1 SC into the first petal space.
- Work 1 Puff Stitch at the top of the next petal group.
- CH 2.
- Continue evenly around the flower.
- Join with SL ST.
Maintain a loose tension to preserve the open lace effect.
5. FORMATION – SQUARING THE FLORAL MEDALLION
Round 8 – Creating Four Corners
Keep working with ivory yarn.
- Identify four equally spaced positions around the medallion.
- Attach yarn at the first corner position.
- Work (3 TR, CH 3, 3 TR) to form the corner.
- CH 3.
- Work SC into the next suitable space.
- Repeat CH 3 arches across the side.
- At the next corner, work another (3 TR, CH 3, 3 TR).
- Repeat for all four corners.
- Join with SL ST.
The circular flower begins transforming into a square.
Round 9 – Openwork Square Border
- CH 3.
- Work DC into the next stitch.
- CH 2.
- SK 2 stitches or the equivalent distance along the lace.
- Repeat around each side.
- Into each corner space, work (2 DC, CH 3, 2 DC).
- Join with SL ST.
Round 10 – Strengthening the Square
- CH 1.
- Work SC evenly across each side.
- Work (SC, CH 2, SC) into each corner.
- Join with SL ST.
- Fasten off.
Block the square to obtain straight sides and four 90-degree corners.
6. FORMATION – MAKING THE COMPLETE BEDSPREAD
Crochet identical floral motifs until you have enough squares for the intended bed dimensions.
Queen-Size Bedspread – Example Layout
10 squares across
10 rows long
100 Floral Motifs
Illustrative arrangement – adjust the number to your measured gauge and desired overhang.
If each blocked motif measures 20 cm, a 10 × 10 layout produces approximately 200 × 200 cm before the outer border.
Joining the Motifs
Method – Invisible Mattress Stitch
- Arrange the finished motifs on a flat surface.
- Place two squares together, right sides facing.
- Thread a yarn needle with ivory yarn.
- Sew the corresponding edge stitches together.
- Continue joining all squares into rows.
- Join the completed rows until the bedspread is assembled.
- Weave in the joining ends.
Alternative – Crochet Join
Use SL ST through the corresponding outer stitches of adjacent squares for a slightly raised seam.
7. FORMATION – DECORATIVE SCALLOPED BORDER
Round 1 – Foundation Edging
Using ivory yarn:
- Attach yarn at an outer corner.
- Work SC evenly around the entire bedspread.
- At each corner, work 3 SC.
- Join with SL ST.
Round 2 – Lace Arches
- CH 5.
- SK approximately 3 stitches.
- SC into the next stitch.
- Repeat around the entire border.
- Adjust the spacing at corners to avoid pulling or ruffling.
- Join with SL ST.
Round 3 – Floral Scallops
- Work 7 DC into the first CH 5 arch.
- SC into the next anchoring stitch.
- Repeat around the entire edge.
- Work additional stitches into the four corner arches as needed.
- Join with SL ST.
Round 4 – Picot Details
- Work SC across the top of each shell.
- CH 3 at the center of the shell.
- SL ST into the first CH to form a picot.
- Continue around the entire border.
- Fasten off and weave in the ends.
8. OPTIONAL DECORATIVE PILLOW
The reference photograph also features a textured ivory cushion with raised bobbles.
Pillow Front
- CH enough stitches to reach the desired cushion width.
- Work one row of DC.
- Work raised popcorn stitches at regular intervals to create a diamond pattern.
- Alternate plain DC rows with popcorn-textured rows.
- Continue until the front reaches the desired dimensions.
Pillow Back
- Crochet a plain ivory panel using HDC or DC.
- Match the finished dimensions of the pillow front.
- Sew or crochet three sides together.
- Insert the pillow form.
- Close the remaining side or make an envelope opening.
Add tassels at the corners if desired.
9. FINISHING AND BLOCKING
- Secure all loose yarn ends.
- Gently dampen the bedspread according to the yarn care label.
- Lay it flat on a large blocking surface.
- Straighten each floral medallion.
- Align the four corners of each square.
- Shape the scalloped lace border.
- Leave the entire piece to dry completely.
The raised blue centers should retain their texture while the ivory lace lies flat.
10. CONCLUSION
The Ocean Blue Daisy Crochet Bedspread combines rich royal-blue floral centers with elegant ivory lace to create a luxurious handmade bedroom accessory.
Each raised flower becomes the centerpiece of a delicate lace square, while the repeating motifs produce a harmonious geometric arrangement.
The scalloped border adds a graceful finishing touch, making the bedspread suitable for coastal, classic, romantic, or vintage-inspired interiors.
Finished Design: A textured ivory crochet bedspread featuring vibrant blue floral medallions, openwork lace squares, and a decorative scalloped edge.
Pattern accuracy note: The central flower and square-forming rounds are approximate design instructions rather than a stitch-tested reproduction. Work one complete sample motif first and adjust the placement and stitch counts for a flat, repeatable square.