
Complete Crochet Pattern with Matching Pillow Covers
Style: Vintage Floral Crochet
Colors: Sage Green and Ivory Cream
Skill Level: Intermediate
Terminology: US Crochet Terms
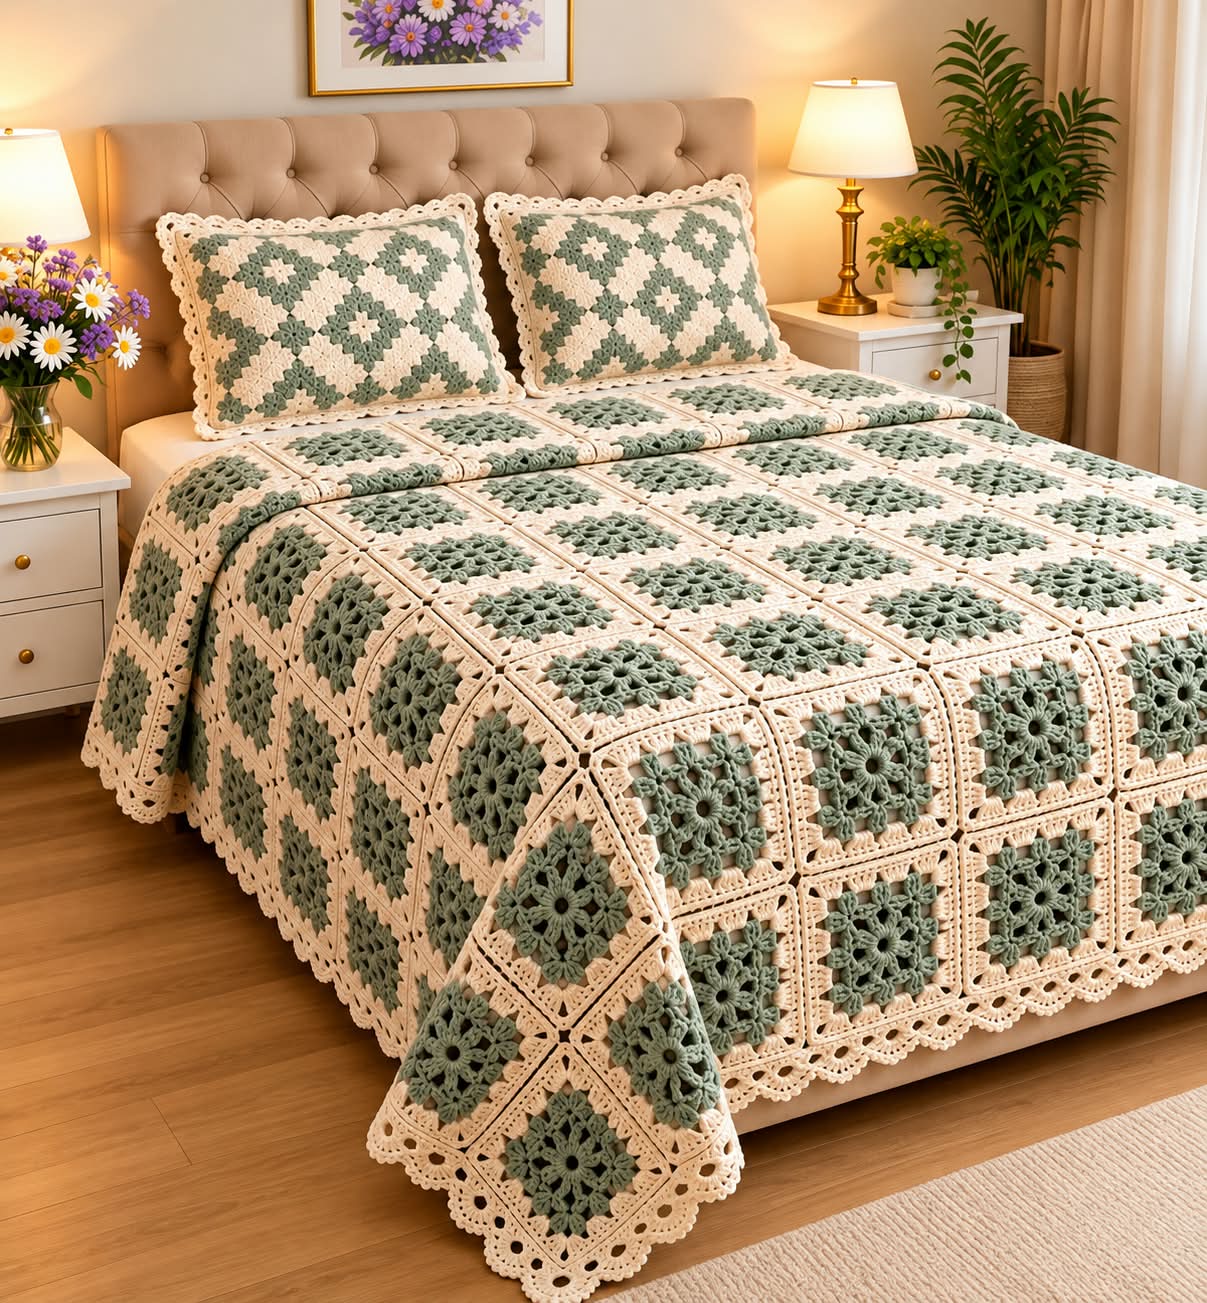
This beautiful crochet bedspread features delicate sage green floral granny squares surrounded by elegant ivory borders. The matching pillow covers and scalloped lace edging create a romantic, timeless bedroom decoration.
This is a reconstructed pattern inspired by the photograph, rather than the original designer’s exact pattern.
1. MATERIALS REQUIRED
Yarn:
- Sage Green cotton or cotton-blend yarn
- Ivory Cream cotton or cotton-blend yarn
- DK weight yarn (Category 3)
- Approximately 3,500–5,000 meters total for a large bedspread, depending on dimensions and gauge
Tools:
- 4.0 mm crochet hook
- Yarn needle
- Scissors
- Stitch markers
- Measuring tape
- Blocking pins and mats
2. CROCHET ABBREVIATIONS
| Abbreviation | Meaning |
|---|---|
| CH | Chain |
| SC | Single Crochet |
| HDC | Half Double Crochet |
| DC | Double Crochet |
| TR | Treble Crochet |
| SL ST | Slip Stitch |
| ST | Stitch |
| SP | Space |
| SK | Skip |
| REP | Repeat |
| YO | Yarn Over |
Special Stitch – Puff Stitch (Puff):
YO, insert the hook into the indicated space, pull up a loop. Repeat this action 3 more times in the same space. YO and pull through all loops on the hook, then CH 1 to secure.
The securing chain is part of each puff.
3. METHOD – FORMING THE FLORAL CENTER
Round 1 – Magic Ring
Color: Sage Green
- Make a magic ring.
- CH 3 (counts as first DC).
- Work 11 DC into the ring.
- Pull the ring closed.
- Join with SL ST to the top of CH 3.
Total: 12 DC.
Round 2 – Flower Foundation
- CH 3.
- Work 1 DC into the same stitch.
- CH 2.
- Work 2 DC into the next stitch.
- CH 2.
- Repeat around until you have 12 groups of 2 DC.
- Join with SL ST.
Total: 12 groups separated by CH 2 spaces.
Round 3 – Forming the Flower Petals
- SL ST into the first CH 2 space.
- Work 1 Puff Stitch into the space.
- CH 2.
- Repeat 1 Puff Stitch and CH 2 in each remaining CH 2 space.
- Join with SL ST.
Result: 12 raised petals around the central ring.
Round 4 – Decorative Outer Petals
- SL ST into the first CH 2 space.
- Work (SC, 3 DC, SC) into the space.
- Repeat in every CH 2 space around.
- Join with SL ST.
Fasten off the sage green yarn.
The center should now resemble a textured flower with twelve petals.
4. FORMATION – TURNING THE FLOWER INTO A SQUARE
Round 5 – Ivory Foundation
Change to Ivory Cream yarn.
- Join ivory yarn in the space between two petals.
- CH 3.
- Work 2 DC into the same space.
- CH 1.
- Work 3 DC into each of the next two spaces, with CH 1 between groups.
- In the following space, work (3 DC, CH 3, 3 DC) to create a corner.
- Continue grouping DC stitches and forming four corners evenly around the flower.
- Join with SL ST.
Distribute the four corners symmetrically, with three petal spaces between consecutive corner positions.
Round 6 – Expanding the Square
- CH 3.
- Work DC stitches along the sides.
- At each corner CH 3 space, work (2 DC, CH 3, 2 DC).
- Continue around all four sides.
- Join with SL ST.
Round 7 – Decorative Openwork
- CH 3.
- Work 1 DC into the next stitch.
- CH 1, SK 1 stitch.
- Continue with DC and CH 1 spaces along the sides.
- At the corners, work (2 DC, CH 2, 2 DC).
- Join with SL ST.
Round 8 – Final Square Border
- CH 1.
- Work SC evenly along each side.
- Work (SC, CH 2, SC) into each corner space.
- Continue around the entire square.
- Join with SL ST.
Fasten off and weave in the ends.
One completed floral granny square is ready.
5. FORMATION – ASSEMBLING THE BEDSPREAD
Create identical floral squares to build the bedspread.
Suggested Size
Example: Queen-Size Motif Arrangement
9 squares across
10 rows
90 Floral Squares
Illustrative layout; actual count depends on blocked motif dimensions.
If each square measures approximately 22 cm after blocking, the joined central bedspread will measure about 198 × 220 cm before the outer border.
Joining Method
Invisible Seam Method
- Lay two squares side by side, right sides facing.
- Align all corners carefully.
- Thread a yarn needle with ivory yarn.
- Sew through corresponding edge stitches using mattress stitch.
- Continue joining squares into horizontal rows.
- Sew the completed rows together.
- Keep all seams consistent.
Alternatively, use a slip stitch join for a slightly raised decorative seam.
6. FORMATION – SCALLOPED LACE BORDER
Round 1 – Foundation
Using ivory yarn:
- Join yarn at any outer corner.
- Work SC evenly around the entire bedspread.
- Work 3 SC at each corner.
- Join with SL ST.
Round 2 – Decorative Openwork
- CH 5.
- SK 3 stitches.
- SC into the next stitch.
- Repeat around the entire edge.
- Adjust the stitch spacing at the corners to keep the work flat.
- Join with SL ST.
Round 3 – Scalloped Shells
- Work 7 DC into the first CH 5 space.
- SC into the next anchor stitch.
- Repeat around the border.
- Add appropriate extra stitches at the corners.
- Join with SL ST.
Round 4 – Delicate Picot Finish
- Work SC across the top of each shell.
- At the center of every shell, CH 3.
- SL ST into the first chain to form a picot.
- Continue around the bedspread.
Fasten off and weave in the ends.
7. MATCHING FLORAL PILLOW COVERS
The matching pillow covers repeat the same sage green floral motifs and ivory borders.
Front Panel
- Crochet floral granny squares using the main pattern.
- Arrange them into a rectangular pillow panel.
- Join the motifs with ivory yarn.
- Add one round of SC around the completed panel.
For a pillow approximately 50 × 50 cm, use smaller motifs or adjust the number of squares to fit the insert.
Back Panel
- Work a plain ivory crochet panel to match the dimensions of the front.
- Alternatively, make two overlapping panels for an envelope closure.
- Place the front and back together with right sides facing.
- Join three sides.
- Turn right side out.
- Insert the cushion.
- Close the final edge or use the envelope opening.
Pillow Lace Border
Work a decorative scalloped shell border around the pillow edges using ivory yarn.
8. FINISHING AND BLOCKING
- Weave in all yarn ends securely.
- Lightly dampen the completed bedspread.
- Place it on a clean, flat surface.
- Straighten the square motifs.
- Gently shape the scalloped edges.
- Allow to dry completely.
- Remove blocking pins if used.
Blocking helps create the neat square formation visible in the reference image.
9. CONCLUSION
The Sage Green Floral Granny Square Crochet Bedspread is a beautiful combination of traditional granny square construction and delicate floral detailing.
The raised sage green flowers add texture and dimension, while the ivory borders create a clean and harmonious appearance.
The repeating motifs make it possible to customize the design for different bed sizes, and the matching pillow covers complete the coordinated bedroom set.
Finished Design: A vintage-inspired floral crochet bedspread featuring textured sage green flowers, ivory granny square borders, delicate openwork, and elegant scalloped lace edging.
Important: This photo-inspired pattern is an interpretation. The exact stitch structure is not fully visible, and the written rounds should be tested on a sample square before producing the entire bedspread.