
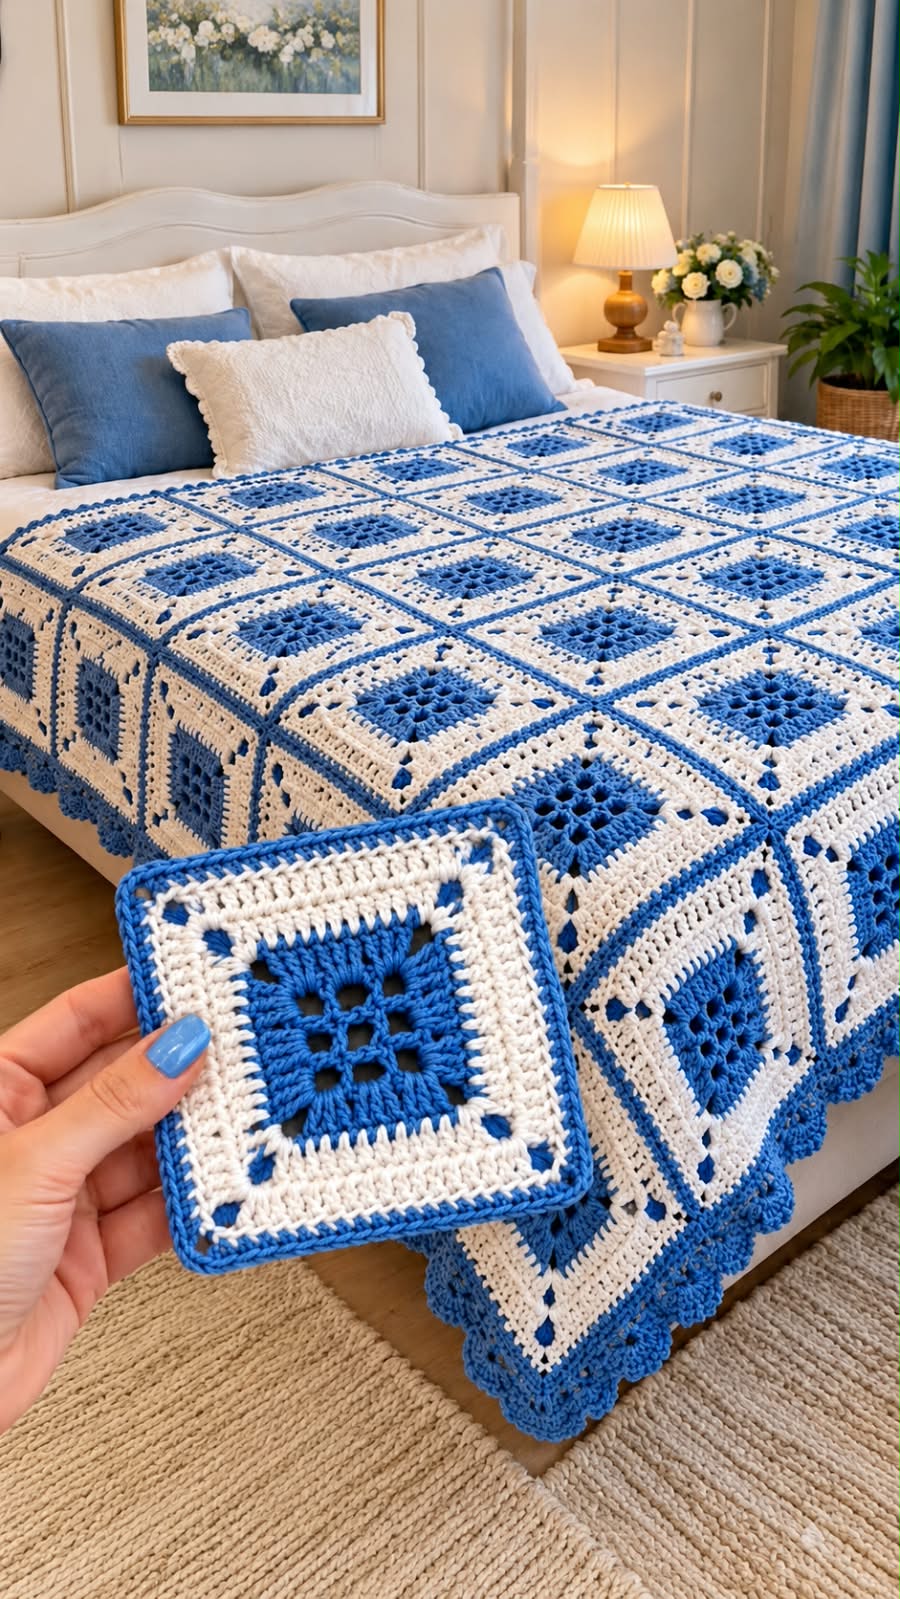
Complete Photo-Inspired Crochet Pattern – With Decorative Scalloped Border
Style: Vintage Coastal Elegance
Colors: Royal Blue and Ivory White
Skill Level: Intermediate
Terminology: US Crochet Terms
Construction: Openwork granny squares featuring royal-blue centers, ivory lace sections, blue outer borders, and decorative scalloped edging.
This beautiful handmade crochet bedspread features geometric blue-and-white squares arranged in neat rows. Each motif combines an open floral-inspired blue center with delicate ivory crochet, creating a fresh, elegant design.
The instructions below are a reconstructed pattern inspired by the photograph, rather than an exact reproduction of the original designer’s stitches.
1. MATERIALS REQUIRED
Yarn
- Color A: Royal Blue
- Color B: Ivory White
- DK or light worsted cotton-blend yarn
- Estimated quantity for a queen-size bedspread: 3,500–5,500 meters total, depending on yarn thickness, gauge, and finished size
Tools
- 4.0 mm crochet hook
- Yarn needle
- Scissors
- Stitch markers
- Measuring tape
- Blocking mats and pins
Sample gauge: One completed and blocked square measures approximately 20 × 20 cm.
2. CROCHET ABBREVIATIONS
| Abbreviation | Meaning |
|---|---|
| CH | Chain |
| SC | Single Crochet |
| HDC | Half Double Crochet |
| DC | Double Crochet |
| TR | Treble Crochet |
| SL ST | Slip Stitch |
| ST | Stitch |
| SP | Space |
| SK | Skip |
| REP | Repeat |
| YO | Yarn Over |
| RS | Right Side |
Special Stitch – Granny Cluster: Three DC worked into the same stitch or space.
Corner: (2 DC, CH 2, 2 DC) worked into the same corner space.
3. METHOD – MAKING THE ROYAL BLUE CENTER
Round 1 – Foundation Ring
Using royal-blue yarn:
- CH 6.
- Join with SL ST into the first chain to form a ring.
- CH 3, counting as the first DC.
- Work 15 DC into the ring.
- Join with SL ST to the top of the beginning CH 3.
Total: 16 DC.
Round 2 – Openwork Formation
- CH 4, counting as 1 DC and CH 1.
- Work (1 DC, CH 1) into each remaining stitch.
- Join with SL ST into the third chain of the beginning CH 4.
Result: 16 DC separated by 16 CH 1 spaces.
Round 3 – Blue Decorative Clusters
- SL ST into the first CH 1 space.
- CH 3 and work 2 DC into that space.
- CH 2.
- Work 3 DC into the next CH 1 space.
- CH 2.
- Repeat around.
- Join with SL ST.
This creates an open textured blue center.
Round 4 – Establishing the Square Shape
- SL ST into the next CH 2 space.
- Work (3 DC, CH 3, 3 DC) into this space to form the first corner.
- CH 1.
- Work 3 DC into each of the next three CH 2 spaces, with CH 1 between groups.
- At the next CH 2 space, work another (3 DC, CH 3, 3 DC).
- Continue the same sequence around all four sides.
- Join with SL ST.
The blue circular center now becomes a square.
Fasten off royal-blue yarn.
4. FORMATION – IVORY LACE SECTION
Round 5 – First Ivory Round
Join ivory yarn in any corner space.
- CH 3.
- Work (1 DC, CH 2, 2 DC) into the same corner.
- Work DC into the stitches along the first side.
- Work 1 DC into each CH 1 side space.
- At the next corner, work (2 DC, CH 2, 2 DC).
- Continue around the square.
- Join with SL ST.
Round 6 – Decorative Openwork
- CH 3.
- Work DC into the next two stitches.
- CH 2.
- SK 2 stitches.
- Continue with DC groups and CH 2 openings along the sides.
- At each corner, work (2 DC, CH 2, 2 DC).
- Join with SL ST.
Round 7 – Ivory Solid Border
- CH 3.
- Work 1 DC into each stitch along the sides.
- Work 2 DC into each CH 2 side space.
- At the corners, work (2 DC, CH 2, 2 DC).
- Join with SL ST.
Round 8 – Decorative Ivory Detail
- CH 1.
- Work SC evenly along the first side.
- At the corners, work (SC, CH 2, SC).
- Continue around.
- Join with SL ST.
Fasten off the ivory yarn.
5. FORMATION – ROYAL BLUE OUTER BORDER
Round 9 – Blue Frame
Attach royal-blue yarn at one corner.
- CH 1.
- Work SC along the first side.
- Work (SC, CH 2, SC) at the corner.
- Repeat around all four sides.
- Join with SL ST.
Round 10 – Final Square Edging
- CH 2.
- Work HDC evenly around the square.
- At each corner, work (2 HDC, CH 2, 2 HDC).
- Join with SL ST.
- Fasten off.
The completed motif features a royal-blue center, ivory decorative section, and a neat blue outline.
Important: Check the motif after each color change and adjust side spacing as needed. The photograph does not provide enough stitch-level information to guarantee identical proportions.
6. FORMATION – BEDSPREAD ASSEMBLY
Crochet enough identical squares to cover the desired bed size.
Example – Queen-Size Motif Arrangement
10 squares across
10 rows long
100 Granny Squares
Illustrative layout – modify the count based on your required dimensions.
For a sample motif measuring 20 cm:
- 10 squares across = 200 cm
- 10 rows long = 200 cm
- Add more rows if you want a longer bedspread.
Joining the Squares
Mattress Stitch Method
- Arrange the completed motifs in rows.
- Place two squares right sides together.
- Align the corners carefully.
- Use a yarn needle threaded with blue yarn.
- Sew through matching edge stitches.
- Continue joining squares to form complete rows.
- Join all rows together.
- Secure and weave in the yarn ends.
Alternative – Slip Stitch Joining
Work SL ST through corresponding edge stitches of adjacent motifs using blue yarn.
This creates a visible decorative blue joining line, similar to the photograph.
7. FORMATION – SCALLOPED BEDSPREAD BORDER
Round 1 – Foundation Edging
Using royal-blue yarn:
- Attach yarn at any corner.
- Work SC evenly around the entire bedspread.
- Work 3 SC at each outer corner.
- Join with SL ST.
Round 2 – Decorative Lace Arches
- CH 5.
- SK 3 stitches.
- SC into the next stitch.
- Repeat around the border.
- Adjust the spacing at the four corners.
- Join with SL ST.
Round 3 – Blue Scalloped Shells
- Work 7 DC into the first CH 5 space.
- SC into the next anchoring stitch.
- Repeat around the entire edge.
- Add extra stitches into corner arches if needed to keep the border flat.
- Join with SL ST.
Round 4 – Final Edging
- CH 1.
- Work SC evenly across the shells.
- Add optional picots at the top of selected shells.
- Join with SL ST.
- Fasten off and weave in the ends.
8. OPTIONAL MATCHING GRANNY SQUARE PILLOW
Although the photograph features plain blue and ivory cushions, a matching crochet pillow can be made using the same blue-and-ivory motifs.
Pillow Front
- Crochet four small granny squares.
- Arrange them in a 2 × 2 formation.
- Join with royal-blue yarn.
- Work SC around the completed panel.
Pillow Back
- Crochet an ivory rectangular panel using HDC.
- Match the dimensions of the front panel.
- Join the front and back together on three sides.
- Insert the pillow form.
- Close the final edge, or create an envelope opening.
Finish with a narrow blue border.
9. FINISHING AND BLOCKING
- Weave in all yarn ends securely.
- Lightly dampen the completed bedspread according to the yarn care label.
- Lay it flat on a clean surface.
- Arrange each granny square into a uniform shape.
- Straighten the blue joining seams.
- Shape the scalloped border.
- Let the entire bedspread dry completely.
Blocking helps give the granny squares a clean, professional appearance.
10. CONCLUSION
The Royal Blue and Ivory Lace Granny Square Bedspread combines bold blue motifs with delicate white crochet for an elegant, timeless design.
The repeating squares create a beautiful geometric arrangement, while the blue joining lines define each individual motif. The scalloped edging adds a decorative finish.
Finished Design: A handmade blue-and-ivory crochet bedspread with openwork granny squares, contrasting borders, visible blue joins, and elegant scalloped lace edging.
Pattern note: This is an approximate photo-inspired design, not a stitch-tested replica. Make and block one complete square before starting the full bedspread, and adjust the instructions wherever necessary to ensure the motif lies flat.