
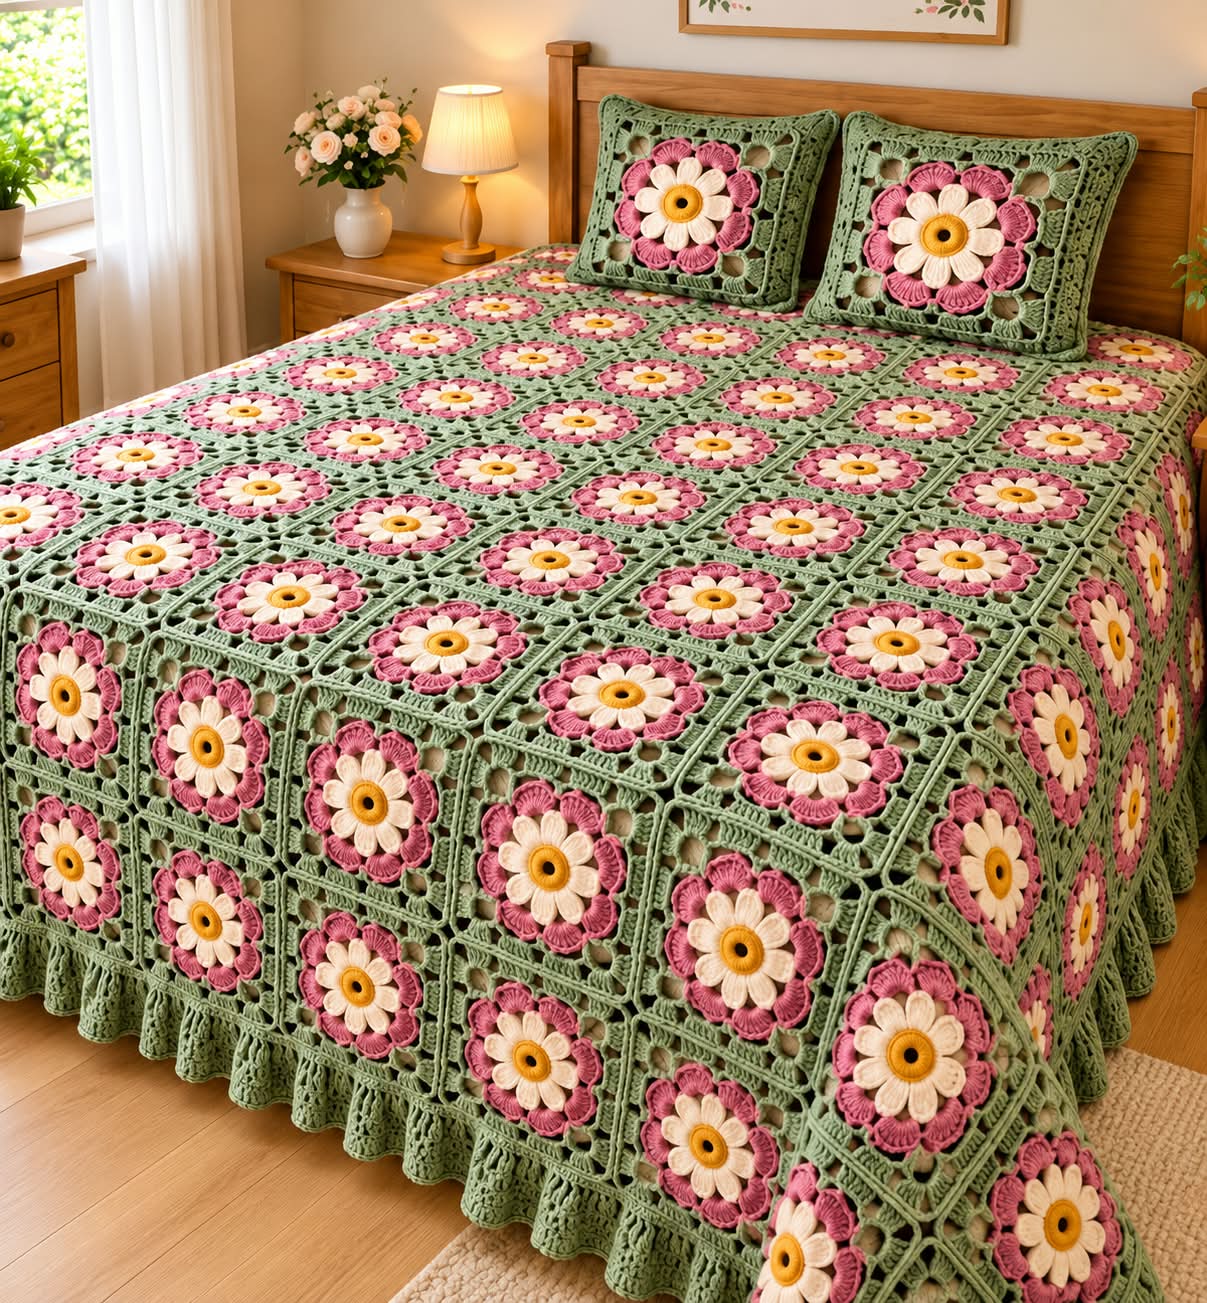
Complete Photo-Inspired Crochet Pattern with Matching Floral Pillow Covers
Style: Romantic Vintage Floral Crochet
Colors: Sage Green, Dusty Rose Pink, Ivory White, and Golden Yellow
Skill Level: Intermediate to Advanced
Terminology: US Crochet Terms
Construction: Raised daisy flowers, pink decorative petals, sage-green openwork granny squares, joined motifs, and scalloped lace edging.
This beautiful crochet bedspread features cheerful daisies with golden-yellow centers, soft ivory petals, and dusty pink outer flowers. Each flower is surrounded by a sage-green lace square, creating an elegant garden-inspired design.
The matching pillow covers repeat the floral pattern, making this a coordinated handmade bedroom set.
Pattern note: The following instructions are a creative reconstruction inspired by the photograph. They are not the original designer’s verified, stitch-tested pattern.
1. MATERIALS REQUIRED
Yarn Colors
- Color A: Golden Yellow – flower centers
- Color B: Ivory White – inner daisy petals
- Color C: Dusty Rose Pink – outer petals
- Color D: Sage Green – square backgrounds, joining, and lace borders
Use DK or light worsted cotton-blend yarn.
Tools
- 4.0 mm crochet hook
- 4.5 mm crochet hook if needed for looser lace
- Yarn needle
- Scissors
- Stitch markers
- Measuring tape
- Blocking mats and pins
Estimated Yarn Quantities
| Color | Approximate Amount |
|---|---|
| Sage Green | 2,500–3,500 m |
| Dusty Rose Pink | 900–1,300 m |
| Ivory White | 700–1,000 m |
| Golden Yellow | 150–300 m |
Quantities are planning estimates for a large bedspread and matching pillow covers, not measured yarn requirements.
2. CROCHET ABBREVIATIONS
| Abbreviation | Meaning |
|---|---|
| CH | Chain |
| SC | Single Crochet |
| HDC | Half Double Crochet |
| DC | Double Crochet |
| TR | Treble Crochet |
| SL ST | Slip Stitch |
| ST | Stitch |
| SP | Space |
| SK | Skip |
| REP | Repeat |
| YO | Yarn Over |
| RS | Right Side |
| BLO | Back Loop Only |
Special Stitch – Puff Stitch
YO, insert hook into the indicated space, and pull up a loop. Repeat three more times in the same space. YO and pull through all loops on the hook. CH 1 to secure.
Special Stitch – Picot
CH 3, then SL ST into the first chain.
3. METHOD – CREATING THE GOLDEN DAISY CENTER
Round 1 – Magic Ring
Using Golden Yellow Yarn
- Make a magic ring.
- CH 1.
- Work 12 SC into the ring.
- Pull the ring closed, leaving a small central opening if you want the same ring effect as the photograph.
- Join with SL ST to the first SC.
Total: 12 SC.
Round 2 – Raised Golden Center
- CH 1.
- Work 2 SC into each stitch around.
- Join with SL ST.
Total: 24 SC.
Fasten off the golden-yellow yarn.
4. FORMATION – IVORY DAISY PETALS
Round 3 – Petal Foundation
Change to Ivory White Yarn
Join ivory yarn to any stitch.
- CH 1.
- Work SC into the same stitch.
- CH 4.
- SK the next stitch.
- SC into the following stitch.
- Repeat around the center to form 12 evenly spaced arches.
- Join with SL ST.
Round 4 – Forming the White Petals
Into each CH 4 arch, work:
- SC.
- HDC.
- 3 DC.
- HDC.
- SC.
Repeat in every arch.
Join with SL ST.
Result: 12 soft ivory daisy petals.
Fasten off the ivory yarn.
5. FORMATION – DUSTY ROSE OUTER PETALS
Round 5 – Pink Foundation
Change to Dusty Rose Pink Yarn
Attach pink yarn behind the ivory petals.
- CH 5.
- Work SC into a corresponding gap behind the next ivory petal.
- Repeat around the flower, creating approximately 12 arches.
- Join with SL ST.
Round 6 – Decorative Rose Petals
Into each CH 5 arch, work:
- SC.
- HDC.
- 5 DC.
- HDC.
- SC.
Repeat around the flower.
Join with SL ST.
The pink petals form a second floral layer surrounding the ivory daisy.
Round 7 – Petal Texture
- CH 1.
- Work SC evenly along the top of each pink petal.
- Work one additional HDC at the center of each petal if needed to emphasize its rounded shape.
- Join with SL ST.
- Fasten off.
The flower is now complete.
6. FORMATION – SAGE GREEN GRANNY SQUARE
Round 8 – Green Foundation
Change to Sage Green Yarn
- Attach sage-green yarn behind the pink flower.
- Work CH 5 arches between the outer petal bases.
- Continue evenly around the flower.
- Join with SL ST.
Keep the chain arches loose enough that the petals remain raised.
Round 9 – Openwork Background
- SL ST into the first chain arch.
- Work 3 DC into the arch.
- CH 2.
- Work 3 DC into the next arch.
- Continue around the flower.
- Join with SL ST.
Round 10 – Forming Four Corners
- Identify four evenly spaced corner positions.
- In the first corner space, work (3 DC, CH 3, 3 DC).
- Work CH 2 arches and DC clusters across the side.
- Repeat the same corner formation at the remaining three corners.
- Join with SL ST.
The round flower now begins to take on a square shape.
Round 11 – Expanding the Square
- CH 3.
- Work DC evenly along each side.
- Work CH 1 between selected clusters to maintain the openwork effect.
- At every corner, work (2 DC, CH 3, 2 DC).
- Continue around.
- Join with SL ST.
Round 12 – Decorative Sage Green Border
- CH 1.
- Work SC evenly along the sides.
- Work (SC, CH 2, SC) into each corner.
- Continue around all four sides.
- Join with SL ST.
Round 13 – Final Square Edging
- CH 2.
- Work HDC evenly around the square.
- At every corner, work (2 HDC, CH 2, 2 HDC).
- Join with SL ST.
- Fasten off.
Block the square to achieve straight sides and four even corners.
Important construction note: The flower-to-square transition is approximate. The petals and corner placement need to be adjusted on a test motif so the sage-green background lies flat.
7. FORMATION – BEDSPREAD ARRANGEMENT
Make identical daisy granny squares until you reach the required quantity.
Example Bedspread Arrangement – 9 × 10
9 squares across
10 rows long
90 Daisy Granny Squares
Illustrative layout; exact quantity depends on bed size and the blocked square measurements.
For example, if each completed square measures 24 × 24 cm:
- Width: 9 × 24 = 216 cm
- Length: 10 × 24 = 240 cm
The final decorative edging will add extra width and length.
8. METHOD – JOINING THE FLORAL SQUARES
Invisible Mattress Stitch
- Arrange all completed squares on a flat surface.
- Position two squares with right sides facing.
- Align corresponding side stitches and corners.
- Thread a yarn needle with sage-green yarn.
- Sew the matching edge stitches together.
- Continue joining motifs into horizontal rows.
- Join the completed rows together.
- Secure all yarn ends.
Alternative – Slip Stitch Joining
- Place two squares right sides together.
- Insert the hook through corresponding edge stitches.
- Work SL ST evenly along the seam.
- Continue joining squares and rows.
The sage-green yarn helps the seams blend with the square borders.
9. FORMATION – SCALLOPED LACE BEDSPREAD BORDER
Round 1 – Foundation
Using sage-green yarn:
- Attach yarn at an outer corner.
- Work SC evenly around the bedspread.
- Work 3 SC at each corner.
- Join with SL ST.
Round 2 – Openwork Lace
- CH 5.
- SK approximately 3 stitches.
- SC into the next stitch.
- Repeat around the entire bedspread.
- Adjust the chain spaces at the corners.
- Join with SL ST.
Round 3 – Decorative Shells
- Work 7 DC into the first CH 5 space.
- SC into the next anchoring stitch.
- Repeat around the border.
- Add extra corner stitches as needed to keep the edging flat.
- Join with SL ST.
Round 4 – Picot Details
- Work SC over the outer shells.
- At the center of each shell, CH 3.
- SL ST into the first chain to make a picot.
- Continue around the entire border.
- Fasten off and weave in the ends.
10. MATCHING DAISY PILLOW COVERS
The photograph features two matching floral pillows.
Pillow Front
For each pillow, make one enlarged daisy square.
- Crochet the golden-yellow flower center.
- Add the ivory petals.
- Complete the dusty rose outer petals.
- Work sage-green rounds around the flower.
- Continue expanding the square until it matches the cushion size.
A finished pillow size of approximately 45 × 45 cm is suitable for this design.
Pillow Back
- Crochet a plain sage-green square using HDC.
- Continue until it matches the front.
- Place the front and back right sides together.
- Join three sides.
- Turn right side out.
- Insert the pillow form.
- Close the remaining opening or create an envelope closure.
Pillow Border
Work a narrow scalloped lace border around each pillow using sage-green yarn.
11. FINISHING AND BLOCKING
- Weave in all yarn ends.
- Gently dampen the bedspread according to the yarn instructions.
- Lay it flat on a large blocking surface.
- Align the granny-square seams.
- Shape the pink and ivory flower petals.
- Straighten the sage-green lace background.
- Arrange the scalloped border.
- Allow the bedspread to dry completely.
Avoid pressing the raised flowers flat.
12. CONCLUSION
The Spring Daisy Garden Crochet Bedspread combines the cheerful beauty of daisies with traditional granny-square craftsmanship.
The golden-yellow centers, ivory petals, and dusty pink floral layers create a colorful three-dimensional design, while the sage-green openwork background adds a natural garden-inspired appearance.
The repeating square motifs make the design customizable for different bed sizes. Matching floral pillow covers complete the coordinated bedroom set.
Finished Design: A romantic floral crochet bedspread featuring raised multicolored daisies, sage-green lace granny squares, beautifully joined motifs, decorative scalloped edging, and matching pillows.
Final note: The rounds above are design guidance rather than an independently tested stitch-by-stitch pattern. Complete one sample daisy square, measure it, and refine the corner spacing before beginning the full bedspread.