
Title
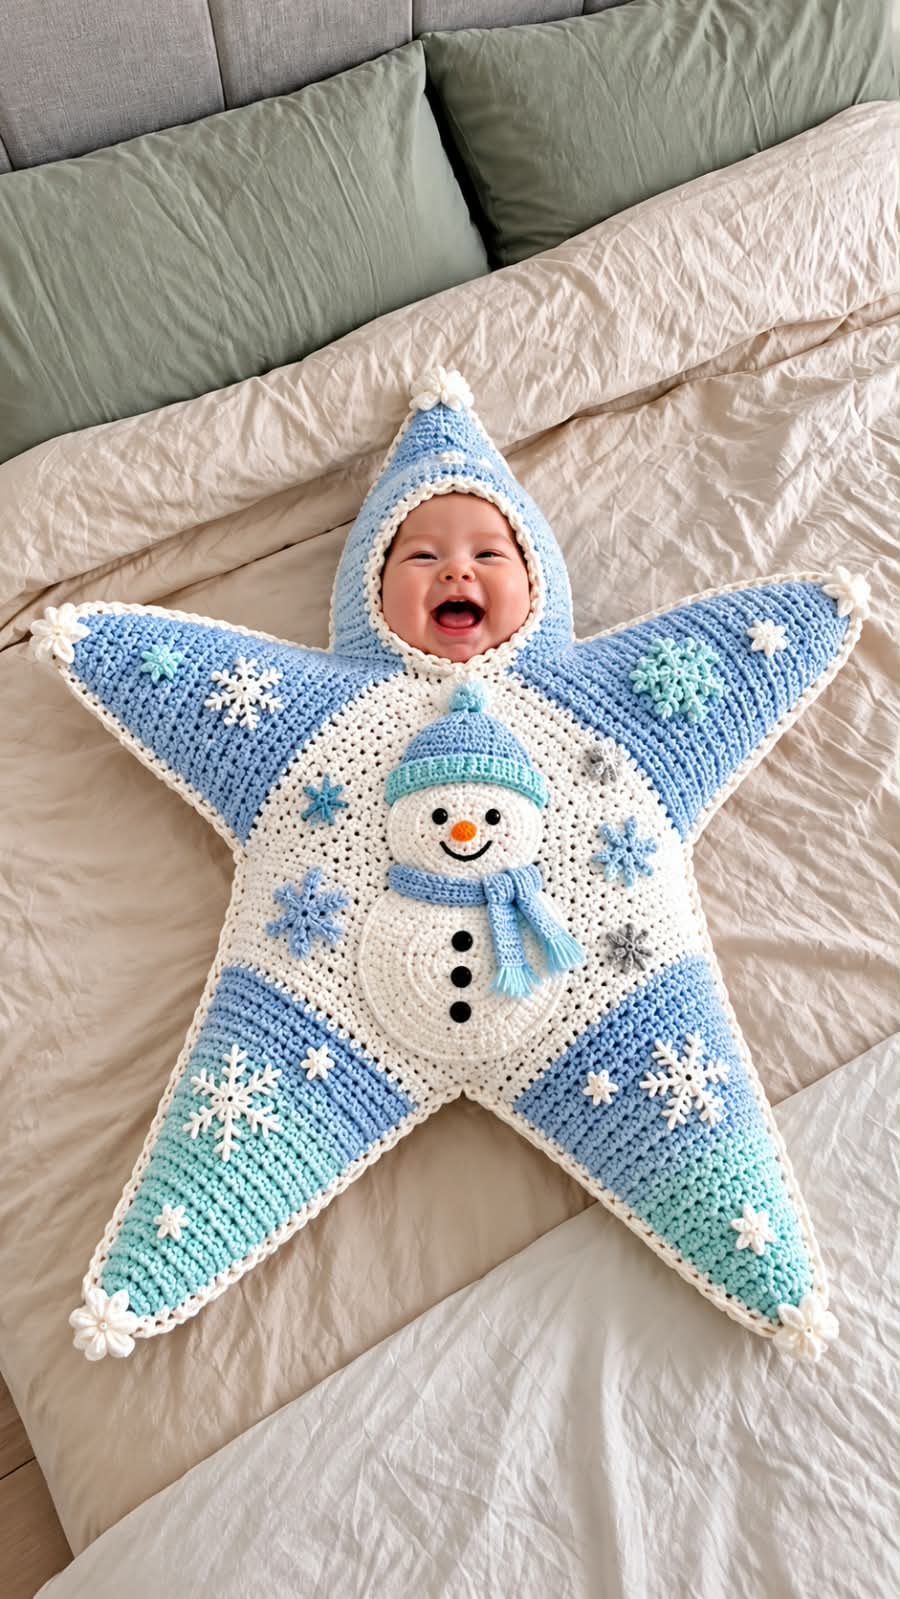
Winter Snowman Star Baby Crochet Wrap – Full Pattern
This adorable winter-themed crochet wrap is shaped like a five-point star and features:
- A soft hood
- Blue and white star sections
- Snowflake appliqués
- A 3D snowman decoration
- White edging
- Optional mint-blue accents
This pattern is best used as a supervised photo prop, stroller blanket, or decorative baby wrap.
Materials
- Soft baby-safe yarn
- Light blue yarn
- White yarn
- Mint or aqua yarn
- Small amount of orange yarn
- Small amount of black yarn
- Crochet hook: 4.0 mm to 5.0 mm
- Yarn needle
- Scissors
- Stitch markers
- Optional soft filling for snowman appliqué
Skill Level
Intermediate
Crochet Abbreviations
- CH – Chain
- SC – Single Crochet
- HDC – Half Double Crochet
- DC – Double Crochet
- TR – Treble Crochet
- SL ST – Slip Stitch
- ST – Stitch
- SP – Space
- INC – Increase
- DEC – Decrease
- REP – Repeat
Approximate Finished Size
Newborn:
55–60 cm / 22–24 in
0–3 months:
60–65 cm / 24–26 in
3–6 months:
65–72 cm / 26–28 in
The finished size depends on yarn, hook size, and tension.
Method
The wrap is built around a large white circular center.
Five tapered points are added around the circle to create the star shape.
The upper point is extended and folded into a hood.
A decorative snowman and snowflakes are crocheted separately and sewn onto the front.
Formation
Part 1 – White Center Circle
Using white yarn, make a magic ring.
Round 1
CH 3.
Work 11 DC into the ring.
Join with SL ST.
Total:
12 DC
Round 2
CH 3.
Work 2 DC into every stitch.
Join.
Total:
24 DC
Round 3
Repeat:
2 DC in next ST, 1 DC in next ST
around.
Join.
Round 4
Repeat:
2 DC in next ST, 1 DC in next 2 ST
around.
Join.
Round 5
Repeat:
2 DC in next ST, 1 DC in next 3 ST
around.
Join.
Round 6
Repeat:
2 DC in next ST, 1 DC in next 4 ST
around.
Continue increasing in this way until the center reaches approximately:
30–35 cm / 12–14 in
in diameter.
Fasten off.
Part 2 – Dividing the Star
Divide the outside edge into:
5 equal sections
Place a stitch marker at the beginning and end of each section.
Each section will become one star point.
Part 3 – Basic Star Point
Join light blue yarn to the first marked section.
Row 1
CH 3.
DC evenly across the section.
Turn.
Row 2
CH 3.
DEC over first 2 stitches.
DC across.
DEC over last 2 stitches.
Turn.
Row 3
Repeat Row 2.
Following Rows
Continue decreasing at both edges on every row.
The section will gradually form a triangle.
Continue until approximately:
3–5 stitches remain
Point Tip
Work the remaining stitches together.
CH 1.
Fasten off.
Repeat the Points
Make a total of:
5 points
The two lower points may be worked slightly longer for a dramatic star shape.
Part 4 – Blue to Mint Color Gradient
For the lower star points, you can create a color transition.
Work approximately:
- Upper 60% in light blue
- Lower 40% in mint or aqua
Change yarn at the beginning of a row.
Continue decreasing normally.
Part 5 – White Star Border
Attach white yarn at any point.
CH 1.
Work SC evenly around the entire star.
At each outer point work:
SC, CH 2, SC
At each inner corner work:
SC2TOG
to keep the edge flat.
Join with SL ST.
Optional Scalloped Border
Work another round:
SC, CH 3, SK 2 ST
around.
At the star points work:
SC, CH 3, SC
Fasten off.
Part 6 – Hood
The upper star point becomes the hood.
Join light blue yarn around the upper section.
Work back and forth in rows.
Hood Row 1
CH 3.
DC evenly across the upper point.
Turn.
Rows 2–8
CH 3.
DC across.
Increase lightly near the center if more head room is required.
Continue until the hood measures approximately:
18–22 cm / 7–9 in
Hood Shaping
Fold the hood section in half.
Seam the top edge using SC or mattress stitch.
Turn right side out.
Hood Opening Border
Join white yarn around the face opening.
Work:
1 SC in each stitch
For a decorative finish, add:
SC, CH 2, SC
every few stitches.
Fasten off.
Hood Tip Decoration
At the top of the hood, make a small white flower or pom-style crochet decoration.
Small Flower
Make a magic ring.
Work 6 SC.
For each petal:
CH 3, 2 DC, CH 3, SL ST
Repeat around.
Sew securely to the hood tip.
Part 7 – Snowman Head
Using white yarn:
Make a magic ring.
Round 1
Work 6 SC.
Round 2
2 SC in every stitch.
Round 3
Repeat:
2 SC, 1 SC
around.
Continue increasing until the circle reaches approximately:
8–10 cm / 3–4 in
Finish with one even SC round.
Fasten off.
Snowman Body
Make a second, larger circle.
Follow the same method.
Continue increasing until it reaches approximately:
12–14 cm / 5–5.5 in
Fasten off.
Optional 3D Effect
Make two circles for each section.
Place matching circles together.
Stuff very lightly.
SC around the edges to close.
Do not overstuff.
Snowman Face
Using black yarn:
Embroider or sew:
- 2 small eyes
- A curved smile
Using orange yarn:
Crochet or embroider a small carrot-shaped nose.
Snowman Buttons
Make 3 small black circles.
Magic ring.
Work 6 SC into the ring.
Join and fasten off.
Sew vertically down the body.
Part 8 – Snowman Hat
Using light blue yarn:
CH enough stitches to fit across the snowman’s head.
Work:
4–6 rows of SC
For the upper section, decrease gradually.
Sew the sides.
Add a small mint pom or knot at the top.
Hat Brim
Join mint yarn.
Work:
1–2 rows of SC or HDC
across the lower edge.
Part 9 – Snowman Scarf
Using blue yarn:
CH 45–55.
Work HDC back across.
Make 2–3 rows.
Fasten off.
Add short yarn fringe at both ends.
Wrap around the snowman’s neck and sew lightly into place.
Part 10 – Snowflake Appliqué
Make several snowflakes in white, blue, and mint.
Round 1
Make a magic ring.
Work 6 SC.
Join.
Snowflake Arms
Repeat 6 times:
CH 5
SL ST into 2nd CH from hook.
SC in next CH.
HDC in next CH.
DC in next CH.
SL ST into next SC on center ring.
Repeat around.
Fasten off.
Small Snowflake Variation
Make a magic ring.
Repeat 6 times:
CH 4, SL ST into ring
Fasten off.
Part 11 – Decoration Placement
Place the snowman in the center of the white section.
Sew securely around the outer edge of the body and head.
Arrange snowflakes around the snowman.
Place additional snowflakes on the star points.
Keep all decorations securely stitched down.
Part 12 – Optional Small Flowers
For the decorative flowers seen at some star tips:
Make a magic ring.
Work 5 SC.
Into each stitch work:
CH 3, 2 DC, CH 3, SL ST
Repeat around.
Sew to selected points.
Finishing
Weave in all loose yarn ends.
Check every appliqué and decoration.
Make sure:
- No loose beads or buttons are used
- All decorations are securely sewn
- The hood opening is comfortable
- The wrap lies flat
- The star points are symmetrical
Block lightly if needed.
Do not flatten the 3D snowman.
Conclusion
This winter snowman star crochet wrap combines a playful five-point star shape with soft blue, white, and mint colors.
The hood, snowflakes, and snowman appliqué make it ideal for:
- Winter baby photos
- Holiday photos
- Stroller decoration
- Supervised cuddle time
- Handmade gifts
For the best result, use soft washable baby yarn and keep every decorative element securely attached.
Important: This design should not be used as an unsupervised sleep product. Keep the baby’s face and airway fully clear at all times, and remove loose or dimensional decorations if the item will be used around a sleeping infant.