
Title
Brown Leaf Lace Crochet Table Runner – Full Pattern
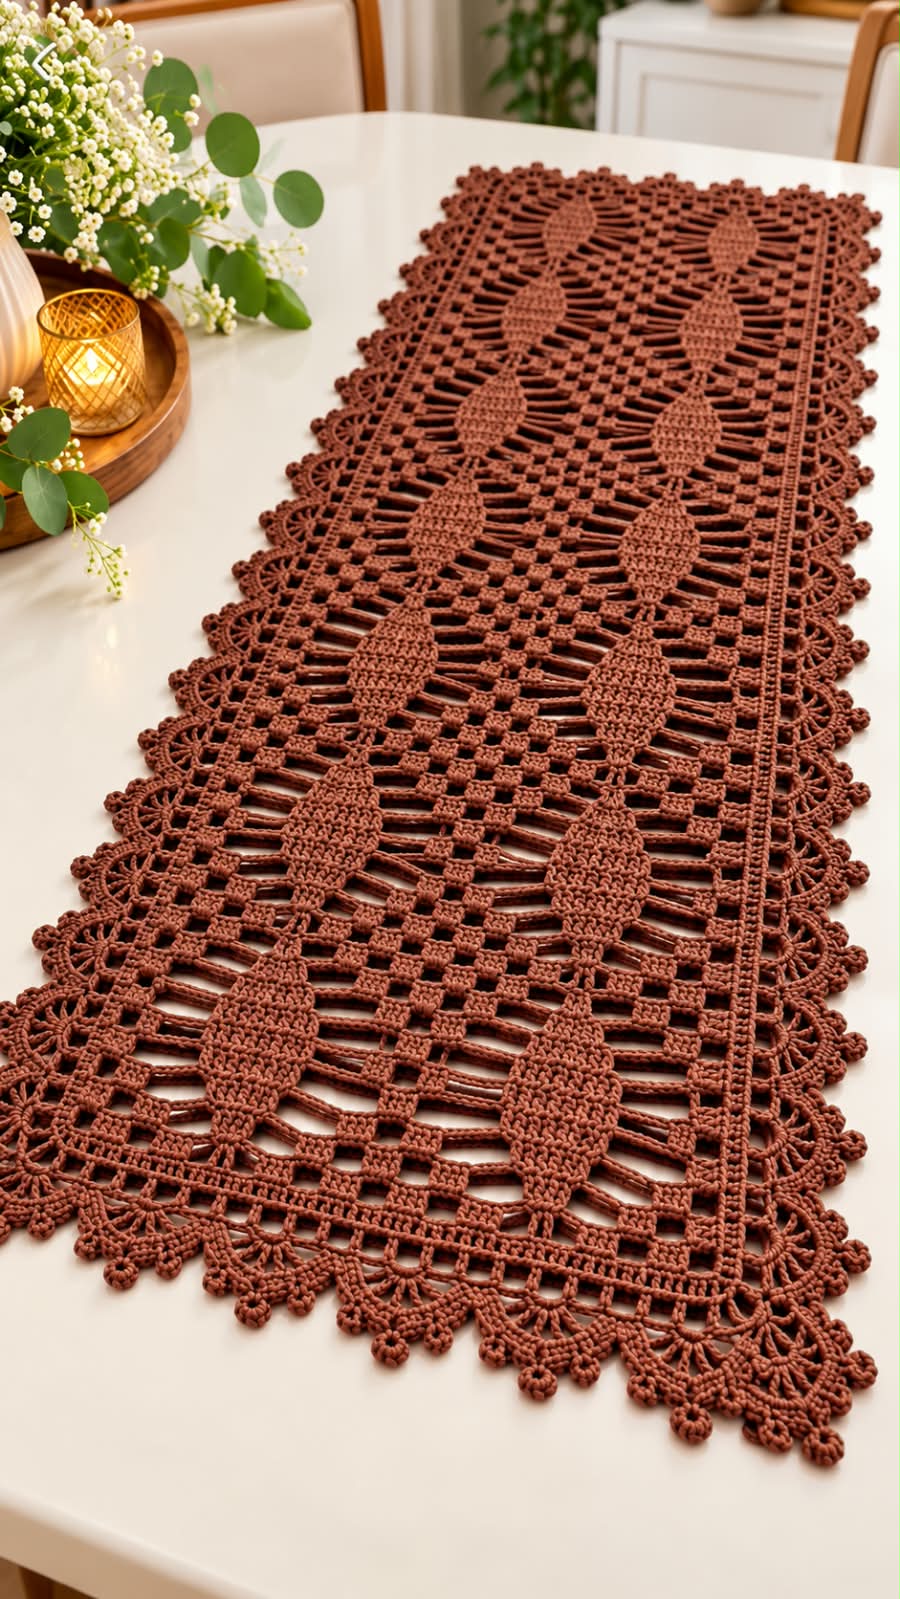
This elegant crochet table runner features repeated leaf motifs arranged in two vertical columns, surrounded by open geometric lace, small textured blocks, and a decorative scalloped border.
The warm brown color gives the finished piece a classic and sophisticated look.
Materials
- Fine cotton or cotton-blend crochet yarn
- Brown, chocolate, chestnut, or cinnamon color
- Crochet hook: 2.0 mm to 3.0 mm
- Yarn needle
- Scissors
- Stitch markers
- Blocking mat
- Blocking pins
Skill Level
Intermediate to Advanced
Crochet Abbreviations
- CH – Chain
- SC – Single Crochet
- HDC – Half Double Crochet
- DC – Double Crochet
- TR – Treble Crochet
- SL ST – Slip Stitch
- ST – Stitch
- SP – Space
- SK – Skip
- REP – Repeat
- CL – Cluster
- PICOT – CH 3, SL ST into first CH
Approximate Finished Size
Width:
38–45 cm / 15–18 in
Length:
120–160 cm / 47–63 in
The length can be increased by adding more complete leaf repeats.
Method
The runner is worked as a long rectangular lace panel.
The design contains:
- Two columns of leaf motifs
- Open chain lattice
- Small solid crochet blocks
- Narrow inner framing
- Wide decorative outer border
The main body can be worked in rows, while the leaf motifs are created directly into the pattern.
Formation
Part 1 – Foundation
CH 121.
For a narrower runner, reduce the foundation in complete pattern repeats.
Row 1
DC in the 5th CH from hook.
CH 2.
SK 2 CH.
DC in next CH.
Repeat:
CH 2, SK 2 CH, DC in next CH
across.
Turn.
Row 2
CH 5.
DC into next DC.
Repeat:
CH 2, DC into next DC
across.
Turn.
This creates the basic open filet structure.
Part 2 – Geometric Block Formation
Row 3
CH 3.
Work 3 DC.
CH 3.
SK 3 stitches.
Work 3 DC.
Repeat across.
Turn.
Row 4
CH 3.
Work DC in each solid block.
Over each open section work:
CH 3
Continue across.
Turn.
Row 5
Work:
3 DC, CH 3, 3 DC
in repeating sections.
Keep the central areas open for the future leaf motifs.
Turn.
Part 3 – Leaf Motif
The leaves are worked inside selected vertical sections.
Make one leaf on the left and one on the right of each repeat.
Leaf Foundation
CH 13.
Leaf Row 1
SC in second CH from hook.
HDC in next stitch.
DC in next 3 stitches.
TR in next 3 stitches.
DC in next 2 stitches.
HDC in next stitch.
SC in final stitch.
Opposite Side
Continue around the opposite side of the foundation chain.
Repeat the same sequence in reverse.
At the tip work:
SC, CH 2, SC
Join at the base.
Leaf Round 2
Work evenly around the leaf.
Use:
- SC near the base
- HDC through the lower sections
- DC through the middle
- TR near the widest section
At the tip work:
TR, CH 2, TR
Continue symmetrically down the opposite side.
Leaf Round 3
Work SC around.
At the point:
SC, CH 2, SC
Fasten off if the motif is being made separately.
Part 4 – Integrating the Leaves
Position one leaf in the left decorative column.
Place a matching leaf in the right column.
Join the base and tip into the surrounding mesh using:
SC or SL ST
Continue the geometric mesh around the leaves.
Part 5 – Open Horizontal Bars
Between leaf motifs work long open horizontal sections.
Use:
CH 5, SC into next block
Repeat across.
On the next row:
CH 5, SC into the center of previous CH-5 loop
This creates the layered open lines visible around each leaf.
Part 6 – Small Block Pattern
Between the open rows, create small solid squares.
Work:
3 DC into selected spaces
then:
CH 3
Repeat.
On the next row, work another 3-DC block above the previous one.
This creates the small brick-like textured pattern.
Part 7 – Main Pattern Repeat
Repeat the following section:
- Small solid block row
- Open chain row
- Leaf motif row
- Open chain row
- Small solid block row
Continue until you reach the desired length.
For a medium runner:
6–8 leaf repeats
For a long runner:
9–12 repeats
Part 8 – Inner Frame
Once the body is complete, work around the entire rectangle.
Frame Round 1
Attach yarn at one corner.
CH 1.
SC evenly around.
At each corner work:
3 SC
Join.
Frame Round 2
CH 3.
DC in every stitch.
At each corner:
2 DC, CH 2, 2 DC
Join.
Frame Round 3
CH 1.
SC in every stitch.
At each corner:
SC, CH 2, SC
Join.
Part 9 – Open Border Foundation
CH 5.
SK 2 stitches.
SC into next stitch.
Repeat:
CH 5, SK 2 ST, SC in next ST
around.
At the corners work:
CH 7
Part 10 – Scalloped Lace Border
Into each CH-5 space work:
SC, HDC, 3 DC, HDC, SC
Repeat around.
Part 11 – Outer Fan Border
CH 6.
SC into the center of the next scallop.
Repeat around.
Into each CH-6 loop work:
SC, HDC, 2 DC, 3 TR, 2 DC, HDC, SC
This creates the large decorative fan edge.
Part 12 – Picot Finish
Work SC around the outer edge.
At the top of each fan work:
SC, PICOT, SC
Repeat around.
Fasten off.
Corner Formation
At each corner, make the fan slightly larger.
Use:
SC, HDC, 3 DC, 5 TR, CH 2, 5 TR, 3 DC, HDC, SC
This helps the border turn cleanly.
Length Adjustment
For a short runner:
5–6 leaf repeats
For a medium runner:
7–8 repeats
For a long runner:
9–12 repeats
For an extra-long runner:
13+ repeats
Width Adjustment
To make the runner wider:
- Add extra mesh columns
- Increase spacing between the two leaf columns
- Add another border round
To make it narrower:
- Remove outer mesh columns
- Use a smaller hook
- Use finer yarn
Blocking
Blocking is essential for this lace design.
Lightly wet the completed runner.
Lay flat on a blocking mat.
Pin:
- All four corners
- Every leaf point
- Outer fan points
- Long side edges
Make sure:
- Both leaf columns remain straight
- The mesh stays open
- Border scallops are symmetrical
- The runner lies flat
Allow to dry completely.
Finishing
Weave in all loose ends.
Trim excess yarn.
Shape every leaf by hand.
Straighten the borders.
Check that the two leaf columns are evenly spaced and aligned.
Conclusion
This brown leaf lace crochet table runner combines botanical motifs, geometric mesh, textured blocks, and a decorative scalloped border.
The repeated construction makes the runner easy to customize for different table lengths.
The design works beautifully for:
- Dining tables
- Coffee tables
- Console tables
- Sideboards
- Elegant home décor
- Handmade gifts
- Wedding table decoration
For the cleanest result, maintain even tension throughout the mesh and block the finished runner carefully so the leaves and outer lace remain crisp and symmetrical.