
Introduction
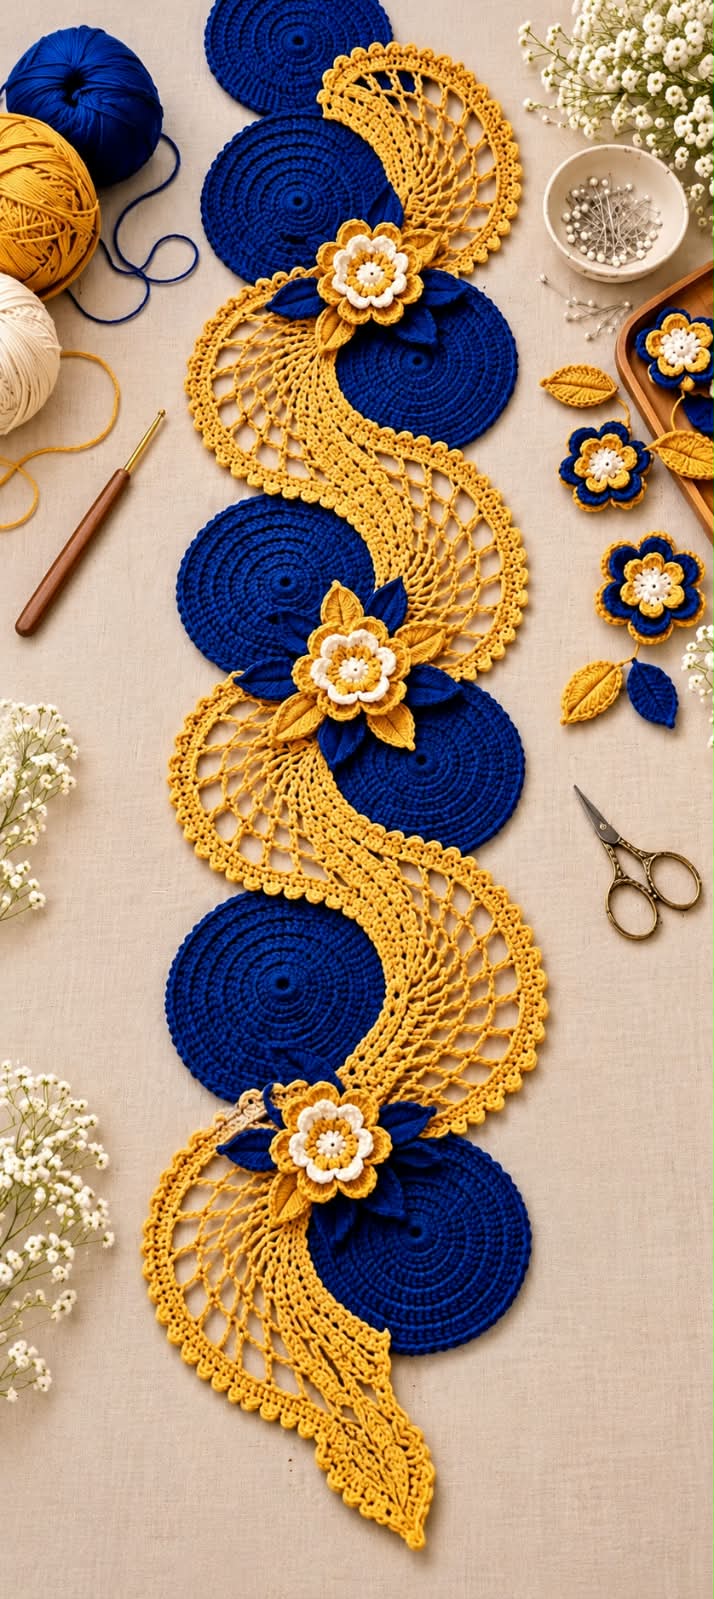
This elegant crochet table runner combines royal blue circular motifs, golden-yellow lace sections, and layered crochet flowers with leaves. The motifs are joined in a flowing wave formation, creating a decorative centerpiece suitable for dining tables, coffee tables, dressers, or special occasions.
Because this pattern is recreated from the finished design shown in the reference image, stitch counts may need slight adjustment depending on your yarn, hook size, and desired finished dimensions.
Materials
- Royal blue cotton yarn
- Golden/mustard yellow cotton yarn
- White or cream cotton yarn
- Small amount of pale yellow yarn for flower centers
- Crochet hook: 2.5–3.5 mm
- Yarn needle
- Scissors
- Stitch markers
- Blocking pins and mat
Recommended Yarn
Use sport or DK-weight cotton yarn for a firm and well-defined result.
Abbreviations
- MR – Magic Ring
- ch – Chain
- sl st – Slip Stitch
- sc – Single Crochet
- hdc – Half Double Crochet
- dc – Double Crochet
- tr – Treble Crochet
- sp – Space
- st / sts – Stitch / Stitches
- inc – Increase
- rep – Repeat
- BLO – Back Loop Only
METHOD
The runner is made in several separate components:
- Royal blue circular motifs
- Golden-yellow crescent lace motifs
- Large layered flowers
- Small decorative flowers
- Crochet leaves
- Final joining and arrangement
The main runner is formed by alternating blue circles and golden lace sections in a soft S-shaped wave.
PART 1 – ROYAL BLUE CIRCULAR MOTIFS
Make approximately 7 blue circles, or as many as needed for your preferred runner length.
Round 1
Using royal blue yarn:
MR.
Ch 3, work 11 dc into the ring.
Join with sl st to the top of beginning ch-3.
12 sts
Round 2
Ch 3.
Work 1 dc in the same stitch.
Work 2 dc in every stitch around.
Join.
24 sts
Round 3
Ch 3, 1 dc in same st.
1 dc in next st.
Repeat:
2 dc in next st, 1 dc in next st
around.
Join.
36 sts
Round 4
Ch 3, 1 dc in same st.
1 dc in each of next 2 sts.
Repeat:
2 dc in next st, 1 dc in next 2 sts
around.
Join.
48 sts
Round 5
Ch 3, 1 dc in same st.
1 dc in each of next 3 sts.
Repeat:
2 dc in next st, 1 dc in next 3 sts
around.
Join.
60 sts
Round 6
Ch 3, 1 dc in same st.
1 dc in each of next 4 sts.
Repeat:
2 dc in next st, 1 dc in next 4 sts
around.
Join.
72 sts
Round 7
Work:
1 sc in every stitch around.
Join with sl st.
Fasten off.
Formation
The circle should lie completely flat.
If it begins to curl, add a few evenly distributed increases.
If it becomes wavy, reduce the number of increases.
Make all blue circles approximately the same size.
PART 2 – GOLDEN CRESCENT LACE SECTION
Each golden section partially surrounds or connects two blue circles.
The exact number of stitches can be adapted to the diameter of your circles.
Foundation
Using golden yarn, attach yarn along approximately one-half of the outer edge of a blue circle.
Work evenly spaced sc stitches around the selected section.
Row 1
Ch 4.
Skip 1 st.
Dc in next st.
Repeat:
ch 1, skip 1, dc in next st
across.
Turn.
Row 2
Ch 4.
Dc into next ch-1 space.
Repeat:
ch 1, dc into next ch-1 sp
across.
Turn.
Row 3
Ch 5.
Sc into next ch-1 space.
Repeat:
ch 5, sc into next ch-1 sp
across.
Turn.
EXPANDING THE LACE
The lace needs to become wider toward the center and narrower toward its ends.
Row 4
Ch 5.
Sc into first loop.
Repeat across.
At several evenly spaced points work:
ch 5, sc into same loop, ch 5, sc into next loop
This creates increases.
Row 5
Repeat Row 4 while adding additional loops gradually.
The center section should expand more than the ends.
Decorative Fan Row
Into selected chain spaces work:
2 dc, ch 2, 2 dc
Then ch 1 and move to the next selected space.
Repeat across.
OPEN MESH SECTION
To create the large open lace appearance visible in the design:
Work:
ch 7, sc into next loop
Repeat across.
Next row:
ch 7, sc into next ch-7 space
Repeat.
For a wider section, increase some loops to:
ch 8 or ch 9
toward the middle.
DENSE GOLDEN SECTION
Near the transition between the mesh and the blue circles:
Work groups of:
3 dc into one chain space
Then:
ch 1.
Repeat across.
On the following row:
Work 1 dc in each dc with small increases as required.
This creates the solid golden section beside the open mesh.
GOLDEN SCALLOPED BORDER
For the decorative outer edge:
Work:
sc in next space, ch 3, 2 dc in same space, ch 3, sc in same space
Repeat around the outer golden edge.
For smaller picots you may use:
sc, ch 3, sl st into first ch
between sections.
Fasten off.
PART 3 – LARGE LAYERED FLOWER
Make approximately 3 large flowers for a runner of the size shown.
The flower contains:
- White center
- Golden inner petals
- White middle petals
- Golden outer petals
Flower Center
Using pale yellow or white yarn:
MR.
Work 10 sc into MR.
Join.
Small White Petals
Change to white.
In each stitch work:
sl st, ch 2, 2 hdc, ch 2, sl st
Repeat around.
Fasten off.
Golden Middle Petals
Join golden yarn behind the first petal layer.
Work around the back loops:
ch 4, sl st behind next petal
Repeat around to create foundation loops.
Into each loop work:
sc, hdc, 3 dc, hdc, sc
Repeat around.
White Petal Layer
Join white yarn behind the golden petals.
Create larger loops:
ch 5, sl st behind next petal
Into every loop:
sc, hdc, 4 dc, hdc, sc
Repeat around.
Golden Outer Petal Layer
Using golden yarn:
Create ch-6 loops behind the previous petals.
Into each loop work:
sc, hdc, dc, 3 tr, dc, hdc, sc
Repeat around.
Fasten off.
PART 4 – BLUE POINTED PETALS
The large flowers in the design are surrounded by dark blue pointed leaf-like petals.
Make approximately 5–6 blue petals per large flower.
Blue Petal
Ch 10.
Starting in second ch from hook:
- sl st
- sc
- hdc
- dc
- 2 tr
- dc
- hdc
- sc
Work 3 sc into final chain.
Continue along opposite side:
- sc
- hdc
- dc
- 2 tr
- dc
- hdc
- sc