
Title
Olive Green Floral Lace Crochet Table Runner – Full Pattern
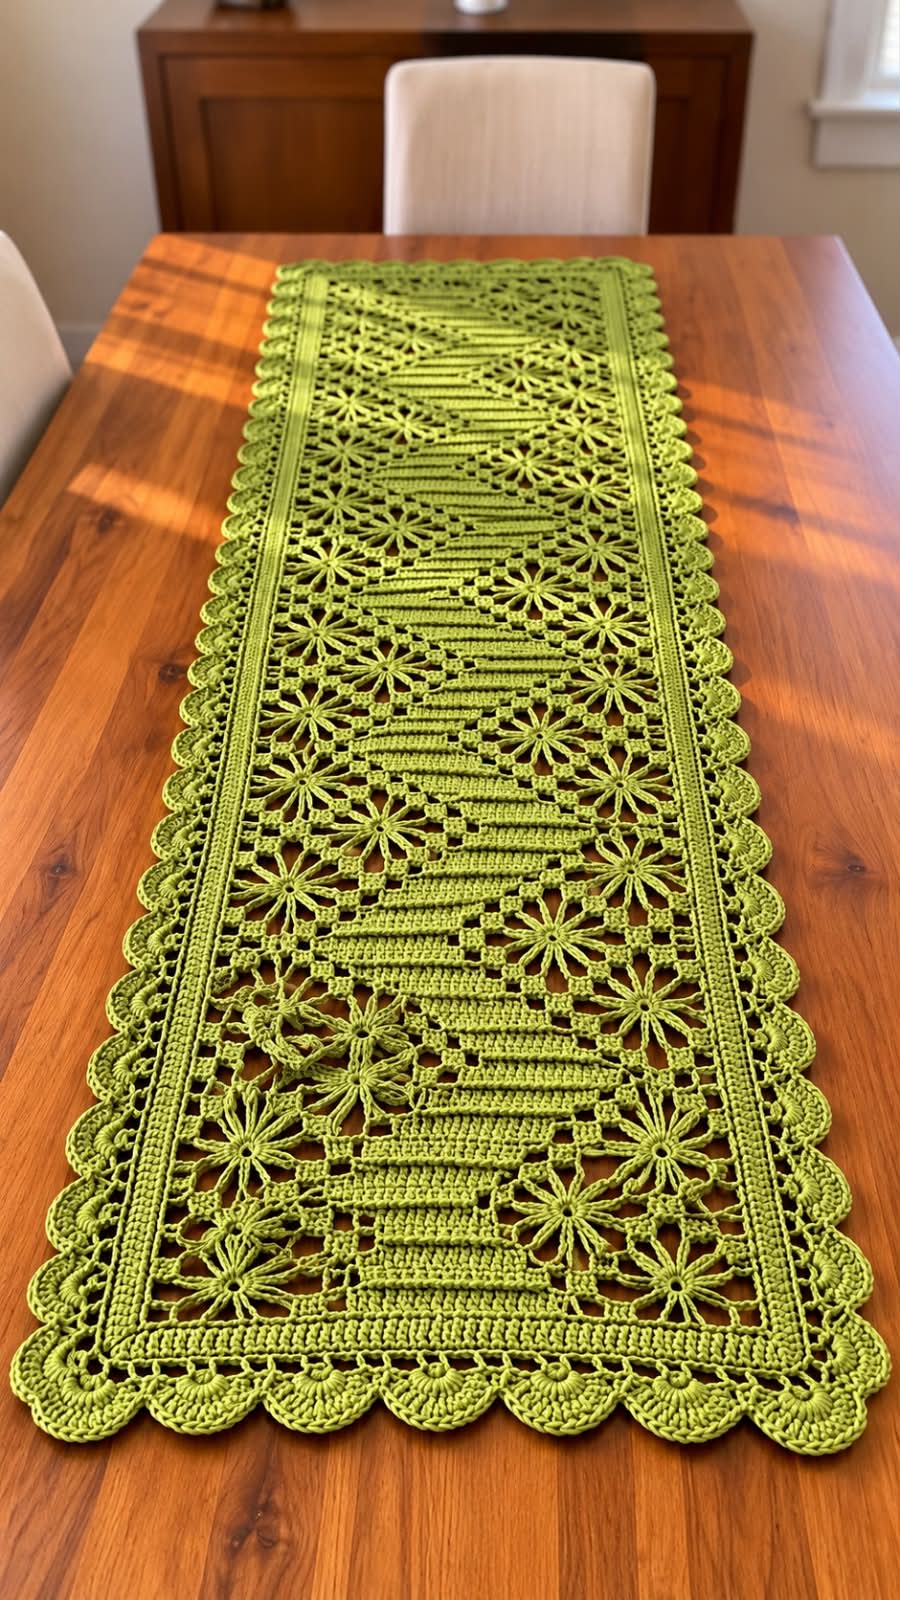
This elegant crochet table runner combines open floral lace motifs with textured horizontal bands, airy mesh sections, and a wide scalloped border.
The repeated flowers create a soft botanical appearance while the structured center keeps the runner balanced and elegant.
Materials
- Fine cotton or cotton-blend crochet yarn
- Olive green, moss green, or sage green
- Crochet hook: 2.0 mm to 3.0 mm
- Yarn needle
- Scissors
- Stitch markers
- Blocking mat
- Blocking pins
Skill Level
Intermediate to Advanced
Crochet Abbreviations
- CH – Chain
- SC – Single Crochet
- HDC – Half Double Crochet
- DC – Double Crochet
- TR – Treble Crochet
- SL ST – Slip Stitch
- ST – Stitch
- SP – Space
- SK – Skip
- REP – Repeat
- PICOT – CH 3, SL ST into first CH
Approximate Finished Size
Width:
38–45 cm / 15–18 in
Length:
120–160 cm / 47–63 in
The runner can be made longer by adding additional floral repeats.
Method
The runner is constructed as one long rectangular lace panel.
The design includes:
- Central textured horizontal bands
- Open chain mesh
- Large flower motifs
- Narrow inner frame
- Wide scalloped outer border
The floral motifs are integrated directly into the openwork structure.
Formation
Part 1 – Foundation
CH 121.
For a wider runner, add chains in complete pattern repeats.
Row 1
DC in the 5th CH from hook.
CH 2.
SK 2 CH.
DC in next CH.
Repeat:
CH 2, SK 2 CH, DC in next CH
across.
Turn.
Row 2
CH 5.
DC in next DC.
Repeat:
CH 2, DC in next DC
across.
Turn.
This creates the basic filet mesh.
Part 2 – Textured Horizontal Bars
Row 3
CH 3.
Work DC across the first solid section.
CH 3.
SK the next mesh space.
Work DC across the next section.
Repeat across.
Turn.
Row 4
CH 3.
Work DC over every solid section.
Above each open section work:
CH 3
Repeat across.
Turn.
Row 5
Repeat Row 4.
These rows create the long solid bands visible through the center.
Part 3 – Floral Motif
The flowers are positioned on both sides of the textured bands.
Flower Center
Make a magic ring.
CH 1.
Work 8 SC into the ring.
Join with SL ST.
Petal Formation
Repeat around:
CH 6
Into the chain work:
- SC
- HDC
- 2 DC
- HDC
- SC
SL ST into next center stitch.
Repeat to create approximately:
8 petals
Fasten off if making separately.
Integrated Flower Option
Instead of making the flower separately, attach directly into the mesh.
Work the flower center into one selected mesh opening.
Create petals using long chain loops.
Join each petal back to the surrounding mesh.
This creates the seamless open floral effect visible in the runner.
Part 4 – Connecting the Flowers
Between flowers work:
CH 5, SC into next motif
or
CH 4, DC into next mesh section
Repeat to create the open geometric connections.
Part 5 – Main Pattern Repeat
Repeat the following sequence:
- Textured horizontal band
- Open mesh row
- Floral motif row
- Open mesh row
- Textured horizontal band
Continue until the runner reaches the desired length.
For a medium runner, work approximately:
8–10 floral sections
For a long runner:
12–14 floral sections
Part 6 – Side Flower Placement
Place flowers alternately along the left and right sides.
Suggested arrangement:
Left flower – Right flower – Left flower – Right flower
Some rows may contain two flowers facing each other.
This creates the balanced floral layout seen in the reference.
Part 7 – Inner Frame
Once the main body is finished, work around the complete rectangle.
Frame Round 1
Attach yarn at one corner.
CH 1.
SC evenly around.
At each corner work:
3 SC
Join.
Frame Round 2
CH 3.
DC in every stitch.
At each corner work:
2 DC, CH 2, 2 DC
Join.
Frame Round 3
CH 1.
SC in every stitch.
At corners:
SC, CH 2, SC
Join.
Part 8 – Border Foundation
CH 5.
SK 2 stitches.
SC in next stitch.
Repeat:
CH 5, SK 2 ST, SC in next ST
around.
At the corners work:
CH 7
Part 9 – Large Scalloped Border
Into each CH-5 loop work:
SC, HDC, 4 DC, HDC, SC
Repeat around.
Part 10 – Fan Border
CH 6.
SC into the center of the next scallop.
Repeat around.
Then into each CH-6 loop work:
SC, HDC, 2 DC, 3 TR, 2 DC, HDC, SC
This creates the large rounded fan edge.
Part 11 – Final Decorative Edge
Work SC around the outer edge.
At the center of every fan work:
SC, PICOT, SC
Repeat around.
Fasten off.
Corner Fans
At every corner use a slightly larger fan:
SC, HDC, 3 DC, 4 TR, CH 2, 4 TR, 3 DC, HDC, SC
This helps the border lie flat.
Length Adjustment
For a short runner:
6–7 floral repeats
For a medium runner:
8–10 repeats
For a long runner:
11–14 repeats
For an extra-long runner:
15+ repeats
Width Adjustment
To make the runner wider:
- Add more center mesh columns
- Increase the distance between flower sections
- Add another border round
To make it narrower:
- Remove outer mesh columns
- Use finer yarn
- Use a smaller hook
Blocking
Blocking is essential for this lace pattern.
Lightly wet the completed runner.
Lay flat on a blocking mat.
Pin:
- All four corners
- Every flower
- Outer fan points
- Long edges
Make sure:
- The center remains straight
- Flowers are evenly opened
- Mesh spaces are symmetrical
- Border scallops lie flat
Allow to dry completely.
Finishing
Weave in all loose yarn ends.
Trim excess fibers.
Shape each flower by hand.
Straighten the border.
Make sure the runner lies completely flat.
Conclusion
This olive green floral lace crochet table runner combines botanical flower motifs, textured geometric bands, open mesh, and a wide decorative border.
The repeated construction makes it easy to customize the finished length.
The same design can also be adapted for:
- Coffee tables
- Console tables
- Sideboards
- Dresser scarves
- Decorative wall panels
- Handmade gifts
For the cleanest result, maintain even tension throughout and block the finished runner carefully so the flowers and scalloped edge remain open and symmetrical.