
Title
Pink Daisy Square Crochet Blanket
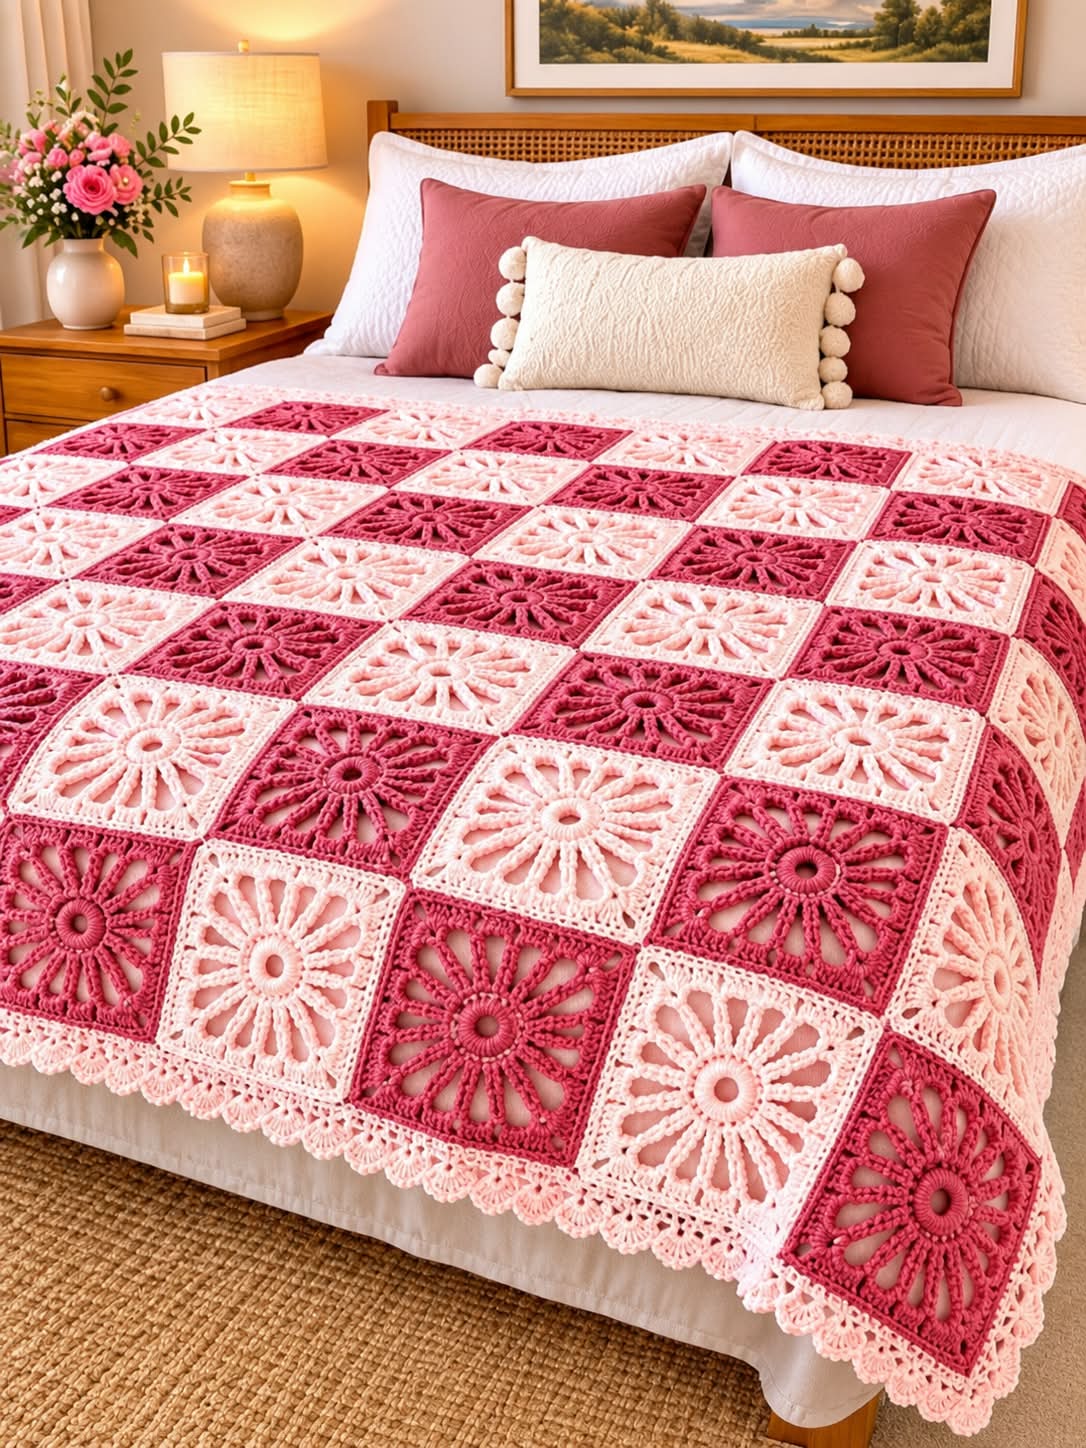
A beautiful crochet bedspread made from alternating deep rose pink and soft blush pink square motifs. Each square features an open floral sunburst design with elongated petals, creating a light and elegant lace effect. The blanket is finished with a delicate scalloped border.
MATERIALS
Yarn
Use soft cotton, cotton blend, or acrylic yarn in:
- Deep rose pink
- Light blush pink
- Optional white or cream for variation
Recommended yarn weight:
DK / Light Worsted Weight
Crochet Hook
Use approximately:
3.5 mm – 4.5 mm
Choose the hook size that gives you a flat and relaxed motif.
Additional Materials
- Yarn needle
- Scissors
- Stitch markers
- Blocking mat
- Blocking pins
- Measuring tape
ABBREVIATIONS
- MR – Magic Ring
- ch – Chain
- sl st – Slip Stitch
- sc – Single Crochet
- hdc – Half Double Crochet
- dc – Double Crochet
- tr – Treble Crochet
- sp – Space
- st – Stitch
- sts – Stitches
- rep – Repeat
- rnd – Round
METHOD
The blanket is created using separate square motifs.
Each motif contains:
- Circular center
- Long floral petals
- Open spaces between petals
- Square-shaped outer rounds
- Final joining round
Make the same motif in both colors and arrange them in a checkerboard pattern.
PART 1 – CENTER RING
Using your chosen color:
Make an MR.
Round 1
Ch 3.
Work:
15 dc into the magic ring.
Pull the ring closed.
Join with sl st to top of beginning ch-3.
You should have approximately:
16 dc
PART 2 – CENTER TEXTURE
Round 2
Ch 1.
Work 1 sc in each stitch around.
Join with sl st.
Round 3
Ch 3.
Work:
1 dc in each stitch around.
Join.
The center should remain circular and flat.
PART 3 – FORMING THE LONG PETALS
The characteristic feature of this blanket is the ring of long open petals.
Each petal is formed using chains and tall stitches.
Round 4
Ch 1.
Sc in first stitch.
Then:
ch 10
Skip 1–2 stitches.
Sc into next selected stitch.
Repeat around.
Aim for approximately:
12–16 chain loops
depending on the size of your center.
Join with sl st.
PART 4 – THICKENING THE PETALS
Round 5
Work around each chain loop.
Into each ch-10 loop work:
- 5 sc down one side
- 3 sc around the top
- 5 sc down the opposite side
Sl st at the base.
This creates a long rounded petal.
Repeat for every chain loop.
ALTERNATIVE PETAL METHOD
For thicker petals similar to the photo:
Into each chain loop work:
sc, hdc, 8 dc, hdc, sc
Repeat around.
Keep the petals elongated rather than round.
PART 5 – OPEN LACE BETWEEN PETALS
After completing all petals, join the spaces between them.
Round 6
Attach yarn between two petals.
Work:
ch 3, sc into tip or side of next petal
Repeat around.
This creates small open spaces between each floral section.
PART 6 – BEGIN SQUARING THE MOTIF
The circular flower must now be transformed into a square.
Divide the motif into four equal sections.
Mark four corner positions.
Round 7
Beginning at one corner:
Ch 3.
Work:
2 dc, ch 2, 3 dc
in the same corner space.
This forms one corner.
Across the side:
Work groups of:
3 dc
into suitable spaces between petals.
Between groups:
ch 1.
At the next corner work:
3 dc, ch 2, 3 dc
Repeat around all four sides.
Join.
PART 7 – SECOND SQUARE ROUND
Round 8
Sl st into first corner.
Ch 3.
Work:
2 dc, ch 2, 3 dc
into the corner.
Across each side:
Work:
3 dc into each ch-1 space.
Ch 1 between groups if required.
In every corner:
3 dc, ch 2, 3 dc
Repeat around.
Join.
PART 8 – SOLID OUTER FRAME
The photograph shows a relatively firm square frame around each flower.
Round 9
Ch 1.
Work:
1 sc in each stitch across.
At every corner work:
sc, ch 2, sc
Continue around.
Join.
Round 10
Ch 3.
Work 1 dc in each stitch.
At each corner space work:
2 dc, ch 2, 2 dc
Repeat around.
Join.
PART 9 – FINAL MOTIF ROUND
Work one final round of sc.
Work:
1 sc in each stitch.
In every corner:
2 sc, ch 2, 2 sc
Fasten off.
Weave in ends.
MOTIF SIZE
Depending on yarn and hook size, each square may measure approximately:
15–20 cm / 6–8 inches
Block all motifs to exactly the same dimensions before assembly.
COLOR FORMATION
The blanket uses an alternating checkerboard arrangement.
For example:
Row 1
Deep Pink
Light Pink
Deep Pink
Light Pink
Deep Pink
Row 2
Light Pink
Deep Pink
Light Pink
Deep Pink
Light Pink
Continue alternating colors for every row.
BLANKET FORMATION
For a medium throw:
Make approximately:
7 squares wide × 9 squares long
Total:
63 squares
For a larger bedspread:
Use approximately:
8 × 10 squares
Total:
80 squares
For a queen-size blanket:
You may need approximately:
9 × 11 squares
Total:
99 squares
The exact number depends on motif size.
JOINING METHOD
There are several ways to join the squares.
The cleanest method for this design is a flat crochet join.
OPTION 1 – SLIP STITCH JOIN
Place two squares with right sides facing each other.
Using matching yarn:
Insert hook through corresponding stitches of both squares.
Work slip stitches across the entire side.
Repeat until all squares are connected.
OPTION 2 – SINGLE CROCHET JOIN
Hold two motifs together.
Work:
1 sc through both layers in each corresponding stitch.
Continue across.
This produces a more visible raised seam.
OPTION 3 – INVISIBLE SEAM
Using a yarn needle:
Sew through corresponding edge stitches using mattress stitch.
Pull gently.
This creates a nearly invisible join.
RECOMMENDED ASSEMBLY
First join individual squares into horizontal rows.
Then join all completed rows together.
Check frequently that:
- Corners remain aligned
- Squares stay flat
- Seams are not too tight
- Blanket does not ripple
OUTER BORDER
Once all squares have been joined, add the decorative border.
Use light pink for a soft finish similar to the reference.
BORDER ROUND 1
Attach yarn in any corner.
Ch 1.
Work sc evenly around the entire blanket.
At each corner work:
3 sc
Join with sl st.
BORDER ROUND 2
Ch 3.
Work 1 dc in every stitch around.
In each corner:
2 dc, ch 2, 2 dc
Join.
BORDER ROUND 3 – OPEN LACE
Ch 4.
Skip 1 stitch.
Sc into next stitch.
Repeat:
ch 4, skip 1 st, sc in next st
around.
At corners, use slightly larger loops if necessary.
BORDER ROUND 4 – SCALLOPS
Into each ch-4 loop work:
sc, hdc, 3 dc, hdc, sc
Repeat around the entire blanket.
This creates the soft scalloped edge visible in the image.
OPTIONAL LARGER FAN BORDER
For a fuller lace border:
Into one chain space work:
sc, hdc, 5 dc, hdc, sc
Skip to next space.
Repeat around.
At corners, increase the fan slightly:
sc, hdc, 7 dc, hdc, sc
This helps the border turn smoothly.
FINISHING
Weave in all remaining ends.
Wash the blanket gently according to yarn instructions.
Lay it flat on a blocking surface.
Stretch each square gently so that:
- Floral centers remain circular
- Petals are evenly spaced
- Corners form clear 90-degree angles
- Joining seams stay straight
Pin in place.
Allow the blanket to dry completely.
FORMATION SUMMARY
The construction sequence is:
Center Ring
↓
Circular Floral Center
↓
Long Open Petals
↓
Lace Connections
↓
Square Frame
↓
Final Square Round
↓
Alternating Pink Arrangement
↓
Joining
↓
Scalloped Border
SIZE ADJUSTMENT
To make the blanket wider:
Add more squares to each row.
To make it longer:
Add additional motif rows.
Because the blanket is modular, you can easily create:
- Baby blanket
- Sofa throw
- Single-bed blanket
- Double-bed blanket
- Queen-size bedspread
- King-size bedspread
without changing the individual motif pattern.
CONCLUSION
The Pink Daisy Square Crochet Blanket is created from repeating open-flower squares arranged in a beautiful two-tone checkerboard design.
The long floral petals create the distinctive lace appearance, while the square outer rounds make the motifs easy to join.
For the best finished result:
- Keep every motif the same size
- Maintain even tension
- Block every square before joining
- Alternate the two colors consistently
- Avoid making joining stitches too tight
- Block the full blanket once more after assembly
The final scalloped border gives the blanket a soft, elegant, handmade finish suitable for bedroom décor, gifts, or decorative crochet projects.