
Title
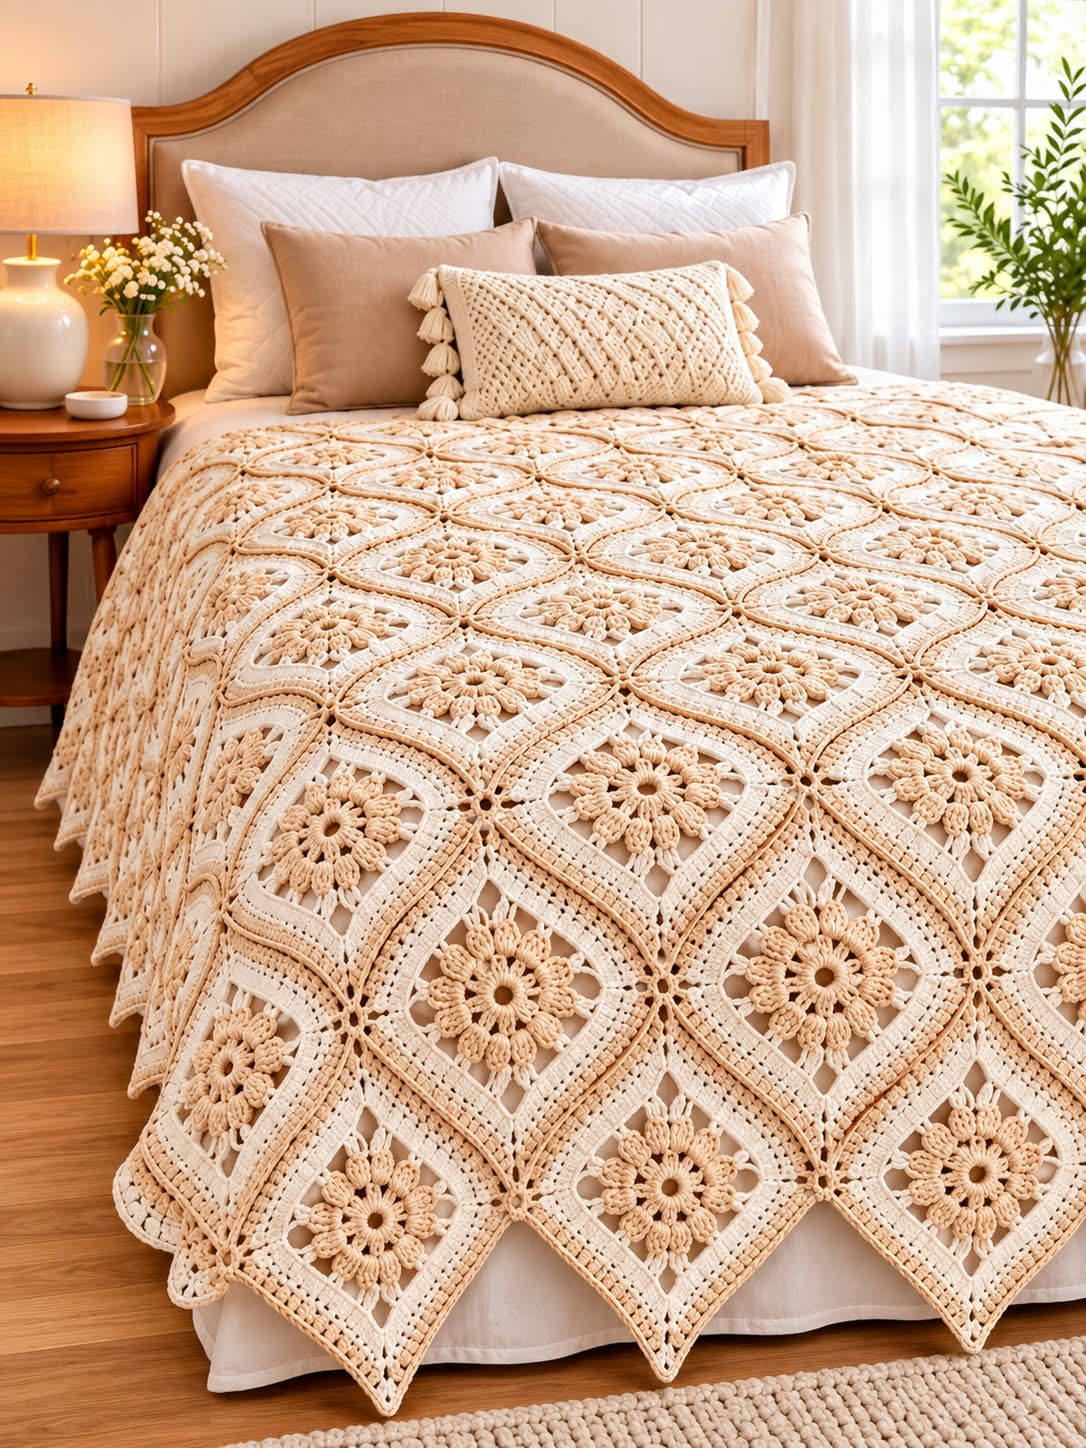
Elegant Cream & Beige Floral Diamond Crochet Bedspread
This luxurious crochet bedspread is made from repeating floral diamond motifs in soft cream and warm beige tones. Each motif features a raised flower in the center, open lace sections, layered geometric borders, and pointed corners that create the elegant diamond effect visible in the finished blanket.
This pattern is recreated from the finished design in the reference image, so small stitch-count adjustments may be needed depending on yarn weight, hook size, and personal tension.
MATERIALS
Yarn
Use two coordinating colors:
- Cream / Ivory
- Warm Beige / Light Caramel
Recommended yarn:
- Cotton
- Cotton blend
- Soft acrylic
- DK or light worsted weight
For a large bedspread, approximately:
- 2,500–4,000 g total yarn
The exact quantity depends on finished size and yarn thickness.
CROCHET HOOK
Recommended:
3.5 mm – 4.5 mm
Choose a hook that gives a soft but structured fabric.
ADDITIONAL MATERIALS
- Yarn needle
- Scissors
- Stitch markers
- Measuring tape
- Blocking mat
- Blocking pins
ABBREVIATIONS
- MR – Magic Ring
- ch – Chain
- sl st – Slip Stitch
- sc – Single Crochet
- hdc – Half Double Crochet
- dc – Double Crochet
- tr – Treble Crochet
- dtr – Double Treble Crochet
- sp – Space
- st – Stitch
- sts – Stitches
- rep – Repeat
- rnd – Round
- BLO – Back Loop Only
METHOD
Each diamond motif is worked from the center outward.
The basic construction is:
- Central ring
- Raised floral petals
- Open lace spaces
- Inner square
- Elongated diamond shaping
- Decorative cream border
- Beige accent round
- Final joining edge
The motifs are joined corner-to-corner and side-to-side to form the complete bedspread.
PART 1 – CENTER RING
Using beige yarn:
Make a magic ring.
Round 1
Ch 3.
Work 15 dc into MR.
Pull ring closed.
Join with sl st.
You should have:
16 dc
PART 2 – INNER FLOWER FOUNDATION
Round 2
Ch 1.
Work:
1 sc in each stitch around.
Join.
Round 3
Ch 3.
Work:
1 dc in each stitch around.
Join.
This creates the firm center of the flower.
PART 3 – RAISED FLOWER PETALS
The flower in the image has approximately 12–16 decorative petals.
Round 4
Repeat around:
ch 7, skip 1 st, sl st into next st
This creates petal loops.
Join.
PART 4 – FIRST PETAL LAYER
Into each ch-7 loop work:
- 1 sc
- 1 hdc
- 4 dc
- 1 hdc
- 1 sc
Repeat in every loop.
Join.
Fasten off beige yarn.
PART 5 – SECOND RAISED PETAL EFFECT
Attach beige yarn behind the first petal layer.
Work behind each petal:
ch 5, sl st behind next petal
Repeat around.
Into each loop work:
- sc
- hdc
- 3 dc
- hdc
- sc
Repeat around.
This adds the fuller flower texture visible in the design.
PART 6 – OPEN LACE AROUND FLOWER
Change to cream yarn.
Attach yarn between two petals.
Round 6
Repeat around:
ch 5, sc between next two petals
Join.
Round 7
Into each ch-5 space work:
sc, ch 4, sc
Repeat around.
This produces the open lace structure surrounding the central flower.
PART 7 – BEGIN SQUARING THE MOTIF
Mark four equally spaced points around the flower.
These will become the main corners.
Round 8
At each marked corner space work:
3 dc, ch 3, 3 dc
Across each side:
Work:
ch 2, 3 dc into next available space
Repeat as needed.
At every corner:
3 dc, ch 3, 3 dc
Join.
PART 8 – OPEN CORNER LACE
Round 9
Sl st to corner.
Work:
3 dc, ch 3, 3 dc
in corner.
Along each side:
ch 3, sc into next space
Repeat.
At next corner:
3 dc, ch 3, 3 dc
Continue around.
PART 9 – FORMING THE DIAMOND SHAPE
To create the elongated pointed appearance, the corner sections must grow more than the side sections.
Round 10
At each corner:
3 dc, ch 3, 3 dc
Across each side:
Work evenly spaced dc groups.
Near the center of each side, reduce the amount of expansion.
At the four corners, continue increasing.
This causes the motif to become more pointed.
PART 10 – CREAM DENSE BORDER
Using cream yarn:
Round 11
Work 1 dc in each stitch across.
At each corner space:
2 dc, ch 2, 2 dc
Repeat around.
Join.
Round 12
Work:
1 sc in each stitch.
In each corner:
sc, ch 2, sc
Join.
PART 11 – BEIGE ACCENT ROUND
Change to beige yarn.
Round 13
Work:
1 hdc in each stitch around.
In each corner:
2 hdc, ch 2, 2 hdc
Join.
This creates the visible beige line around the cream section.
PART 12 – SECOND CREAM BORDER
Change back to cream.
Round 14
Ch 3.
Work:
1 dc in each stitch.
At corners:
2 dc, ch 3, 2 dc
Join.
Round 15 – Openwork Round
Repeat:
dc in next st, ch 1, skip 1 st
around.
At each corner:
2 dc, ch 3, 2 dc
Join.
PART 13 – TEXTURED BORDER
To create the slightly raised decorative lines visible in the image:
Round 16
Work alternating:
- Front post dc
- Regular dc
around the motif.
Or, for a simpler version:
Work 1 dc BLO in every stitch.
At each corner:
2 dc, ch 2, 2 dc
Join.
PART 14 – FINAL BEIGE OUTLINE
Change to beige.
Work:
1 sc in every stitch around.
At each corner:
2 sc, ch 2, 2 sc
Join.
Fasten off.
MOTIF FORMATION
Once blocked, each motif should resemble a large diamond with:
- Beige flower center
- Open cream lace
- Cream structural borders
- Thin beige accent lines
- Four elongated corners
APPROXIMATE MOTIF SIZE
Using DK yarn and a 4 mm hook:
Each motif may measure approximately:
22–30 cm / 9–12 inches
from point to point.
COLOR FORMATION
For the closest appearance to the image:
Flower
Warm beige
Inner Lace
Cream
Main Diamond Border
Cream
Accent Lines
Warm beige
Final Edge
Cream with beige trim
Keep the same color arrangement for every motif for a clean and elegant overall look.
BLANKET FORMATION
Arrange the motifs diagonally.
Each diamond should touch the neighboring motifs along its sides and corners.
Example:
◇ ◇ ◇ ◇
◇ ◇ ◇ ◇
◇ ◇ ◇ ◇
Because the motifs are pointed, the finished outer edge naturally forms elegant triangular points.
NUMBER OF MOTIFS
The number depends on the final bed size.
Throw Size
Approximately:
5 × 6 motifs
30 motifs
Double Bed
Approximately:
7 × 8 motifs
56 motifs
Queen Bed
Approximately:
8 × 9 motifs
72 motifs
King Bed
Approximately:
9 × 10 motifs
90 motifs
Adjust according to your motif size.
JOINING METHOD
Option 1 – Slip Stitch Join
Place two motifs with right sides facing.
Insert the hook through corresponding stitches.
Work slip stitches along the matching sides.
This gives a strong seam.
Option 2 – Invisible Needle Join
Using matching cream yarn:
Sew corresponding edge stitches together with mattress stitch.
Pull gently.
This creates a cleaner, flatter join.
Option 3 – Join As You Go
During the final round of each new motif, replace selected chains with slip stitches into the neighboring motif.
This method is especially useful for this design because it keeps the lace appearance continuous.
RECOMMENDED JOINING FORMATION
First create horizontal rows.
Then join the rows together.
Make sure:
- All flower centers face the same direction
- Corners remain aligned
- Motifs remain flat
- Seams are not too tight
OUTER BORDER
The reference image has a subtle decorative pointed edge formed mainly by the diamond motifs themselves.
You can leave the edge as it is or add a simple border.
BORDER ROUND 1
Attach cream yarn.
Work sc evenly around the entire blanket.
At outer points:
3 sc
At inward valleys:
Work fewer stitches to prevent rippling.
BORDER ROUND 2
Work:
1 dc in each stitch.
At each outer point:
3 dc, ch 2, 3 dc
BORDER ROUND 3 – BEIGE ACCENT
Change to beige.
Work:
1 sc in each stitch.
At the tip of each point:
sc, ch 3, sc
Continue around.
OPTIONAL SCALLOPED EDGE
For a softer decorative finish:
Repeat:
skip 2 sts, 5 dc in next st, skip 2 sts, sc in next st
around.
At the motif points, work a slightly larger fan:
7 dc in the point
FINISHING
Weave in all yarn ends securely.
Block each motif before joining whenever possible.
After joining, block the entire blanket again.
Stretch gently so that:
- Diamond points are sharp
- Flower centers remain round
- Lace spaces are open
- Motifs lie flat
- Joining seams remain straight
Allow to dry completely.
FORMATION SUMMARY
The construction order is:
Magic Ring
↓
Raised Beige Flower
↓
Cream Open Lace
↓
Square Foundation
↓
Diamond Shaping
↓
Cream Structural Rounds
↓
Beige Accent Round
↓
Final Cream Border
↓
Join Motifs
↓
Finish Outer Edge
SIZE ADJUSTMENT
To make the bedspread larger:
Add more motifs to the width and length.
To make it smaller:
Remove complete motif rows.
Because the design is modular, it can easily be adapted into:
- Baby blanket
- Sofa throw
- Single-bed blanket
- Double-bed bedspread
- Queen-size bedspread
- King-size bedspread
CONCLUSION
The Elegant Cream & Beige Floral Diamond Crochet Bedspread combines raised floral motifs, open lacework, geometric shaping, and soft neutral colors to create a sophisticated handmade blanket.
The most important parts of the design are:
- Keeping the flower centers consistent
- Increasing carefully at all four corners
- Maintaining equal motif dimensions
- Blocking each diamond before assembly
- Keeping joining stitches loose enough for the blanket to drape naturally
Once all motifs are joined, the repeating floral diamonds create the luxurious continuous pattern seen across the entire bedspread.