
Title
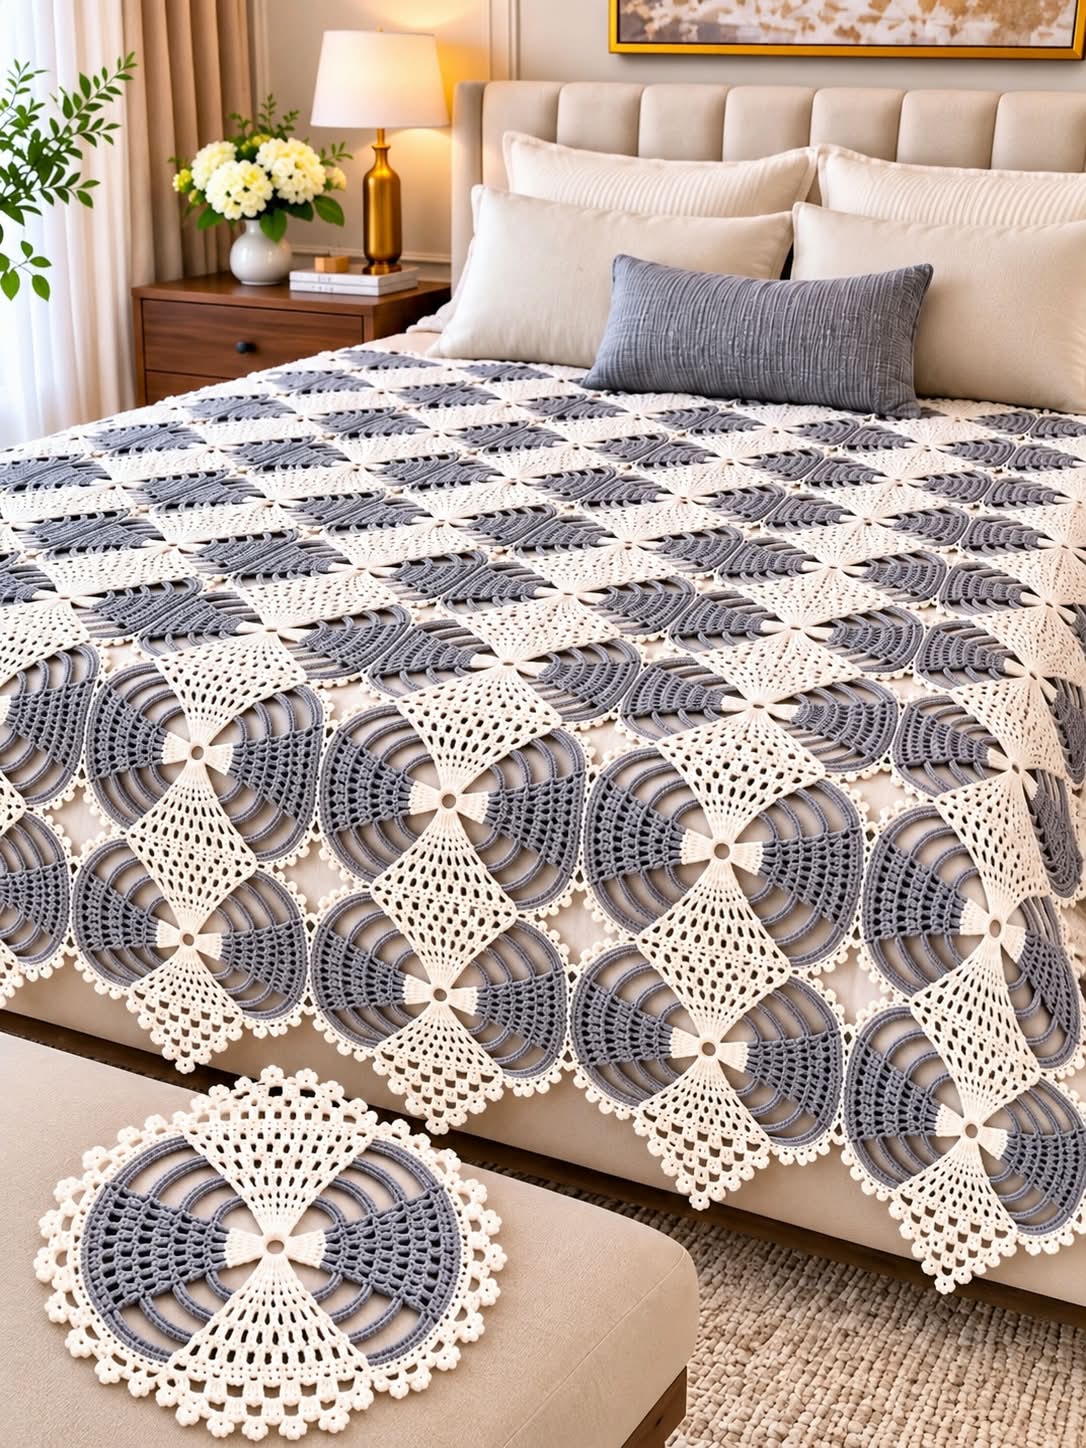
Gray & Ivory Circular Fan Crochet Bedspread
This elegant crochet bedspread is made from repeating circular fan motifs in soft gray and ivory white. Each motif features a small central ring, four large fan-shaped sections, open lace arches, circular bands, and a delicate scalloped outer border.
When the motifs are joined together, they create a sophisticated repeating geometric pattern across the bed.
This pattern is recreated from the visible design in the reference image, so small stitch-count adjustments may be needed depending on yarn weight, hook size, and tension.
MATERIALS
Yarn Colors
Use two contrasting colors:
- Soft medium gray
- Ivory / cream white
Recommended yarn:
- DK cotton
- Cotton blend
- Light worsted acrylic
- Mercerized cotton for sharper stitch definition
For a large bedspread, prepare approximately:
2,500–4,000 g total yarn
depending on final dimensions.
CROCHET HOOK
Recommended:
3.5 mm – 4.5 mm
Use a hook that keeps the lace open while maintaining enough structure in the circular sections.
ADDITIONAL MATERIALS
- Yarn needle
- Scissors
- Stitch markers
- Measuring tape
- Blocking mat
- Blocking pins
ABBREVIATIONS
- MR – Magic Ring
- ch – Chain
- sl st – Slip Stitch
- sc – Single Crochet
- hdc – Half Double Crochet
- dc – Double Crochet
- tr – Treble Crochet
- dtr – Double Treble Crochet
- sp – Space
- st – Stitch
- sts – Stitches
- rep – Repeat
- rnd – Round
METHOD
Each main motif is worked from the center outward.
The construction consists of:
- Small central ring
- Four ivory center wedges
- Four gray fan sections
- Open circular arches
- Gray outer mesh
- Ivory scalloped edging
- Joining points between motifs
The completed motif is circular but joins naturally into a repeating geometric blanket.
PART 1 – CENTRAL RING
Using ivory yarn:
Make a magic ring.
Round 1
Ch 1.
Work:
12 sc into MR.
Pull ring closed.
Join with sl st.
Round 2
Ch 1.
Work:
2 sc in each stitch around.
Join.
You should have:
24 sc
Fasten off.
PART 2 – FOUR IVORY CENTER WEDGES
Divide the center ring into four equal sections.
Mark four points evenly around the ring.
Attach ivory yarn at one marked section.
Row 1
Ch 3.
Work:
4 dc across the selected center section.
Turn.
Row 2
Ch 3.
Work:
2 dc in first stitch.
1 dc in each middle stitch.
2 dc in last stitch.
Turn.
Row 3
Repeat:
2 dc in first st.
1 dc in each stitch across.
2 dc in last st.
Turn.
Row 4
Repeat the increase again.
Fasten off.
Make the same wedge at each of the four marked sections.
You should now have four small ivory fans pointing:
- Up
- Down
- Left
- Right
PART 3 – BEGIN GRAY FAN SECTIONS
Attach gray yarn between two ivory wedges.
Row 1
Ch 4.
Work:
tr stitches evenly across the available space.
Turn.
Row 2
Ch 4.
Increase at both ends:
2 tr in first stitch.
1 tr in each stitch across.
2 tr in last stitch.
Turn.
PART 4 – OPEN GRAY ARCHES
To create the long curved bands visible in the image:
Row 3
Ch 5.
Skip 1 stitch.
Sc in next stitch.
Repeat:
ch 5, skip 1 st, sc in next st
across.
Turn.
Row 4
Work:
ch 6, sc into next ch-5 space
Repeat across.
Turn.
Row 5
Repeat:
ch 7, sc into next chain space
across.
The arches should gradually become larger toward the outside.
PART 5 – CIRCULAR GRAY BANDS
The motif contains several concentric gray arcs.
Work into the chain loops.
Band 1
Into each loop work:
3–5 dc.
Continue evenly across the section.
Band 2
On the next row:
Work:
1 dc in each stitch.
Increase at both outer edges.
Band 3
Work another row of:
dc, ch 1
across.
This produces a decorative open band.
PART 6 – SECOND OPEN ARCH SECTION
Work:
ch 7, sc into next suitable stitch
across.
Next row:
ch 8, sc into next chain loop
Repeat.
The fan should continue widening smoothly.
PART 7 – GRAY OUTER MESH
The wide gray side sections in the reference have a mesh appearance.
Work:
dc, ch 2, skip 2 sts, dc
across.
Next row:
Work:
dc into previous dc, ch 2
Repeat.
Continue for approximately 3–5 rows.
Increase slightly at both outer edges of each row.
PART 8 – FORMING THE FOUR-FAN MOTIF
Repeat the gray fan section between every pair of ivory wedges.
You should have:
- 4 ivory central wedges
- 4 gray fan sections
Together they form one complete circular motif.
PART 9 – IVORY OUTER FOUNDATION
Attach ivory yarn around the outside of the complete motif.
Work one round of sc evenly around.
At four joining points, work:
sc, ch 2, sc
This creates clear attachment points.
PART 10 – IVORY SCALLOPED BORDER
The outer edge in the reference has small rounded scallops.
Repeat around:
skip 1 st, 5 dc in next st, skip 1 st, sc in next st
For a smaller picot-style edge, use:
sc, ch 3, sl st in first ch
between scallops.
Continue around the entire motif.
Fasten off.
APPROXIMATE MOTIF SIZE
Using DK yarn with a 4 mm hook:
One motif may measure approximately:
25–32 cm / 10–12.5 inches diameter
Block every motif to exactly the same size.
FORMATION OF THE BEDSPREAD
Arrange the circular motifs in straight rows.
Example:
○ ○ ○ ○ ○
○ ○ ○ ○ ○
○ ○ ○ ○ ○
○ ○ ○ ○ ○
The motifs should touch at four main points.
Because each motif has four large fans, the joined blanket creates alternating circular and diamond-shaped negative spaces.
JOINING METHOD
Option 1 – Join As You Go
This is the best method for an open lace design.
While working the final ivory border of a new motif:
At each joining point:
Ch 1.
Sl st into corresponding joining point of neighboring motif.
Ch 1.
Continue working the border.
Repeat wherever motifs touch.
Option 2 – Needle Join
Complete all motifs first.
Using ivory yarn and a yarn needle:
Sew together corresponding scallops or joining points.
Use small hidden stitches.
Do not pull too tightly.
Option 3 – Slip Stitch Join
Place motifs edge to edge.
Using ivory yarn:
Slip stitch through corresponding border stitches.
This creates a stronger connection.
CENTER CONNECTION BETWEEN FOUR MOTIFS
Where four motifs meet, use a small joining ring.
Make:
MR.
Work 8 sc into ring.
Join.
Fasten off.
Sew or crochet this small ring to all four motif corners.
This keeps the junction open and decorative.
WHITE CONNECTING DIAMONDS
The image also shows narrow ivory lace shapes between some gray circular motifs.
These can be added as connecting panels.
Row 1
Using ivory yarn:
Ch 5.
Work 3 dc into first chain.
Turn.
Row 2
Ch 3.
2 dc in first stitch.
Dc across.
2 dc in last stitch.
Turn.
Row 3
Repeat increases at both ends.
Continue until the panel reaches its widest point.
OPEN LACE SECTION
Work:
dc, ch 2, skip 1 st
across.
Continue increasing at the edges.
DECREASE SECTION
Once the panel reaches the required width:
Decrease at both edges of each row until one narrow point remains.
Fasten off.
This creates a diamond or bow-like connector.
DECORATIVE LOWER POINTS
At the lower edge of the blanket, some ivory sections extend into fan-shaped points.
To recreate them:
Attach ivory yarn at the lower portion of a motif.
Work:
ch 5, sc into next space
across.
Next row:
ch 6, sc into next loop
Repeat.
Then:
ch 7, sc into next loop
Repeat.
FAN EDGE
Into each final loop work:
sc, hdc, 5 dc, hdc, sc
Repeat.
This creates the rounded lace fans seen along the lower edge.
PICOT FINISH
Around each fan work:
sc, ch 3, sl st into first ch
Repeat every few stitches.
This produces the small decorative bumps around the outer border.
BLANKET SIZE
Approximate motif arrangements:
Small Throw
4 × 5 motifs
20 motifs
Double Bed
6 × 7 motifs
42 motifs
Queen Bed
7 × 8 motifs
56 motifs
King Bed
8 × 9 motifs
72 motifs
The exact number depends on motif size and desired overhang.
COLOR FORMATION
For the closest appearance to the image:
Central Ring
Ivory
Four Center Wedges
Ivory
Main Circular Fans
Gray
Outer Mesh
Gray
Joining Areas
Ivory
Scalloped Border
Ivory
This gives the design its clean and elegant gray-and-cream contrast.
OPTIONAL MATCHING ROUND MAT
The same motif can also be used individually as:
- Table mat
- Placemat
- Decorative doily
- Stool cover
- Cushion centerpiece
Simply complete one full motif and add an extra ivory scalloped round.
FINAL BORDER FOR THE BEDSPREAD
After all motifs have been joined, you may add an additional edge around the complete blanket.
Border Round 1
Using ivory yarn:
Work sc evenly around the outer edge.
Border Round 2
Work:
ch 4, skip 2 sts, sc in next st
Repeat.
Border Round 3
Into each ch-4 space work:
sc, hdc, 4 dc, hdc, sc
Repeat around.
Border Round 4 – Picot Finish
Work:
sc, ch 3, sl st in first ch
every 2–3 stitches.
Continue around.
Fasten off.
FINISHING
Weave in every loose yarn end.
Block each motif individually before joining if possible.
After joining, block the entire bedspread.
Stretch the lace gently so that:
- All circles remain round
- Gray arches are evenly spaced
- Ivory fans remain symmetrical
- Joining points stay flat
- Scallops open clearly
- The blanket does not ripple
Allow to dry completely.
FORMATION SUMMARY
The construction order is:
Magic Ring
↓
Four Ivory Wedges
↓
Four Gray Fan Sections
↓
Open Gray Arches
↓
Gray Mesh
↓
Ivory Outer Round
↓
Scalloped Border
↓
Join Motifs
↓
Add Connecting Lace Sections
↓
Complete Final Border
CONCLUSION
The Gray & Ivory Circular Fan Crochet Bedspread combines circular lace motifs, open arches, fan-shaped sections, contrasting colors, and delicate scalloped edging.
The most important elements are:
- Keeping all four fan sections symmetrical
- Maintaining loose tension in the long chain arches
- Blocking each circular motif carefully
- Joining only at consistent points
- Keeping the ivory and gray sections balanced
Once the motifs are assembled, the repeating circular pattern creates an elegant and highly decorative bedspread with a sophisticated lace appearance.
The same motif can also be used individually for matching mats, table decorations, cushions, or smaller crochet projects.