
Title
Red & Ivory Geometric Crochet Bedspread – Full Pattern
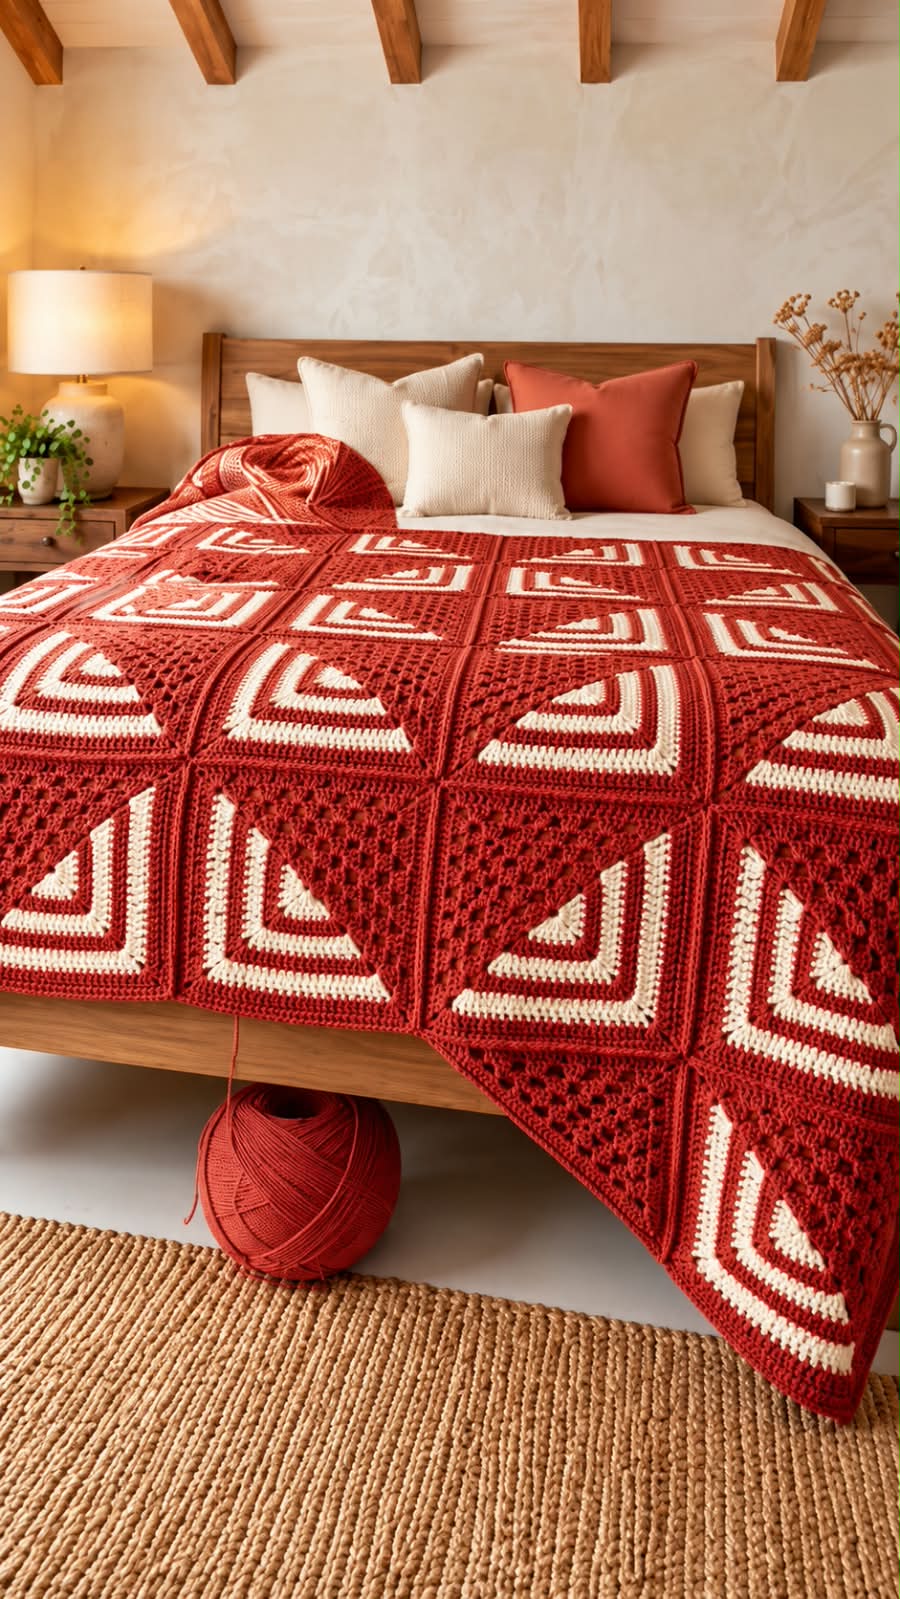
This bold crochet bedspread is made from repeated square motifs in deep red and ivory.
Each square combines:
- A red openwork triangle
- Ivory geometric stripes
- Solid red framing
- A strong diagonal design
The motifs are rotated in different directions before joining, creating a striking patchwork pattern across the entire bedspread.
Materials
- Medium-weight cotton or cotton-blend yarn
- Deep red, brick red, or rust-red yarn
- Ivory or cream yarn
- Crochet hook: 4.0 mm to 5.0 mm
- Yarn needle
- Scissors
- Stitch markers
- Blocking mats
- Blocking pins
Skill Level
Intermediate
Crochet Abbreviations
- CH – Chain
- SC – Single Crochet
- HDC – Half Double Crochet
- DC – Double Crochet
- TR – Treble Crochet
- SL ST – Slip Stitch
- ST – Stitch
- SP – Space
- SK – Skip
- REP – Repeat
Approximate Finished Size
Individual square:
18–20 cm / 7–8 in
Large bedspread:
Approximately:
200 × 220 cm / 79 × 87 in
The size can easily be adjusted by adding or removing motifs.
Method
The bedspread is constructed from individual geometric squares.
Each motif is worked from one corner outward.
Alternating red and ivory rows create the striped corner section.
The opposite half of the square is worked in red openwork lace.
A red border frames every motif.
All motifs are blocked to the same size before joining.
Formation
Part 1 – Starting Corner
Using red yarn:
CH 4.
Join with SL ST to form a small ring.
Row 1
CH 3.
Work:
2 DC, CH 2, 3 DC
into the ring.
Turn.
Row 2
CH 3.
Work 1 DC in each stitch.
In the CH-2 corner space work:
2 DC, CH 2, 2 DC
Work DC across the remaining stitches.
Turn.
Part 2 – Ivory Stripe
Switch to ivory yarn.
Row 3
CH 3.
Work DC across.
In the center corner space:
2 DC, CH 2, 2 DC
Continue DC across.
Turn.
Row 4
Continue with ivory.
Repeat the same increase at the center corner.
Fasten off.
Part 3 – Red Stripe
Join red yarn.
Work two rows in the same way:
- DC across
- Increase in the center corner
- Maintain the triangular shape
Part 4 – Repeating Stripe Pattern
Continue alternating:
2 red rows
then
2 ivory rows
then
2 red rows
Continue until the striped triangle reaches approximately half the final square size.
For the closest appearance, finish the stripe section with red.
Part 5 – Openwork Red Triangle
Keep using red yarn.
Along the remaining half of the square, begin the lace section.
Lace Row 1
CH 3.
Work:
DC, CH 2, SK 2 ST
Repeat across the open section.
At the outer edge, work DC into the last stitch.
Turn.
Lace Row 2
CH 3.
Work 3 DC into the next CH-2 space.
CH 2.
Work 3 DC into the following CH-2 space.
Repeat across.
Turn.
Lace Row 3
CH 5.
SC into the next CH-2 space.
Repeat:
CH 5, SC in next space
across.
Turn.
Lace Row 4
Into each CH-5 space work:
3 DC, CH 2, 3 DC
Repeat across.
Turn.
Part 6 – Completing the Square
Continue expanding both sides until the motif forms a full square.
Use solid red DC rows around the outer edge to straighten the shape.
At each square corner work:
2 DC, CH 2, 2 DC
Part 7 – Red Frame
Once the motif is square:
Frame Round 1
CH 1.
SC evenly around.
At every corner work:
SC, CH 2, SC
Join.
Frame Round 2
CH 3.
DC into every stitch.
At each corner:
2 DC, CH 2, 2 DC
Join.
Frame Round 3
CH 1.
SC in every stitch.
At each corner:
3 SC
Fasten off.
Final Motif Size
Block each square to:
18–20 cm / 7–8 in
Every motif must be the same size.
Motif Arrangement
Rotate the squares before joining.
Suggested pattern:
↗ ↘ ↗ ↘
Next row:
↘ ↗ ↘ ↗
This makes the striped triangles alternate direction and creates a larger geometric pattern.
Suggested Motif Count
Small Throw
7 × 9 squares
Total:
63 motifs
Double Bed
9 × 11 squares
Total:
99 motifs
Queen Bed
10 × 12 squares
Total:
120 motifs
King Bed
12 × 14 squares
Total:
168 motifs
Joining the Squares
Place two motifs right sides together.
Using red yarn:
Work SC through matching stitches of both squares.
Continue across the entire side.
Fasten off.
Join all squares into rows first.
Then join the rows together.
Flat Slip-Stitch Join
For a flatter seam:
Place motifs side by side.
Insert hook through the back loop of each corresponding stitch.
Work SL ST across.
This creates the clean red lines visible between the squares.
Invisible Join Option
Use mattress stitch with a yarn needle.
Sew through corresponding outer loops.
Pull gently after every few stitches.
Outer Border
Attach red yarn to any corner of the completed blanket.
Border Round 1
CH 1.
SC evenly around.
At each corner:
3 SC
Border Round 2
CH 3.
DC in every stitch.
At each corner:
2 DC, CH 2, 2 DC
Border Round 3
Switch to ivory.
SC around.
At corners:
SC, CH 2, SC
Final Red Round
Switch back to red.
Work:
SC in every stitch
At corners:
3 SC
Fasten off.
Optional Decorative Border
For a softer finished edge:
Repeat around:
SC, SK 2 ST, 5 DC in next ST, SK 2 ST
This creates a scalloped border.
Use red for the closest look to the reference.
Matching Pillow Cover
Make four motifs.
Arrange:
2 × 2
Join using red yarn.
Add a narrow red frame.
For the back:
Crochet a simple solid red or ivory rectangle using DC.
Join three sides.
Insert cushion.
Close with:
- Buttons
- Crochet ties
- Zipper
- SC seam
Color Placement
For the closest appearance:
Red
Use for:
- Open lace triangle
- Most geometric stripes
- Outer frame
- Joining seams
- Blanket border
Ivory
Use only for:
- Contrasting diagonal stripes
This keeps red as the dominant color.
Blocking
Block every square before joining.
Lightly wet each motif.
Pin into exact square dimensions.
Make sure:
- All corners are sharp
- Diagonal stripes remain straight
- Openwork sections are evenly spread
- Every motif measures the same
Allow to dry completely.
After assembly, lightly block the complete bedspread again.
Finishing
Weave in all loose yarn ends.
Trim excess fibers.
Check all seams.
Straighten the outer border.
Make sure all rotated motifs follow the planned geometric arrangement.
Conclusion
This red and ivory geometric crochet bedspread combines strong diagonal stripes with open lace sections to create a bold modern patchwork design.
The modular square construction makes the pattern easy to resize for any bed.
The same motif can also be used for:
- Throws
- Cushion covers
- Sofa blankets
- Bed runners
- Baby blankets
- Decorative panels
For the best result, keep every motif the same size and rotate the squares carefully before joining so the geometric design remains balanced.