
Pattern Note
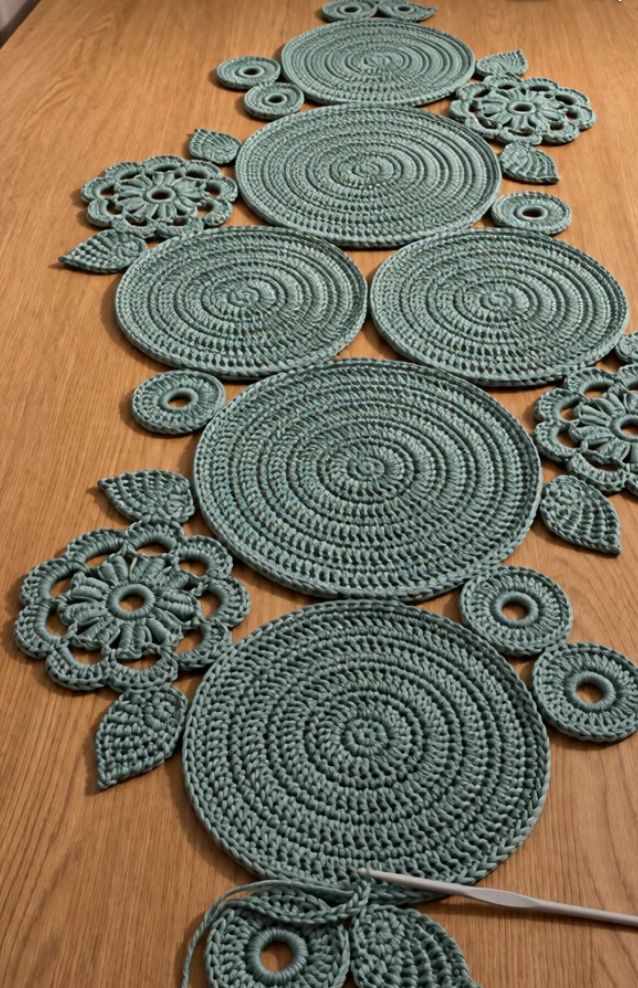
The reference photograph clearly shows a modular table runner assembled from large flat crochet circles, openwork flowers, small ring motifs, and pointed leaves in one sage-green color. Exact stitch counts, yarn, hook size, and hidden joins cannot be determined from a photograph alone. The instructions below are therefore an original reconstruction intended to create a closely related look, not a transcription of an original designer pattern.
Design Overview
The runner is built as separate motifs and joined after blocking. Its main visual line is formed by six large circular motifs. Some circles sit one above another while a central pair is arranged side by side, creating the gently irregular, organic layout visible in the reference. Open flowers, leaves, and small rings fill the spaces along both sides.
Approximate Finished Size
With large circles around 16-19 cm (6 1/4-7 1/2 in) in diameter, the completed runner can measure roughly 95-120 cm (37-47 in) long and 32-42 cm (12 1/2-16 1/2 in) at its widest points. Dimensions are adjustable.
Materials
Firm cotton or cotton-blend yarn in sage green; DK or light worsted works well
Crochet hook approximately 3.0-4.0 mm, adjusted for a firm flat fabric
Yarn needle and scissors
Stitch markers
Blocking mat and rustproof pins
Optional fabric-safe starch or blocking spray
US Crochet Abbreviations
| Abbreviation | Meaning |
| MR | magic ring |
| ch | chain |
| sl st | slip stitch |
| sc | single crochet |
| hdc | half double crochet |
| dc | double crochet |
| tr | treble crochet |
| st(s) | stitch(es) |
| rep | repeat |
Motif A – Large Flat Circle
Make 6. The photograph suggests dense circles with visible concentric rounds. If the circle cups, add increases more frequently; if it ripples, reduce them.
Rnd 1: MR, ch 2, 12 dc into ring. Join with sl st. (12)
Rnd 2: Ch 2, 2 dc in each st around. Join. (24)
Rnd 3: *1 dc in next st, 2 dc in next st; repeat around. (36)
Rnd 4: *dc in next 2 sts, 2 dc in next st; repeat around. (48)
Rnd 5: *dc in next 3 sts, 2 dc in next st; repeat around. (60)
Rnd 6: *dc in next 4 sts, 2 dc in next st; repeat around. (72)
Rnd 7: *dc in next 5 sts, 2 dc in next st; repeat around. (84)
Rnd 8: *dc in next 6 sts, 2 dc in next st; repeat around. (96)
Continue the same increase rhythm if a larger circle is needed.
Final round: sc evenly around for a firm edge; join and fasten off.
Motif B – Open Six-Petal Flower
Make approximately 4-5. These are airy flowers with a ring-shaped center and elongated petals.
Ch 12 and join with sl st to form a center ring. Work 18 sc evenly around; join.
*Ch 9, skip 2 sts, sl st in next st; repeat 6 times to form six petal loops.
Into each ch-9 loop work 1 sc, 2 hdc, 5 dc, 2 hdc, 1 sc. Repeat around.
Work sc around the outer petal edges to strengthen them, adding stitches near tips if necessary. Join and fasten off.
Motif C – Small Ring
Make approximately 7-10. These small open circles act as visual connectors and fillers.
Ch 12-16 and join without twisting.
Work 24-30 sc around the chain ring, packing the stitches closely enough to cover the foundation.
Work one additional sc round; add an occasional increase if the ring needs to lie flatter.
Join, fasten off, and shape into a clean circle.
Motif D – Pointed Leaf
Make approximately 10-14. Leaves are used singly and in pairs.
Ch 10.
Starting in 2nd ch from hook: sl st, sc, hdc, dc, tr, dc, hdc, sc, sl st.
Ch 1 and work down the opposite side: sl st, sc, hdc, dc, tr, dc, hdc, sc, sl st.
Ch 2 at the tip if a sharper point is desired; sl st to finish.
Optional: surface sl st along the center foundation chain to suggest a vein.
Blocking Before Assembly
Block every motif before joining. Pin the large circles perfectly round, open the flower petals, straighten the leaves, and shape the small rings. Let all pieces dry completely.
Suggested Layout Based on the Photograph
Start with one large circle near the top, place a second below it, then arrange two large circles side by side through the middle section. Continue downward with one large circle and finish with a sixth. Distribute open flowers alternately along the left and right sides, tuck pairs of leaves between circles and beside flowers, and use small rings to fill narrow gaps. Keep the arrangement intentionally asymmetric.
Joining the Motifs
Use matching yarn and a yarn needle. Sew through back loops or edge stitches for approximately 2-4 cm where two motifs touch. Secure flowers and leaves at more than one point so they cannot rotate. Small rings may be attached at two opposite points. Check the runner flat after every few joins to prevent sideways pulling.
How to Lengthen or Shorten
To lengthen, add another large circle to either end and surround the transition with a flower, leaves, and rings. To shorten, remove one large circle and nearby fillers. For a narrower runner, arrange all circles in one vertical line.
Finishing
Weave in all ends on the wrong side and give the assembled runner a final light blocking. Cotton may be lightly starched if a crisper decorative finish is desired, but avoid making the motifs rigid.
Adjustment Notes
Because this guide is reconstructed from a photograph, stitch counts are a starting framework. Yarn thickness and tension can change the dimensions. Preserve the key visual features: flat concentric circles, open flowers, small rings, pointed leaves, and an irregular botanical arrangement.
Quick Motif Plan
| Motif | Suggested Quantity | Role |
| Large circles | 6 | Main body |
| Open flowers | 4-5 | Decorative side motifs |
| Small rings | 7-10 | Fillers/connectors |
| Pointed leaves | 10-14 | Organic accents |