
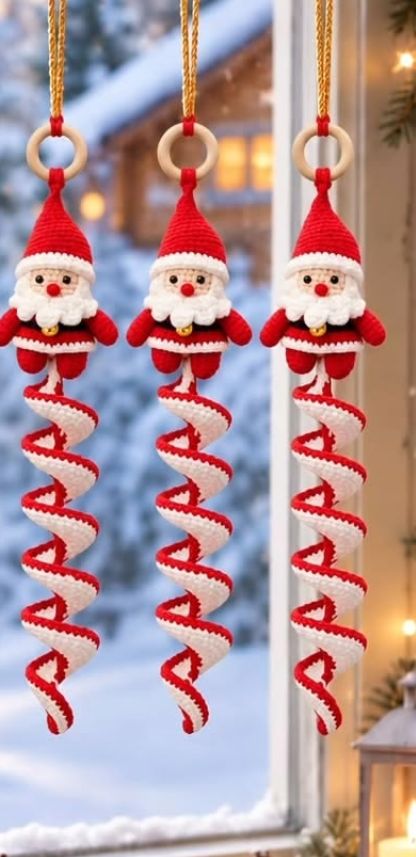
This hanging Santa ornament combines a small amigurumi Santa with a long red-and-white corkscrew spiral that swings below him. A wooden ring and a gold cord finish the top, so it is ready to hang on the tree, a door handle or a window. Make three matching Santas for a festive set.
Pattern details
- Skill level: intermediate
- Finished size: Santa about 9–11 cm tall; spiral about 20–25 cm long; about 30–35 cm in total without the hanging cord
- Yarn: sport or fingering weight cotton yarn
- Hook: 2.0–2.5 mm
- Terminology: US crochet terms
Materials
- Yarn in red, white, skin tone and black, plus a little yellow or gold
- Crochet hook, 2.0–2.5 mm
- Fiberfill stuffing
- Yarn needle, stitch marker and scissors
- Wooden ring, about 3–4 cm in diameter
- Gold cord for hanging, about 25–30 cm
Abbreviations
- MR: magic ring
- ch: chain
- sl st: slip stitch
- sc: single crochet
- hdc: half double crochet
- dc: double crochet
- inc: 2 sc in the same stitch
- dec: single crochet 2 stitches together
- st(s): stitch(es)
- FO: fasten off
Pattern notes
- The Santa pieces are worked in continuous rounds. Use a stitch marker to mark the first stitch of each round.
- The number in parentheses is the stitch count at the end of the round.
Santa
1. Head
Use skin-tone yarn.
- Round 1: 6 sc in MR. (6)
- Round 2: inc in each st around. (12)
- Round 3: (sc, inc) 6 times. (18)
- Round 4: (2 sc, inc) 6 times. (24)
- Rounds 5–9: sc around. (24)
- Round 10: (2 sc, dec) 6 times. (18) Start stuffing firmly.
- Round 11: (sc, dec) 6 times. (12)
- Round 12: dec 6 times. (6) FO and close the opening.
2. Nose
Use red yarn.
- Round 1: 5 sc in MR. (5)
- Round 2: sc around. (5)
Add a tiny bit of stuffing, FO leaving a long tail and sew the nose to the center of the face.
3. Eyes
With black yarn, embroider two small eyes above and slightly to each side of the nose, about 4 sts apart. You can use small safety eyes instead, but only if the ornament will not be handled by young children.
4. Beard
Use white yarn.
- Foundation: ch 15.
- Row 1: sc in the 2nd ch from the hook and in each ch across. (14) Turn.
- Row 2 (curls): ch 1, sl st in the first st, *ch 4, sl st in the 2nd ch from the hook and in the next 2 ch, sl st in the next st of the row*; repeat from * across.
FO, leaving a long tail. Sew the beard around the lower half of the face and shape the curls with your fingers.
5. Moustache
Make 2 in white. Ch 6. Starting in the 2nd ch from the hook, work sl st, sc, hdc, sc, sl st. FO. Sew one piece on each side of the nose with the wider ends pointing outward.
6. Hat
Use red yarn.
- Round 1: 4 sc in MR. (4)
- Round 2: sc around. (4)
- Round 3: (sc, inc) 2 times. (6)
- Round 4: sc around. (6)
- Round 5: (2 sc, inc) 2 times. (8)
- Round 6: sc around. (8)
- Round 7: (3 sc, inc) 2 times. (10)
- Round 8: sc around. (10)
- Round 9: (4 sc, inc) 2 times. (12)
- Round 10: sc around. (12)
- Round 11: (sc, inc) 6 times. (18)
- Round 12: sc around. (18)
- Round 13: (2 sc, inc) 6 times. (24)
- Round 14: sc around. (24)
- Rounds 15–16: change to white, sc around. (24)
FO, leaving a long tail. Place the hat on the head and sew the white brim securely all the way around.
7. Pom-pom
Use white yarn.
- Round 1: 6 sc in MR. (6)
- Round 2: sc around. (6) Add a tiny bit of stuffing.
- Round 3: dec 3 times. (3)
FO and sew to the tip of the hat.
8. Body
Use red yarn.
- Round 1: 6 sc in MR. (6)
- Round 2: inc in each st around. (12)
- Round 3: (sc, inc) 6 times. (18)
- Round 4: (2 sc, inc) 6 times. (24)
- Rounds 5–8: sc around. (24)
- Round 9: (2 sc, dec) 6 times. (18)
- Round 10: sc around. (18)
- Round 11: (sc, dec) 6 times. (12) Stuff firmly.
- Round 12: dec 6 times. (6)
FO and close. Sew the head firmly to the top of the body.
9. Coat trim
- Bottom trim (white): ch 25. Row 1: sc in the 2nd ch from the hook and in each ch across (24). Row 2: ch 1, turn, sc (or hdc for a thicker trim) in each st across (24). FO, leaving a long tail. Wrap the trim around the lower part of the body and sew it in place.
- Front trim (white): ch 9. Sc in the 2nd ch from the hook and in each ch across (8). FO and sew it vertically down the center front of the body.
10. Belt and buckle
- Belt (black): ch 24–26, or enough to fit around the body. Sc in the 2nd ch from the hook and in each ch across. Wrap the belt around the middle of the body and sew the ends together.
- Buckle (yellow or gold): embroider a small square at the center front of the belt, or ch 8, join with a sl st to form a ring, shape it into a square and sew it onto the belt.
11. Arms
Make 2, starting with red yarn.
- Round 1: 6 sc in MR. (6)
- Rounds 2–3: sc around. (6)
- Round 4: change to white, sc around. (6)
- Rounds 5–9: change back to red, sc around. (6)
Stuff the lower half lightly. Flatten the top and work 3 sc through both layers to close. FO, leaving a long tail, and sew one arm to each side of the body, angled slightly downward.
12. Legs
Make 2, starting with red yarn.
- Round 1: 6 sc in MR. (6)
- Rounds 2–5: sc around. (6)
- Round 6: change to white, sc around. (6)
- Rounds 7–8: change back to red, sc around. (6)
Stuff very lightly, flatten the top and close with 3 sc through both layers. FO and sew both legs under the body with a small gap between them.
13. Boot toes
Make 2 in red. Ch 4. Starting in the 2nd ch from the hook, work sc, hdc, dc. FO and sew one piece to the front of each foot.
Spiral
14. Red and white spiral
Use red yarn.
- Foundation: ch 75–90. For a medium ornament, ch 80.
- Row 1: work 3 dc in the 3rd ch from the hook and 3 dc in each ch across. The strip curls into a spiral on its own; do not force it. FO.
- White edging: join white yarn to one long edge and sc in each st along the entire edge. FO. Repeat along the opposite edge.
For a tighter spiral, work 4 dc in each chain; for a softer, more open spiral, work 2 dc.
15. Bottom tip
With red yarn, ch 8. Starting in the 2nd ch from the hook, work 7 sl st. FO and sew this small tail to the bottom end of the spiral.
For a small teardrop instead: 4 sc in MR (4); sc around (4); sc, dec, sc (3). FO, close and sew to the bottom of the spiral.
Assembly
16. Attach the spiral
Place the top end of the spiral directly under the body, between the legs. With red yarn and a yarn needle, sew through the spiral and the lower part of the body several times. Make this join strong, because the whole spiral hangs from it.
17. Wooden ring
Attach red yarn to the top of the hat, ch 10–12, pass the chain through the wooden ring and sew the end back to the top of the hat with several strong stitches. The ring should sit about 1–2 cm above the tip of the hat.
18. Hanging cord
Thread 25–30 cm of gold cord through the wooden ring, bring the ends together and tie a secure knot. Adjust the length to suit where you will hang the ornament.
Assembly checklist
- Sew the head to the body.
- Attach the beard, moustache and nose, and embroider the eyes.
- Sew on the hat and pom-pom.
- Add the coat trims, belt and buckle.
- Sew the arms to the sides and the legs under the body.
- Attach the spiral between the legs.
- Add the wooden ring and the gold hanging cord.
- Weave in all loose ends.
Shaping
Hold the ornament by the wooden ring and let the spiral hang freely. Separate the turns gently with your fingers and rotate the spiral until the red and white sections are evenly spread. If the spiral is too tight, stretch it gently downward; if it is too loose, twist it in the direction of the curl. The finished spiral should hang straight with about 6–9 visible turns.
Tips for a matching set
To make three identical Santas, use the same yarn, hook, number of spiral chains and cord length for each one. Crochet all three heads first, then all three bodies, and so on, so your tension stays consistent.
Safety note
Safety eyes, the wooden ring and small sewn-on parts can be a choking hazard. This ornament is a decoration, not a toy.
Your finished Santa, with his curly beard, pointed hat and swirling red-and-white spiral, will add a handmade touch to your Christmas tree for many years.
Im definitely going to try this thank uou