
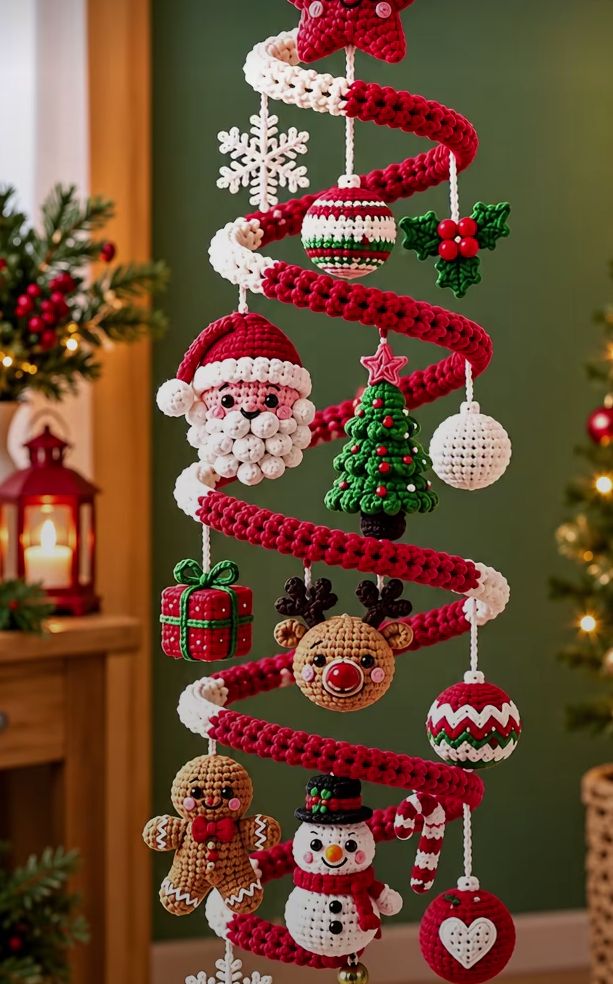
This hanging decoration turns one long red-and-white crochet spiral into a floating Christmas tree. The spiral hangs from a star on a central cord, and a collection of mini ornaments (Santa, a reindeer, a snowman, a gingerbread man, baubles, a gift box, holly, a candy cane and more) dangles in and around it. It is a bigger project, but every piece is small and quick, so it is easy to work on a little at a time.
Pattern details
- Skill level: intermediate
- Finished size: about 90–110 cm tall and 30–38 cm wide (about 100–120 cm including the top loop)
- Yarn: DK or light worsted cotton for the ornaments; thicker yarn or cotton cord for the large spiral
- Hooks: 3.0–4.0 mm for the ornaments and 5.0–6.0 mm for the large spiral
- Terminology: US crochet terms
Materials
- Yarn in red, white, green, dark green, brown, dark brown, beige or tan, pink, black and orange, plus a little yellow or gold
- Crochet hooks, 3.0–4.0 mm and 5.0–6.0 mm
- Fiberfill stuffing
- Yarn needle, scissors and stitch markers
- Black safety eyes, 6–8 mm (optional; embroider the eyes instead if children may touch the decoration)
- Thin white cord for hanging the ornaments
- Strong cord, 120–140 cm, for the central support
- Small red beads and small bells (optional)
Abbreviations
- MR: magic ring
- ch: chain
- sl st: slip stitch
- sc: single crochet
- hdc: half double crochet
- dc: double crochet
- tr: treble crochet
- inc: 2 sc in the same stitch
- dec: single crochet 2 stitches together
- BLO / FLO: back loop only / front loop only
- st(s): stitch(es)
- FO: fasten off
Pattern notes
- The small 3D pieces are worked in continuous rounds. Mark the first stitch of each round with a stitch marker.
- The number in parentheses at the end of a round is the stitch count for that round.
- Make all the ornaments first, then assemble the tree. Hanging everything before tying the final knots lets you balance the decoration.
Part 1: Main spiral
Use the larger hook and red yarn.
- Foundation: ch 115–125. For a decoration about 1 m tall, ch 120.
- Row 1: work 3 dc in the 3rd ch from the hook and 3 dc in each ch across. The strip curls on its own; do not straighten it. For a tighter curl, work 4 dc in each ch; for a softer spiral, work 2 dc.
- Color placement: to add white accents, work the dc groups in red for 18–22 chains, then in white for the next 6–8 chains, then in red for 22–28 chains, then white again for 6–8 chains. Keep alternating irregularly so that the white falls near the outer ends of the turns instead of forming regular stripes.
FO, leaving a long tail at each end for assembly.
Part 2: Central cord
Cut 120–140 cm of strong white cord. It runs vertically through the center of the finished tree and carries the weight of the spiral and ornaments. You will tie it to the star and stitch the spiral to it during assembly.
Part 3: Star topper
Make 2 star panels in red.
- Round 1: 10 sc in MR, join with a sl st. (10)
- Points: *ch 6, starting in the 2nd ch from the hook work sl st, sc, hdc, dc, tr; skip 1 st of the center, sl st in the next st*; repeat from * 4 more times. (5 points) FO.
Place the two stars together and sc around both layers with red yarn, stuffing lightly before you close. FO. Add a few small white embroidered dots if you like. Tie the central cord securely to the bottom of the star and add a hanging loop at the top.
Part 4: Snowflake
Use white yarn.
- Round 1: 6 sc in MR, join with a sl st. (6)
- Arms: *ch 5, sl st in the 2nd ch from the hook and in the next ch; ch 3, sl st in the 2nd and 3rd ch from the hook (a small branch made); sl st in each of the remaining 2 ch of the arm; sl st in the next sc of the center*; repeat from * 5 more times. (6 arms) FO.
Block the snowflake flat and add a white hanging loop.
Part 5: Striped bauble
Use red, white and green.
- Round 1: 6 sc in MR, in red. (6)
- Round 2: inc in each st around. (12)
- Round 3: (sc, inc) 6 times. (18)
- Round 4: (2 sc, inc) 6 times. (24)
- Round 5: sc around in red. (24)
- Round 6: sc around in white. (24)
- Round 7: sc around, alternating red and white every 2 sts. (24)
- Round 8: sc around in white. (24)
- Round 9: sc around in green. (24)
- Round 10: sc around, alternating green and red every 2 sts. (24)
- Round 11: sc around in green. (24)
- Round 12: (2 sc, dec) 6 times. (18)
- Round 13: (sc, dec) 6 times. (12) Stuff firmly.
- Round 14: dec 6 times. (6) FO and close the opening.
Cap: with white, work 6 sc in MR, then 1 round of 6 sc. FO and sew to the top of the ball. Add a white hanging cord.
Part 6: Holly
Leaves (make 3 in dark green): ch 10. Starting in the 2nd ch from the hook, work sl st, sc, hdc, dc, tr, dc, hdc, sc, sl st. Then work along the other side of the foundation chain in the same sequence. FO. For a spiky holly edge, add a few picots around the leaf (ch 2, sl st in the first ch).
Berries (make 3 in red):
- Round 1: 6 sc in MR. (6)
- Round 2: sc around. (6) Stuff lightly.
- Round 3: dec 3 times. (3) FO and close.
Arrange the three leaves behind the berries, sew everything together and add a hanging loop.
Part 7: Santa head
Head (skin-tone yarn):
- Round 1: 6 sc in MR. (6)
- Round 2: inc in each st around. (12)
- Round 3: (sc, inc) 6 times. (18)
- Round 4: (2 sc, inc) 6 times. (24)
- Round 5: (3 sc, inc) 6 times. (30)
- Rounds 6–10: sc around. (30)
- Round 11: (3 sc, dec) 6 times. (24)
- Round 12: (2 sc, dec) 6 times. (18) Stuff firmly.
- Round 13: (sc, dec) 6 times. (12)
- Round 14: dec 6 times. (6) FO and close.
Nose (pink): 6 sc in MR, then 1 round of 6 sc. Stuff lightly, close and sew to the center of the face.
Eyes: attach safety eyes or embroider two black eyes, about 5–6 sts apart.
Cheeks (make 2 in pink): 6 sc in MR, FO and sew below the eyes.
Beard: make 12–15 small white balls. For each ball: 6 sc in MR; inc in each st around (12); sc around (12); dec around (6). Stuff lightly and close. Arrange the balls around the cheeks, chin and lower face and sew them on firmly.
Hat (red):
- Round 1: 4 sc in MR. (4)
- Round 2: sc around. (4)
- Round 3: (sc, inc) 2 times. (6)
- Round 4: sc around. (6)
- Round 5: (2 sc, inc) 2 times. (8)
- Round 6: sc around. (8)
- Round 7: (3 sc, inc) 2 times. (10)
- Round 8: sc around. (10)
- Round 9: (4 sc, inc) 2 times. (12)
- Round 10: (sc, inc) 6 times. (18)
- Round 11: (2 sc, inc) 6 times. (24)
- Round 12: (3 sc, inc) 6 times. (30)
- Rounds 13–14: change to white, sc around. (30) FO.
Add a small white pom-pom to the tip, sew the hat onto the head and add a hanging cord.
Part 8: Mini Christmas tree
Tree (green):
- Round 1: 6 sc in MR. (6)
- Round 2: sc around. (6)
- Round 3: (sc, inc) 3 times. (9)
- Round 4: sc around. (9)
- Round 5: (2 sc, inc) 3 times. (12)
- Round 6: sc around. (12)
- Round 7: (3 sc, inc) 3 times. (15)
- Round 8: sc around. (15)
- Round 9: (4 sc, inc) 3 times. (18)
- Round 10: sc around. (18)
- Round 11: (5 sc, inc) 3 times. (21)
- Round 12: sc around. (21)
- Round 13: (6 sc, inc) 3 times. (24)
- Round 14: sc around. (24) FO and stuff lightly.
Base (green): 6 sc in MR; inc around (12); (sc, inc) 6 times (18); (2 sc, inc) 6 times (24). FO and sew to the bottom of the tree.
Trunk (dark brown): 6 sc in MR, then 3 rounds of 6 sc. Stuff and sew under the tree.
Decorations: sew on tiny red beads or embroider red dots, and add a small red star at the top. For the star, follow the star topper pattern, but ch 4 for each point and work sl st, sc, hdc back along the chain.
Part 9: White textured bauble
- Rounds 1–4: work as the striped bauble, all in white. (24)
- Rounds 5–8: sc around. (24) For extra texture, on Rounds 6 and 8 replace every 4th sc with a popcorn stitch: 5 dc in the same st, drop the loop, insert the hook from the front into the first dc, pick up the dropped loop and pull it through.
- Round 9: (2 sc, dec) 6 times. (18)
- Round 10: (sc, dec) 6 times. (12) Stuff.
- Round 11: dec 6 times. (6) FO and close.
Add a white hanging loop.
Part 10: Gift box
Squares (make 6 in red): ch 9. Row 1: sc in the 2nd ch from the hook and in each ch across (8). Rows 2–8: ch 1, turn, sc across (8). FO.
Sew the six squares together into a cube with sc or whip stitch, stuffing before you close the last seam.
Ribbon: with green yarn, embroider or sew on one strip vertically and one horizontally around the box. For a crochet strip, ch enough to go around the box and work sc back along the chain.
Bow: with green yarn, ch 15 and sl st into the first ch to form a loop. Make a second loop the same way. Wrap the center of the two loops several times with green yarn and sew the bow to the top of the box. Add a hanging cord.
Part 11: Reindeer head
Head (tan): work Rounds 1–14 exactly as the Santa head. (30 sts at the widest point)
Muzzle (beige): 6 sc in MR; inc around (12); (sc, inc) 6 times (18); 1 round of 18 sc. Stuff lightly and sew to the lower front of the head.
Nose (red): 6 sc in MR; inc around (12); sc around (12); dec around (6). Stuff, close and sew onto the muzzle.
Ears (make 2 in tan): ch 5. Starting in the 2nd ch from the hook, work sc, hdc, dc, then 4 dc in the last ch. Working along the other side of the chain, work dc, hdc, sc. FO and sew to the head.
Antlers (make 2 in dark brown): ch 9, sl st in the 2nd ch from the hook and in the next 2 ch. Ch 4, sl st in the 2nd ch from the hook and in the next 2 ch (a branch made). Continue with sl st down the main chain, making one or two more branches the same way. FO and sew above the ears.
Add black eyes and pink cheeks.
Part 12: Patterned bauble
Work the striped bauble pattern entirely in red. Before the decrease rounds, while you can still reach inside, embroider bands with white and green yarn: a white zigzag, a green stripe, white dots, a green zigzag and a white lower band. Then finish the decreases, stuff and close. Add a white hanging cord.
Part 13: Gingerbread man
This ornament is flat. Make 2 identical panels in brown and sew them back to back.
- Head: 6 sc in MR; inc around (12); (sc, inc) 6 times (18). Sl st to join and FO.
- Body: ch 7. Row 1: sc in the 2nd ch from the hook and in each ch across (6). Rows 2–8: ch 1, turn, sc across (6). FO.
- Arms (make 2): ch 7. Row 1: sc in the 2nd ch from the hook and in each ch across (6). Row 2: ch 1, turn, sc across (6). FO.
- Legs (make 2): ch 8. Row 1: sc in the 2nd ch from the hook and in each ch across (7). Row 2: ch 1, turn, sc across (7). FO.
Sew the head to the top of the body, the arms to the upper sides and the legs to the bottom. Place the two panels back to back and whip stitch around the edges with brown yarn, adding a little stuffing as you go. Embroider white icing zigzags on the hands and feet, add black eyes, a smiling mouth, pink cheeks and a small red bow tie. Add a hanging loop.
Part 14: Snowman
Lower body (white): work Rounds 1–14 as the Santa head. (30 sts at the widest point)
Head (white):
- Rounds 1–4: as the striped bauble. (24)
- Rounds 5–8: sc around. (24)
- Round 9: (2 sc, dec) 6 times. (18)
- Round 10: (sc, dec) 6 times. (12) Stuff.
- Round 11: dec 6 times. (6) FO and close.
Sew the head to the body.
Nose (orange): ch 4. Starting in the 2nd ch from the hook, work sl st, sc, hdc. FO and sew to the face.
Hat (black):
- Round 1: 6 sc in MR. (6)
- Round 2: inc around. (12)
- Round 3: (sc, inc) 6 times. (18)
- Round 4: sc in BLO around. (18)
- Rounds 5–7: sc around. (18)
- Round 8 (brim): working in FLO, inc in each st around. (36) FO.
Add a small red and green band around the hat and sew it on.
Scarf (red): ch 35, sc in the 2nd ch from the hook and in each ch across (34). FO and wrap around the neck.
Add black buttons, black eyes and an embroidered smile.
Part 15: Candy cane
With red, ch 35 and work sl st in the 2nd ch from the hook and in each ch back along the chain. FO. Make a second cord the same way in white. Twist the red and white cords firmly together and bend the top into a hook. Secure the twist at several points with matching thread. For a firmer candy cane, lay a piece of thin craft wire along the cords before twisting and make sure both wire ends are completely covered. Add a hanging loop.
Part 16: Red bauble with a white heart
Bauble (red):
- Rounds 1–4: as the striped bauble. (24)
- Rounds 5–9: sc around. (24)
- Round 10: (2 sc, dec) 6 times. (18)
- Round 11: (sc, dec) 6 times. (12) Stuff.
- Round 12: dec 6 times. (6) FO and close.
Heart (white): make a MR and work into it: ch 2, 3 dc, 3 hdc, ch 1, dc, ch 1, 3 hdc, 3 dc, ch 2, sl st into the ring. Pull the ring closed and FO. The single dc with a ch 1 on each side forms the point of the heart. Sew the heart to the front of the bauble and add a white hanging cord.
Assembly
Step 1: Shape the spiral
Lay the long spiral flat and let it curl naturally, then hold it up vertically. Arrange it into 7–9 large turns: small at the top, widest through the middle and slightly narrower at the bottom. This creates the outline of a Christmas tree.
Step 2: Attach the star
Place the star at the very top and tie the central cord very securely to the back or bottom of the star.
Step 3: Attach the spiral
Stitch the first turn of the spiral just below the star, then stitch the center of each following turn to the central cord, leaving about 8–13 cm between levels. Rotate each level slightly so the turns do not sit directly under one another, and do not pull the spiral tight. It should look open and suspended.
Step 4: Place the ornaments
- Top: snowflake, striped bauble and holly
- Upper middle: Santa head, mini Christmas tree and white bauble
- Middle: gift box, reindeer head and patterned bauble
- Lower middle: gingerbread man, snowman and candy cane
- Bottom: red heart bauble, plus an extra snowflake or bell
The ornaments do not need to be perfectly symmetrical; different hanging lengths look more natural.
Step 5: Hanging cords
Use white yarn or cord. Give small ornaments cords of about 5–8 cm and larger ornaments cords of about 8–12 cm. Alternate the lengths so the ornaments hang at different levels, and tie every cord securely to the spiral.
Step 6: Balance
Hang the whole decoration before tying the final knots and check that it hangs straight. Santa, the reindeer, the snowman and the mini tree are the heaviest pieces, so spread them around opposite sides. Adjust until the decoration hangs evenly.
Finishing
- Weave in all loose ends and check every seam.
- Reshape the stuffed pieces, fluff Santa’s beard and straighten the snowflake.
- Shape the holly leaves, the antlers and the candy cane.
- Rotate the spiral until the turns are evenly spaced, and secure each knot with an extra stitch.
- Cotton pieces can be steam blocked lightly: hold the iron above the crochet and never press it directly onto the yarn.
Finished size
The main spiral hangs about 85–100 cm long and 30–38 cm wide at its widest point, and the whole decoration measures about 100–120 cm including the top loop. The individual ornaments are about 5–12 cm each, depending on your yarn and tension.
Safety note
Safety eyes, beads, bells and wire are small or sharp parts. This decoration is not a toy: hang it out of reach of babies, young children and pets.
The secret to this project is the final assembly. Keep the top turns small, let the middle turns open up and spread the heavier ornaments evenly, and the red-and-white spiral will look like a floating Christmas tree full of handmade treasures.