
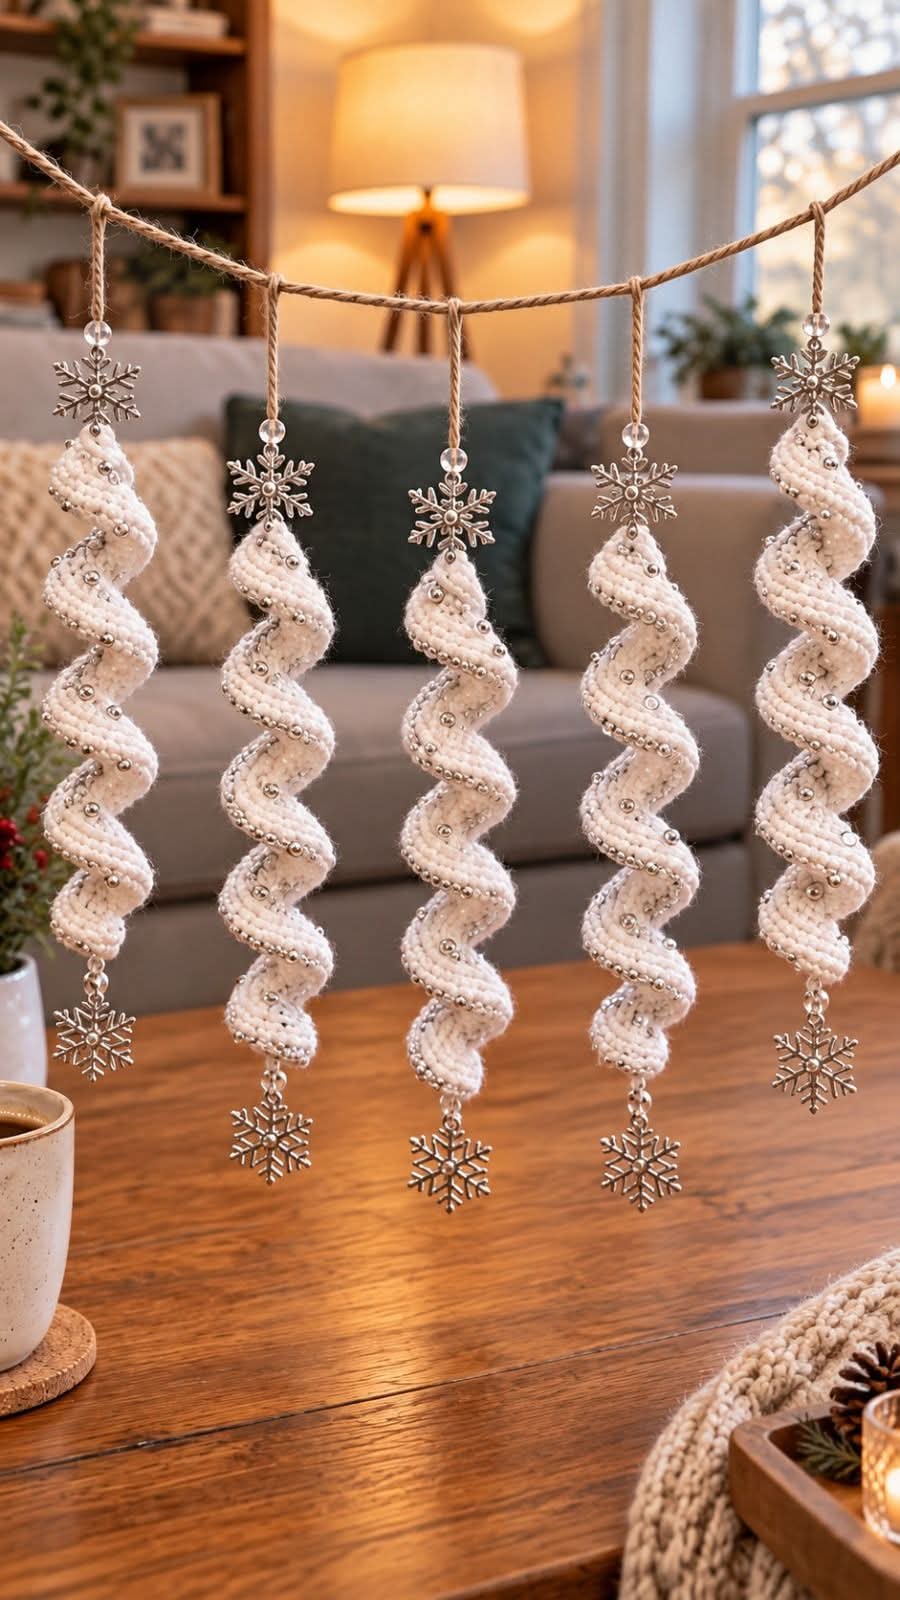
This pattern is reconstructed from the photo and is designed to reproduce the same long white spiral ornaments with silver beads, snowflake charms and hanging cords.
US crochet terminology
Finished length approximately 45 to 60 cm including the snowflake charms.
Spiral width approximately 3.5 to 5 cm.
Make 5 ornaments for a set similar to the photo.
Materials
White chunky yarn or soft bulky yarn
Approximately 35 to 50 g of yarn for each ornament
5 mm crochet hook
Silver metallic thread or thin silver yarn for optional edging
Silver beads in assorted sizes
Small clear acrylic or glass-look beads
10 decorative metal snowflake charms
Small silver jump rings
Jute cord or natural twine
Yarn needle
Small sewing needle suitable for beads
Strong white sewing thread
Scissors
Jewelry pliers for opening and closing jump rings
Abbreviations
ch = chain
sl st = slip stitch
sc = single crochet
hdc = half double crochet
dc = double crochet
tr = treble crochet
st = stitch
sts = stitches
rep = repeat
FO = fasten off
Crochet Spiral
Make 5.
The spiral is created by placing several stitches into each chain.
The extra stitches force the crochet strip to twist naturally into a corkscrew shape.
Foundation Chain
With white yarn, ch 52.
For a shorter ornament, ch 42 to 46.
For a longer ornament, ch 58 to 65.
Do not crochet too tightly because the foundation chain needs enough flexibility to curl evenly.
Row 1
Work 3 dc into the 4th ch from hook.
Work 3 dc into each remaining chain across.
The work will begin curling almost immediately.
Do not try to straighten it while crocheting.
At the end, turn.
For a foundation chain of 52 chains, you will have approximately 147 dc plus the beginning turning chain.
Row 2
Ch 1.
Work 1 sc into each dc across.
Because the first row already contains many increased stitches, the strip will continue twisting while you work.
Do not stretch the spiral flat.
FO, leaving a long tail for finishing.
Wider Spiral Option
If you want the thick, soft spiral appearance shown in the photo, work this version instead.
Foundation
Ch 48.
Row 1
Work 3 dc in the 4th ch from hook.
Work 3 dc in every chain across.
Turn.
Row 2
Ch 2.
Work 1 hdc in every stitch across.
Turn.
Row 3
Ch 1.
Work 1 sc in every stitch across.
FO.
This produces a thicker ribbon with more visible body.
Extra Curly Version
For a tighter spiral, work 4 dc into every foundation chain instead of 3 dc.
This creates a much stronger curl.
If using very bulky yarn, 3 dc per chain is usually enough.
If using DK or light worsted yarn, 4 dc per chain will create a fuller spiral.
Optional Silver Edge
The photo has a silver decorative effect along portions of the spiral.
Join silver metallic thread to one end of the finished spiral.
Work loosely along one outer edge.
Ch 1.
Work 1 sl st in each stitch along the entire outer edge.
FO.
Repeat along the second edge if you want more silver detail.
Do not pull the metallic thread tightly because this can distort the spiral.
Alternative Silver Beaded Edge
For an appearance closer to the photo, sew small silver beads along the outer edge instead of crocheting metallic thread.
Thread a sewing needle with strong white or silver thread.
Secure the thread on the back of the spiral.
Sew one small silver bead approximately every 1.5 to 2 cm along one outer edge.
You do not need to add a bead to every stitch.
Place some beads slightly closer together around the most visible curves.
Knot securely on the back.
Hide the thread ends inside the crochet stitches.
Decorative Beads On The Spiral
Use a mixture of small and medium silver beads.
Lay the spiral flat in its natural curled position.
Choose the front-facing sections.
Sew approximately 10 to 18 beads over each ornament.
Place the beads irregularly rather than in perfectly straight rows.
Add some beads near the outer edge.
Add some near the center of the ribbon.
Leave some sections without beads.
This gives the scattered decorative appearance shown in the photo.
Secure every bead individually or with very short thread sections so that one broken thread does not release all of the beads.
Shaping The Spiral
Hold the top of the finished strip.
Allow the crochet to hang freely.
Use your fingers to rotate the strip gently in the direction it naturally curls.
Arrange each turn so the spiral is approximately even from top to bottom.
The spiral should look like a long soft corkscrew.
Do not block the strip completely flat.
Top Attachment Loop
Cut a piece of jute cord approximately 30 to 35 cm long.
Fold it in half.
Pass the folded end through the top of the spiral.
Pull the two loose ends through the loop.
Tighten gently.
Alternatively, sew the cord securely to the upper end using strong thread.
The finished hanging loop should measure approximately 10 to 15 cm.
Clear Top Bead
Thread one clear bead onto the lower part of the jute cord before attaching the snowflake.
If your bead hole is too small for the jute cord, attach the bead using thin jewelry wire or strong transparent thread.
Position the clear bead directly above the metal snowflake.
Top Snowflake Charm
Open a silver jump ring with jewelry pliers.
Attach the jump ring to the top snowflake charm.
Connect the snowflake to the jute hanging cord.
Close the jump ring securely.
The snowflake should hang directly above the crocheted spiral.
For the look in the photo, leave approximately 1 to 2 cm between the snowflake and the top of the crochet.
Connecting The Spiral To The Top Snowflake
Thread strong white yarn through the top end of the spiral.
Pass it through the lower loop of the snowflake charm.
Repeat several times.
Pull firmly but do not compress the crochet.
Tie securely.
Hide the yarn ends inside the spiral.
Bottom Snowflake Charm
Open another silver jump ring.
Attach it to the bottom snowflake charm.
Using white yarn or strong thread, connect the bottom of the crochet spiral to the jump ring.
The snowflake should hang freely below the spiral.
Leave approximately 1 to 3 cm between the crochet and the charm.
Secure the connection firmly.
Optional Bottom Clear Bead
Before attaching the bottom snowflake, add one clear bead between the crochet and the metal charm.
The order will be:
Crochet spiral
Clear bead
Small jump ring
Snowflake charm
Ornament Assembly
For each ornament, assemble the pieces from top to bottom in this order:
Jute hanging loop
Clear bead
Silver snowflake charm
White crochet spiral
Silver beads sewn over the spiral
Optional silver edge
Clear bead or small metal connector
Silver snowflake charm
Long Ornament Version
Ch 60.
Work 3 dc in each chain.
Work 1 hdc in every stitch for the second row.
Work 1 sc in every stitch for the third row.
Finished crochet section approximately 45 to 50 cm depending on yarn and tension.
Add top and bottom decorations.
Finished ornament approximately 55 to 65 cm.
Medium Ornament Version
Ch 50.
Work 3 dc in each chain.
Work 1 hdc in every stitch.
Work 1 sc in every stitch.
Finished crochet section approximately 35 to 42 cm.
Finished ornament approximately 45 to 55 cm.
Short Ornament Version
Ch 40.
Work 3 dc in each chain.
Work 1 sc in every stitch.
Finished crochet section approximately 28 to 35 cm.
Finished ornament approximately 38 to 45 cm.
Five Ornament Set
To reproduce the display in the photo, make 5 spiral ornaments.
Make the center ornament slightly longer.
Make the two ornaments beside it medium length.
Make the two outer ornaments slightly shorter or approximately the same length.
Suggested lengths:
Outer left ornament
Ch 46
Second ornament
Ch 52
Center ornament
Ch 58
Fourth ornament
Ch 52
Outer right ornament
Ch 46
Hanging Garland Cord
Cut a long piece of thick jute cord approximately 180 to 220 cm.
Leave extra cord at both ends for tying.
Hang or stretch the cord loosely.
Do not pull it completely straight.
Allow a gentle curve in the center.
Positioning The Five Ornaments
Attach the center ornament first.
Place it in the middle of the garland.
Attach the second and fourth ornaments approximately 25 to 30 cm from the center ornament.
Attach the two outer ornaments approximately 25 to 30 cm farther outward.
Adjust the spacing until all five ornaments hang evenly.
Optional More Textured Crochet Version
For a slightly more raised texture, use back-loop-only stitches on the final row.
After completing the 3 dc increases:
Ch 1.
Turn.
Working in back loops only, sc in every stitch across.
FO.
This creates a small ridge along the spiral and makes the crochet texture more visible.
Soft Plush Version
Use bulky velvet yarn, chenille yarn or soft wool blend.
Use a 5.5 mm to 6 mm hook.
Ch 45 to 50.
Work 3 dc in each chain.
Do not add too many extra rows because bulky yarn creates enough width on its own.
Finish with a loose sl st edge if required.
Cotton Version
Use worsted cotton yarn and a 4 mm hook.
Ch 55.
Work 4 dc in each chain for a strong spiral.
Work 1 sc in every stitch for the final row.
Cotton produces a firmer and more defined corkscrew.
Finishing
Weave in all crochet ends securely.
Arrange the spiral with your fingers.
Check that all silver beads are firmly attached.
Check every jump ring and close it completely.
Straighten the hanging cord.
Allow each snowflake charm to hang freely.
Trim any visible sewing thread.
Do not heavily block the finished spiral because the natural curl is the main feature of the design.
Approximate Materials For Five Ornaments
White bulky yarn approximately 200 to 250 g
10 silver snowflake charms
50 to 90 small silver beads
15 to 25 medium silver beads
5 to 10 clear beads
10 to 15 silver jump rings
Approximately 2.5 to 3 m of jute cord for the ornament loops
Approximately 2 m of thicker jute cord for the main garland
Silver metallic thread if using the optional edging
Final Size
Each finished ornament approximately 40 to 60 cm long.
Crochet spiral approximately 4 to 5 cm wide.
Five-piece garland approximately 150 to 200 cm wide depending on spacing.
For the closest appearance to the photo, use soft white bulky yarn, keep the crochet spiral quite full, add scattered silver beads, and finish each ornament with a silver snowflake at both the top and bottom.