
Title
Red & White Geometric Triangle Crochet Bedspread
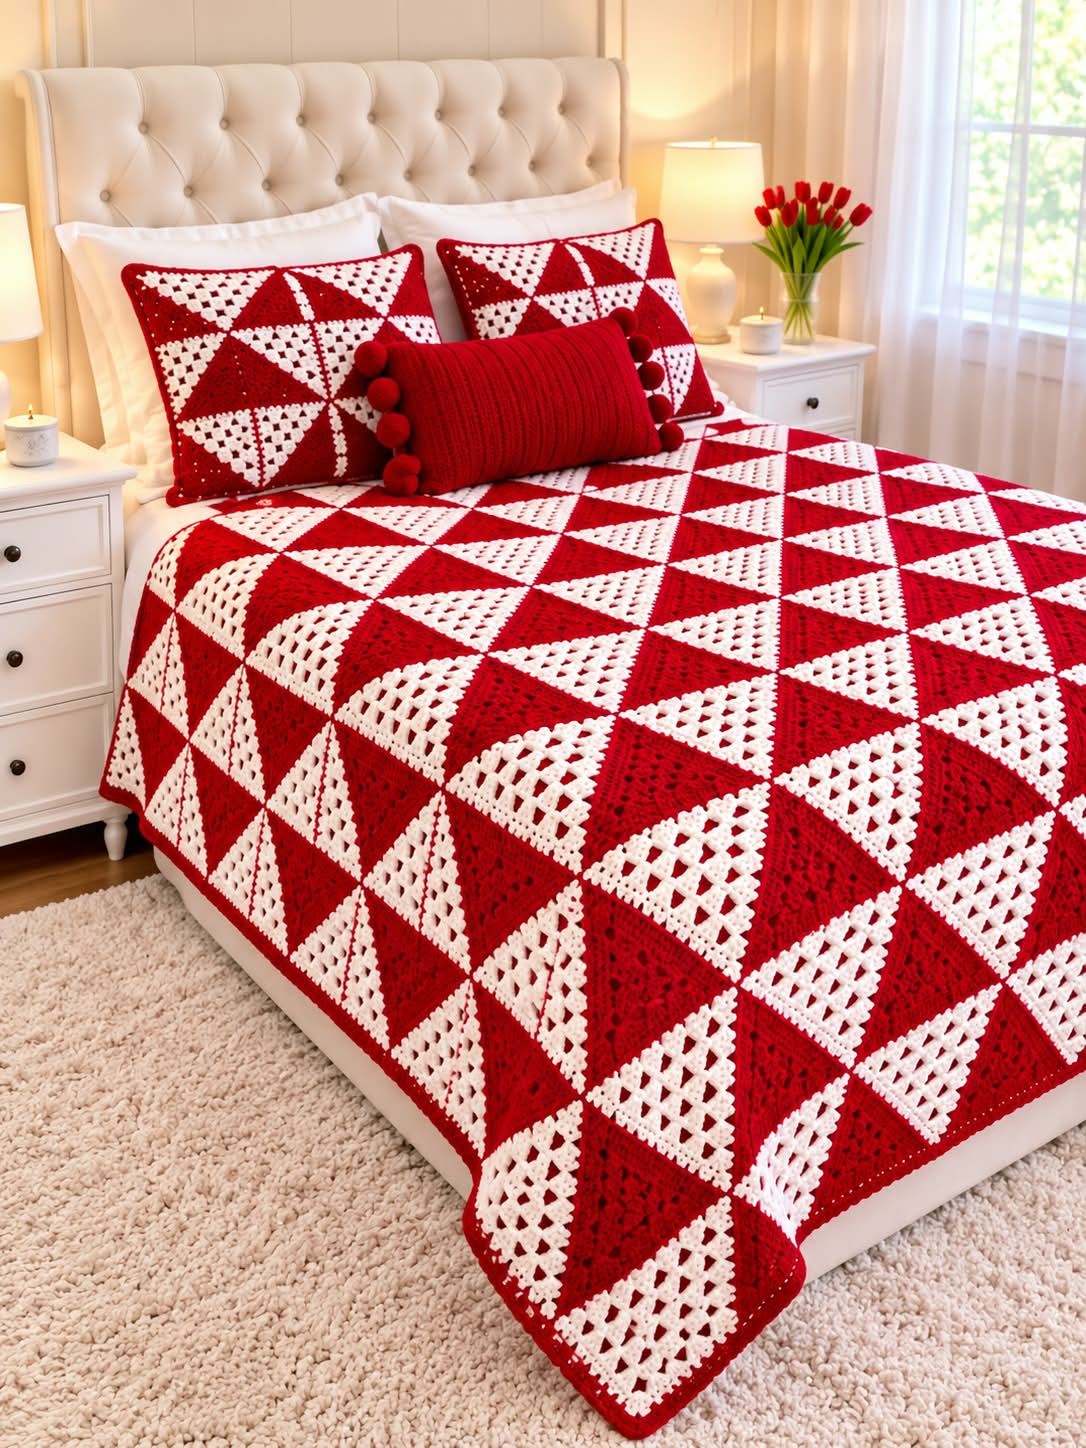
This striking crochet bedspread uses repeating red-and-white triangular motifs arranged into squares and larger geometric blocks. The design creates a bold patchwork effect with alternating solid red triangles and open white lace triangles.
It is ideal for:
- Bedspreads
- Large blankets
- Sofa throws
- Decorative covers
- Matching cushion covers
Because the pattern is recreated from the finished design shown in the image, minor adjustments may be needed depending on yarn, hook size, and tension.
MATERIALS
Yarn
Use two colors:
- Bright red
- White
Recommended yarn:
- DK cotton
- Cotton blend
- Light worsted acrylic
- Medium-soft yarn with good stitch definition
For a large bedspread, prepare approximately:
2,500–4,000 g total yarn
depending on size.
CROCHET HOOK
Recommended hook size:
3.5 mm – 4.5 mm
Use a slightly larger hook if you want a softer and more open fabric.
ADDITIONAL MATERIALS
- Yarn needle
- Scissors
- Stitch markers
- Measuring tape
- Blocking mat
- Blocking pins
ABBREVIATIONS
- MR – Magic Ring
- ch – Chain
- sl st – Slip Stitch
- sc – Single Crochet
- hdc – Half Double Crochet
- dc – Double Crochet
- tr – Treble Crochet
- sp – Space
- st – Stitch
- sts – Stitches
- rep – Repeat
- rnd – Round
METHOD
The blanket is made from triangular crochet pieces.
There are two main triangle styles:
- Solid red triangle
- Open lace white triangle
Four triangles are arranged together to form a square block.
These square blocks are then joined to create the full bedspread.
PART 1 – SOLID RED TRIANGLE
Start with red yarn.
Row 1
Ch 4.
Work:
2 dc into 4th ch from hook.
Turn.
Row 2
Ch 3.
Work 1 dc in first stitch.
Work 1 dc in each stitch across.
Work 2 dc in last stitch.
Turn.
Row 3
Ch 3.
Work:
2 dc in first stitch.
1 dc in each stitch across.
2 dc in final stitch.
Turn.
CONTINUE INCREASING
Repeat the same method for every row:
- Increase at beginning
- Work evenly across
- Increase at end
This causes the triangle to expand evenly.
Continue until the triangle reaches your desired size.
A good finished size is approximately:
15–20 cm / 6–8 inches per side
OPTIONAL TEXTURE FOR RED TRIANGLE
To create more texture similar to the image:
Alternate rows of:
1 dc in each stitch
and
1 dc BLO in each stitch
This gives subtle raised horizontal lines.
PART 2 – WHITE OPEN LACE TRIANGLE
Using white yarn:
Row 1
Ch 5.
Work:
1 dc in first chain.
Turn.
Row 2
Ch 4.
Dc in first stitch.
Ch 1.
Dc in last stitch.
Turn.
Row 3
Ch 4.
Dc in first stitch.
Ch 1.
Dc into next ch-1 space.
Ch 1.
Dc in last stitch.
Turn.
LACE FORMATION
Continue increasing one mesh space per row.
Work:
dc, ch 1
across.
At both edges, add an increase.
The triangle should gradually widen.
OPEN MESH PATTERN
Use the following repeated sequence:
dc in next dc, ch 2, skip space, dc in next dc
Repeat across.
For a more open look:
Use:
dc, ch 2, dc
in alternating spaces.
PART 3 – FINAL EDGE OF WHITE TRIANGLE
When the triangle reaches the same size as the red triangle:
Work one row of sc around all three sides.
At each corner:
3 sc
Fasten off.
PART 4 – FINAL EDGE OF RED TRIANGLE
Work one final round or row of sc around the red triangle.
At each corner:
3 sc
Fasten off.
This makes joining easier.
FORMATION OF ONE SQUARE BLOCK
Take:
- 2 red triangles
- 2 white triangles
Arrange them so that their points meet in the center.
For example:
Red triangle opposite red triangle.
White triangle opposite white triangle.
This forms one square.
The center creates a pinwheel-style geometric shape.
ALTERNATIVE FORMATION
You can also arrange:
- Red
- White
- Red
- White
clockwise around the center.
This produces a rotating windmill effect.
JOINING TRIANGLES INTO A SQUARE
Place two triangles with edges aligned.
Using matching yarn:
Work slip stitches through both edges.
Or use mattress stitch with a yarn needle.
Join all four triangles until you have one completed square block.
SQUARE BLOCK BORDER
Once four triangles are joined:
Attach red yarn.
Work:
1 sc around the entire square.
At each corner:
3 sc
Join.
Second Border Round
Ch 3.
Work:
1 dc in each stitch around.
At corners:
2 dc, ch 2, 2 dc
Join.
Fasten off.
BLANKET FORMATION
Arrange all finished squares in rows.
Rotate some squares to create the repeating diagonal pattern visible in the image.
A suggested layout is:
Row 1
Square A
Square B
Square A
Square B
Row 2
Square B
Square A
Square B
Square A
Continue alternating.
This creates the strong red-and-white geometric pattern.
FORMATION SUMMARY
Each square block consists of:
4 triangles
The blanket is built as:
Triangles
↓
Square Blocks
↓
Rows of Squares
↓
Full Bedspread
↓
Outer Border
APPROXIMATE NUMBER OF BLOCKS
Small Throw
Approximately:
5 × 7 squares
35 square blocks
Double Bed
Approximately:
7 × 9 squares
63 blocks
Queen Bed
Approximately:
8 × 10 squares
80 blocks
King Bed
Approximately:
9 × 11 squares
99 blocks
The exact number depends on square size.
JOINING THE SQUARE BLOCKS
Option 1 – Slip Stitch Join
Place two squares right sides together.
Work slip stitches through matching edge stitches.
This creates a firm seam.
Option 2 – Single Crochet Join
Hold both blocks together.
Work one sc through both corresponding stitches.
This creates a slightly raised joining line.
Option 3 – Invisible Seam
Using a yarn needle:
Sew through corresponding loops with mattress stitch.
Pull gently.
This produces a flatter and cleaner result.
RECOMMENDED METHOD
For this geometric design, the invisible seam or slip stitch join works best because it keeps the triangles visually clean.
OUTER BORDER
Use red yarn for the final border.
Border Round 1
Attach yarn in any corner.
Work:
1 sc in each stitch around.
At each corner:
3 sc
Join.
Border Round 2
Ch 3.
Work:
1 dc in every stitch.
At each corner:
2 dc, ch 2, 2 dc
Join.
Border Round 3
Work:
1 sc in each stitch.
At every corner:
sc, ch 2, sc
Join.
OPTIONAL DECORATIVE BORDER
For a slightly softer edge:
Repeat:
skip 2 sts, 5 dc in next st, skip 2 sts, sc in next st
around.
At corners:
Work 7 dc instead of 5 dc.
CUSHION COVER FORMATION
The same square motif can be used for matching pillows.
Make:
- 1 large square for front
- 1 plain red or white square for back
Join around three sides.
Insert cushion.
Close fourth side with crochet or buttons.
COLOR PLACEMENT
To achieve the closest look to the image:
Use strong contrast.
Solid areas:
Bright red
Lace areas:
Pure white
Joining:
Mostly red
Outer border:
Red
This keeps the final design sharp and graphic.
FINISHING
Weave in all yarn ends.
Block each triangle before joining.
Then block each completed square.
After assembling the whole blanket:
Block the entire bedspread again.
Make sure:
- Triangles stay symmetrical
- Square corners remain sharp
- White lace stays open
- Red sections remain flat
- Seams are not too tight
- Overall blanket edges remain straight
Allow to dry completely.
SIZE ADJUSTMENT
To make a larger blanket:
Add more square blocks.
To make it smaller:
Remove complete rows or columns.
Because the design is modular, it can easily be adapted for:
- Baby blankets
- Sofa throws
- Twin beds
- Double beds
- Queen beds
- King beds
- Cushion covers
CONCLUSION
The Red & White Geometric Triangle Crochet Bedspread is built from simple triangular motifs combined into repeating square blocks.
The design works especially well because of the contrast between:
- Solid red crochet
- Open white lace
- Sharp triangle shapes
- Repeating geometric rotations
For the cleanest result, keep all triangles identical in size, block them carefully before assembly, and maintain consistent tension throughout.
Once all square blocks are joined and finished with the red border, the result is a bold, modern, and highly decorative crochet bedspread.