
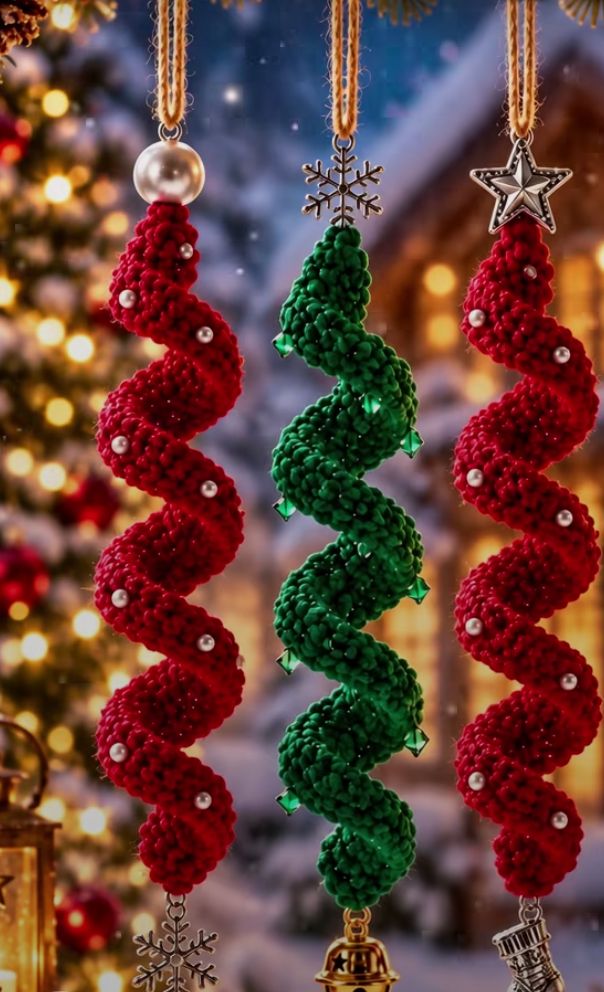
This Christmas spiral ornament is made from one long crochet strip that twists into a corkscrew all by itself. Add a few beads, a star on top and a small charm at the bottom, and a very simple stitch pattern becomes an elegant decoration for the tree, a window or a gift package. It works up quickly, so you can make a whole set in different holiday colors.
Pattern details
- Skill level: easy to intermediate
- Finished length: about 28–35 cm (11–14 in), not including the hanging loop
- Yarn: sport or medium weight cotton yarn
- Hook: 3.0–4.0 mm, or the size recommended for your yarn
- Terminology: US crochet terms
Materials
- Cotton yarn in red, dark green or white/cream (metallic gold or silver yarn is optional)
- Crochet hook, 3.0–4.0 mm
- Yarn needle and scissors
- Small pearl or crystal beads, plus a sewing needle and strong thread
- A small metal charm, such as a star, snowflake, bell or stocking
- Jump rings
- Cord or yarn for the hanging loop
- Stitch marker (optional)
Abbreviations
- MR: magic ring
- ch: chain
- sl st: slip stitch
- sc: single crochet
- hdc: half double crochet
- dc: double crochet
- st(s): stitch(es)
- FO: fasten off
How the spiral works
The corkscrew shape comes from working several stitches into each stitch of the base row. The extra stitches have nowhere to go, so the strip twists as you work. The more stitches you work into each stitch, the tighter the spiral becomes.
Instructions
Spiral
- Foundation: ch 70–80. For a shorter ornament, ch 55–60; for a longer one, ch about 90.
- Row 1: sc in the 2nd ch from the hook and in each ch across. Turn. The strip is still flat at this stage.
- Row 2: ch 2 (does not count as a stitch), work 3 dc in each sc across. The strip starts to curl as you go; do not try to straighten it. FO.
- Row 3 (edging): join yarn at one end of the outer edge, ch 1, then sc in each st along the outer edge. For extra texture, work (sc, ch 1, sc) at regular intervals instead. FO and weave in the ends.
Aim for a dense spiral with five or six large curves. For a tighter curl, work 4 dc into each stitch in Row 2; for a looser curl, work 2 dc.
Two-color candy spiral (optional)
- Make two spirals, one in the main color and one in a contrasting color.
- Twist them gently around each other to create a double helix.
- Stitch the two strips together at the top and bottom.
Good color pairs are red and white, green and white, red and green, green and gold, or white and silver.
Beaded version (optional)
- Sew a small pearl or bead onto the outer edge about every 5–7 cm.
- Try white pearls on red yarn, or green crystal beads on dark green yarn.
- Stitch each bead through several crochet stitches so it cannot come loose.
Hanging loop
Ch 25–30, join with a sl st to form a loop and sew it firmly to the top end of the spiral. You can use decorative cord or metallic thread instead.
Crochet star topper (optional)
- Round 1: MR, ch 1, work 10 sc into the ring, join with a sl st to the first sc. (10 sts)
- Round 2 (points): *ch 4, sl st in the 2nd ch from the hook, sc in the next ch, hdc in the next ch, skip 1 st on the circle, sl st in the next st*; repeat from * 4 more times. (5 points) FO.
Block the star lightly if the points curl. Instead of a crochet star, you can use a metal star or snowflake charm, a large pearl or a wooden bead. Thread the hanging cord through the topper before you secure it to the spiral.
Bottom charm
Attach a jump ring to the bottom of the spiral and add one charm: a bell, snowflake, stocking, crystal drop, tassel or bead. The charm adds a little weight, which helps the spiral hang straight and show off its curves.
Assembly and shaping
- Lay the spiral flat and let it curl naturally, then hold it by the top so that it hangs vertically.
- Spread the curves evenly with your fingers. You should see five to seven turns.
- If a section is too tight, twist it gently in the opposite direction. If it is too loose, twist it in the direction of the curl.
- Attach the hanging loop and topper at the top, the beads along the edge and the charm at the bottom.
- Check that the ornament hangs straight, then weave in any remaining ends.
Blocking
Mist the ornament lightly with water, arrange the curves and let it dry completely, either hanging up or lying on a towel. Do not stretch it too much, because the natural curl is the main feature of the design.
Color ideas
- Classic Christmas: red yarn, white pearls and a silver snowflake charm
- Traditional green: dark green yarn, green crystal beads and a gold bell
- Elegant neutral: cream yarn, gold edging and a gold star
- Winter snow: white yarn, silver beads and a snowflake charm
- Candy cane: a red-and-white double spiral with white beads and a gold bell
Size options
- Small tree ornament: start with 40–50 chains
- Window decoration: start with 70–90 chains
- Long hanging decoration: start with 100 chains or more
Safety note
Beads, charms and jump rings are small parts that can be a choking hazard. This ornament is a decoration, not a toy, so keep it out of reach of babies, young children and pets.
Once you know the basic spiral, you can make a whole collection in red, green, white, gold and silver and hang them together on the tree, in a window, over a doorway or along the mantel.