METHOD
Materials
- Medium-weight cotton crochet thread
- Crochet hook suitable for the yarn
- Scissors
- Tapestry needle
- Measuring tape
- Blocking pins and a flat blocking surface
Abbreviations
- ch = chain
- sl st = slip stitch
- sc = single crochet
- hdc = half double crochet
- dc = double crochet
- tr = treble crochet
- st / sts = stitch / stitches
- sp = space
- rep = repeat
1. CENTRAL STEM
Start with a foundation chain long enough for the desired length of the runner.
Work along the chain using single crochet to create a firm central stem.
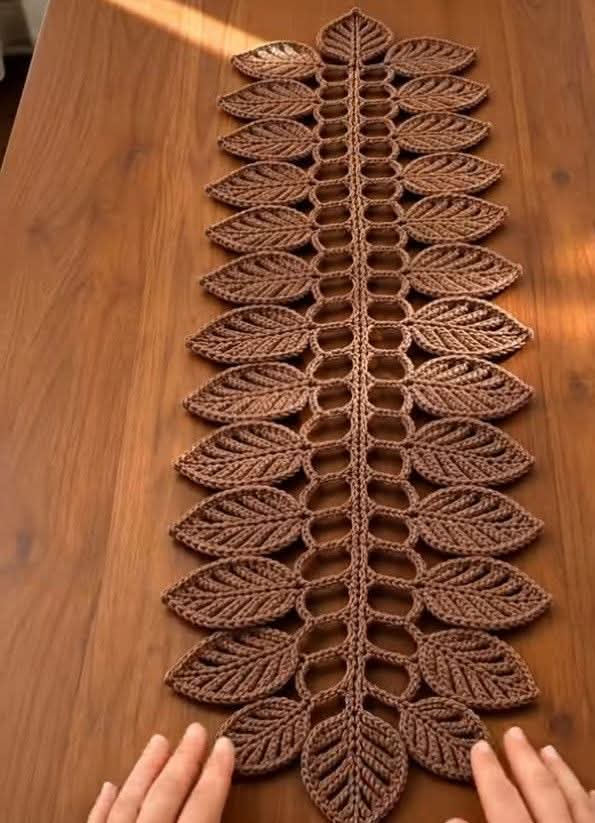
At regular intervals, create small chain loops on both sides of the stem. These loops form the openwork sections visible between the leaves.
For each open section:
Ch 5, skip the required stitches, sc into the next stitch.
Repeat this pattern along the entire length.
Continue working the central stem until you reach the desired length.
Fasten off and weave in the end.
2. CROCHET LEAF
Make one leaf at a time.
Foundation
Ch 14.
Work back along the chain:
Sl st in the first chain, sc in the next chain, hdc in the next chain, dc in the next 3 chains, tr in the next 3 chains, dc in the next 3 chains, hdc in the next chain, sc in the last chain.
Do not turn.
Work along the opposite side of the foundation chain using the same stitch sequence.
Join at the base with a slip stitch.
3. LEAF VEINS
To create the raised vein effect shown in the design, work a chain or slip-stitch line through the center of the leaf.
Attach the yarn at the base of the leaf.
Sl st or surface crochet along the center of the leaf toward the tip.
Create several smaller diagonal veins branching from the center toward the edges.
Repeat on both sides of the leaf.
This gives the leaf its characteristic feather-like appearance.
Fasten off neatly at the base.
4. LEAF EDGING
Work a neat round of single crochet around the entire leaf.
At the pointed end, work:
sc, ch 1, sc
to emphasize the tip.
Continue around the opposite side.
Join with a slip stitch.
Fasten off and weave in the yarn securely.
5. FORMATION OF THE RUNNER
Make multiple leaves in the same size.
For the design shown, approximately 12–14 pairs of side leaves can be used, depending on the final length.
Arrange the leaves alternately:
Left leaf → right leaf → open space → left leaf → right leaf
Attach each leaf to the corresponding chain loop beside the central stem.
Use slip stitches or small sewing stitches to secure the base of each leaf.
Keep the leaves evenly spaced.
6. TOP AND BOTTOM LEAVES
At the top of the runner, place one larger leaf pointing upward.
At the bottom, place a larger central leaf pointing downward.
Add two or three smaller leaves around the bottom section to reproduce the floral shape visible in the photograph.
Secure all leaves firmly to the central stem.
7. FINAL EDGES
Check both sides of the runner carefully.
Make sure:
- The leaves are evenly spaced.
- The central stem remains straight.
- All attachment points are secure.
- Loose yarn ends are woven into the stitches.
- The leaves are positioned symmetrically.
If necessary, gently stretch the runner into shape.
FORMATION
The table runner is formed from three main elements:
1. Central Stem
A long crocheted spine runs through the center of the entire piece.
2. Openwork Loops
Small chain spaces are worked along both sides of the stem, creating the decorative open sections.
3. Leaf Motifs
Individual leaves are crocheted separately and attached symmetrically to both sides of the central stem.
The leaves should point slightly outward, creating the natural botanical appearance shown in the reference image.
FINISHING
When the complete runner has been assembled, gently block it.
Lightly dampen the crochet and place it flat on a blocking surface.
Stretch the central stem into a straight line and arrange each leaf carefully.
Pin the leaves into their natural pointed shapes.
Allow the piece to dry completely before removing the pins.
Trim and hide any remaining yarn tails.
CONCLUSION
This crochet table runner creates an elegant botanical design using a combination of a central openwork stem and repeated leaf motifs.
The symmetrical arrangement gives the runner a balanced appearance, while the detailed leaf veins add texture and dimension.
The pattern can easily be adapted by changing the number of leaves or the length of the central stem.
For a longer table runner, simply repeat additional leaf sections along the central stem.
For a shorter runner, use fewer leaf pairs while maintaining the same spacing and symmetrical arrangement.