
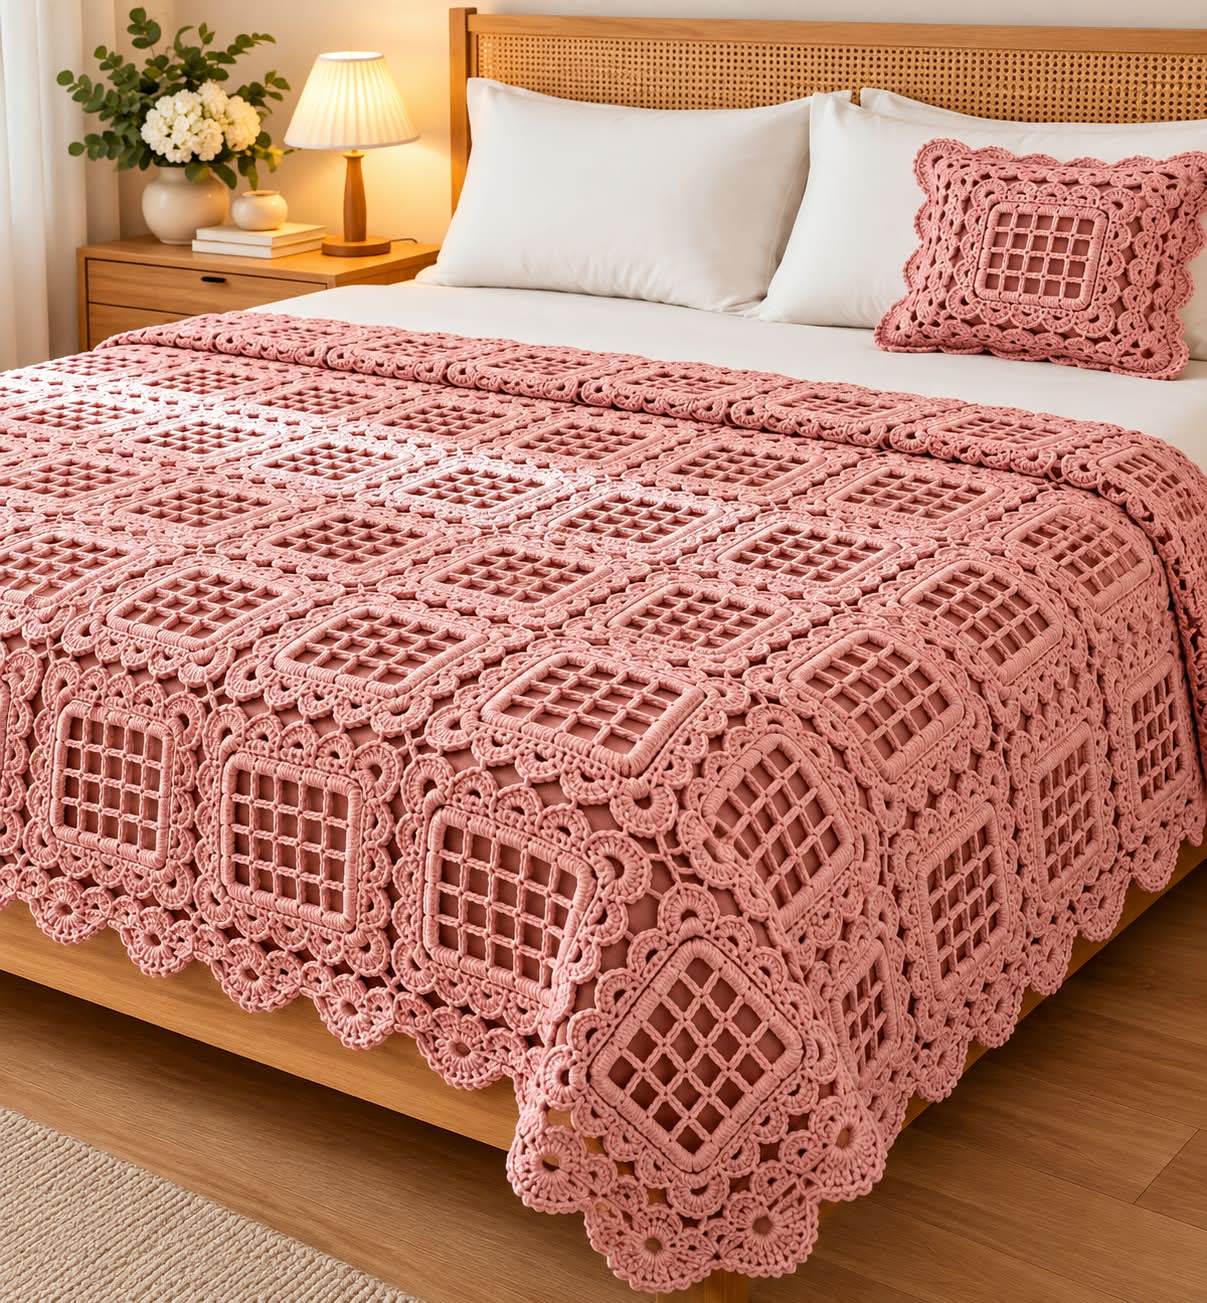
Elegant Vintage Lace Bedspread with Matching Decorative Pillow
Full Crochet Pattern – Inspired by the Reference Photo
This beautiful handmade bedspread features openwork lattice squares surrounded by decorative floral lace and scalloped borders. The repeating square motifs create a romantic, vintage-inspired design in dusty rose pink.
The following is a reconstructed crochet pattern inspired by the photograph, not the original designer’s verified instructions.
1. MATERIALS
Yarn
- Soft cotton or cotton-blend yarn
- Color: Dusty Rose Pink
- Recommended yarn weight: DK or light worsted (3–4)
- Quantity: Approximately 3,000–4,500 meters for a large bedspread, depending on size, gauge, and border
Tools
- Crochet hook: 3.5 mm–4.5 mm
- Scissors
- Yarn needle
- Measuring tape
- Stitch markers
- Blocking mats and pins
2. CROCHET ABBREVIATIONS
US CROCHET TERMINOLOGY
| Abbreviation | Meaning |
|---|---|
| CH | Chain |
| SC | Single Crochet |
| DC | Double Crochet |
| SL ST | Slip Stitch |
| ST | Stitch |
| SP | Space |
| SK | Skip |
| REP | Repeat |
| RS | Right Side |
| PICOT | Chain 3, slip stitch into the first chain |
3. METHOD – MAKING THE SQUARE MOTIF
Step 1 – Creating the Central Lattice
The center of each motif consists of an open mesh pattern with ten square openings across and ten rows high.
Foundation Chain
CH 35.
Row 1
- Work 1 DC into the 8th chain from the hook.
- CH 2.
- SK 2 chains.
- Work 1 DC into the next chain.
- Repeat steps 2–4 until the end.
You should have 10 open mesh spaces.
Row 2
- CH 5 and turn.
- Work 1 DC into the next DC of the previous row.
- CH 2.
- Work 1 DC into the next DC.
- Repeat across the entire row, ending in the turning chain.
Rows 3–10
Repeat Row 2.
The result is a square lattice panel with evenly spaced vertical and horizontal bars.
Step 2 – Strengthening the Square
Border Round 1
- Work SC evenly around the entire mesh panel.
- Place approximately 3 SC along each outer mesh space.
- Work 3 SC into each corner to keep the square flat.
- Join with SL ST to the first SC.
Keep the stitch spacing uniform on all four sides.
4. FORMATION – DECORATIVE FLORAL BORDER
Round 2 – Lace Arches
- Begin at one corner.
- CH 3.
- SK 3 stitches.
- SC into the next stitch.
- Repeat the CH 3 arches evenly along each side.
- At every corner, make a larger CH 5 arch.
Adjust the spacing slightly if necessary to obtain five small arches per side.
Round 3 – Crochet Flower Petals
- Work 5 DC into the first CH 3 arch.
- Work 1 SC between neighboring arches.
- Repeat across the side.
- At each corner, work 7 DC into the CH 5 corner arch.
- Continue the same arrangement on the remaining sides.
- Join with SL ST.
These shell groups produce the floral appearance surrounding the central lattice.
Round 4 – Decorative Picot Details (Optional)
- Work SC along the upper edge of each shell.
- At the center of each shell, make a PICOT.
- Continue around the motif.
- Fasten off and weave in the yarn ends.
For easier assembly, you may omit the picots along the sides that will be joined to other squares.
5. FORMATION – ASSEMBLING THE BEDSPREAD
Making Multiple Squares
Crochet identical motifs until you have enough to cover the desired bed size.
Suggested arrangement for a large bedspread:
Example motif layout — 8 columns × 10 rows
8 motifs across
10 motifs long
80 square motifs in total
For example, if each blocked motif measures 22 cm:
- Width: approximately 176 cm before the final border.
- Length: approximately 220 cm before the final border.
Adjust the number of motifs according to your bed dimensions and desired overhang.
Joining the Motifs
Method 1 – Invisible Needle Joining
- Place two completed squares with right sides facing.
- Align the shell edges.
- Thread a yarn needle with matching yarn.
- Sew together the corresponding edge stitches using mattress stitch or whipstitch.
- Repeat for each square until a full row is formed.
- Join the completed rows together.
Method 2 – Slip Stitch Joining
- Place two squares with right sides together.
- Insert the hook through the corresponding edge stitches of both squares.
- Work SL ST stitches along the joined edge.
- Continue joining motifs and rows.
- Turn the bedspread right side out.
Choose one joining method and use it consistently.
6. FORMATION – FINAL BEDSPREAD BORDER
Round 1 – Foundation Edging
Work SC evenly around the complete joined bedspread.
At each outer corner, work 3 SC.
Round 2 – Open Lace Edging
Repeat the following pattern around the bedspread:
CH 5, SK approximately 3 stitches, SC into the next stitch.
Adjust stitch spacing to keep the edging flat and use larger arches at the four corners.
Round 3 – Scalloped Floral Edging
- Work 7 DC into the first CH 5 space.
- SC into the next anchoring stitch.
- Continue repeating the shell pattern around the bedspread.
- Add extra stitches at the corners if necessary.
- Join with SL ST.
Round 4 – Finishing
Add optional picot details along the scallops.
Fasten off securely.
Weave in all loose yarn ends.
7. MATCHING DECORATIVE PILLOW
The pillow shown in the photograph coordinates with the bedspread’s lattice and floral edging.
Pillow Front
- Crochet one central mesh motif using the same method as the bedspread.
- Add the surrounding floral shell border.
- Continue additional decorative rounds until the front reaches the desired cushion size.
Pillow Back
- Crochet a plain square or two overlapping crochet rectangles.
- Match the dimensions of the decorated front.
- Join the front and back along the outer edges.
- Leave an opening for the pillow insert, or make an envelope closure.
Finish with a delicate scalloped edging.
8. FINISHING AND BLOCKING
Blocking helps all motifs maintain the same shape and improves the appearance of the lace.
- Lightly wet the finished bedspread according to the yarn care instructions.
- Gently remove excess water using a clean towel.
- Spread the bedspread on a large flat surface.
- Arrange the squares and straighten the floral borders.
- Pin into shape if appropriate for the yarn.
- Allow to dry completely before use.
Avoid stretching the open lattice too firmly.
9. CONCLUSION
The Rose Garden Crochet Bedspread combines geometric lattice squares with delicate floral crochet edging, creating an elegant and timeless bedroom accessory.
The modular construction allows you to customize the finished dimensions for a single, double, queen, or king-sized bed.
The matching pillow adds a coordinated decorative touch, while the soft dusty rose color highlights the intricate crochet texture.
Final result: A romantic handmade lace bedspread with repeating openwork squares, raised floral borders, and graceful scalloped edges.
Pattern note: This is an approximate, workable interpretation of the photographed design. Exact stitch counts, floral shapes, and motif proportions may differ from the original. Making and blocking one sample square before beginning the full bedspread is recommended.