
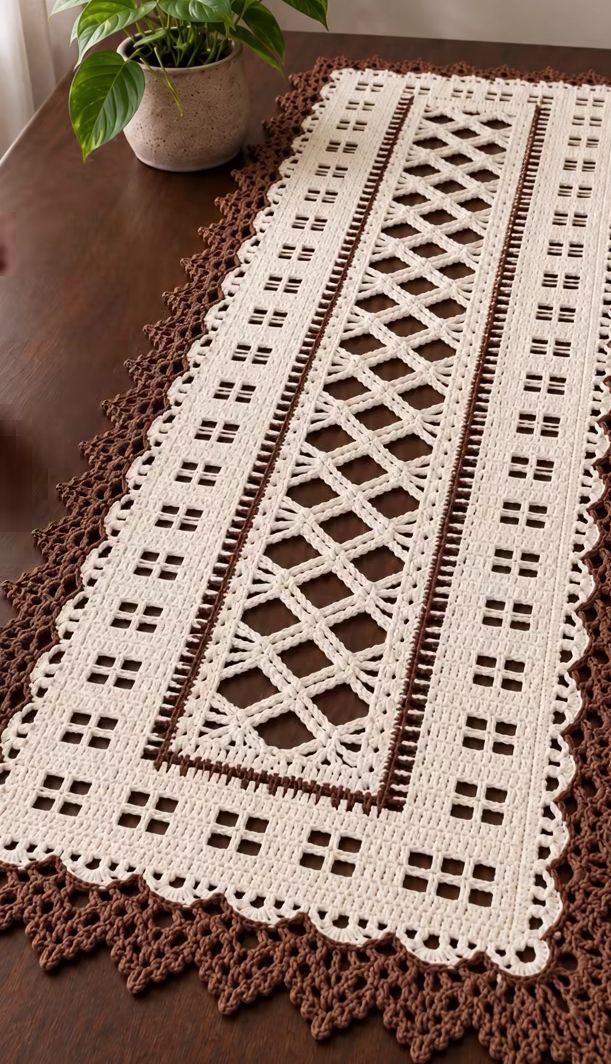
This elegant crochet table runner combines a cream filet-style frame with a dramatic open lattice center and a contrasting brown lace border. The design looks intricate, but it can be divided into three manageable sections: the center lattice panel, the cream outer frame, and the decorative brown edging.
The instructions below are inspired by the photographed runner and recreate its overall construction and appearance rather than an exact stitch-for-stitch copy of an original pattern.
Materials
You will need:
- Cream cotton yarn or crochet thread
- Brown cotton yarn or crochet thread
- Crochet hook suitable for your yarn
- Scissors
- Yarn needle
- Stitch markers
- Blocking pins
A smooth cotton yarn is recommended because it gives the geometric sections good definition and helps the finished runner keep its rectangular shape.
Abbreviations
ch – chain
sl st – slip stitch
sc – single crochet
hdc – half double crochet
dc – double crochet
tr – treble crochet
dtr – double treble crochet
st / sts – stitch / stitches
sp – space
ch-sp – chain space
sk – skip
rep – repeat
rnd – round
Finished Size
The size can be adjusted easily.
For a medium table runner, aim for approximately 35–40 cm wide and 90–120 cm long.
To make a longer runner, simply continue the center lattice pattern before beginning the end section.
Center Lattice Panel
The center is made with large diagonal open squares. Two sets of diagonal bars cross each other to create repeated diamond shapes.
Using cream yarn, begin with a foundation chain corresponding to the desired width of the center panel.
For a medium runner, start with approximately:
Ch 35.
Row 1
Dc in the fourth ch from the hook.
Dc across.
Turn.
Row 2
Ch 3.
Dc in the next 2 sts.
Then begin creating large open spaces:
ch 5, sk 4 sts, dc in next 3 sts.
Repeat across.
Turn.
Creating the Diagonal Lattice
The lattice effect is formed with groups of chains and tall stitches positioned diagonally.
Work a long chain extending from one side of the panel toward the opposite side.
A basic diagonal bar can be made with:
ch 7, tr into the next appropriate ch-sp.
Continue:
ch 7, tr into next ch-sp.
Repeat diagonally across the panel.
On the following row, work the diagonal in the opposite direction.
As the two directions cross, they form the characteristic X shapes and diamonds visible in the center.
Strengthening the Diagonal Bars
To make the lattice look thick and corded rather than like simple chains, crochet back over each diagonal chain.
Work:
3–4 sc around each chain section.
Continue along the entire diagonal.
For an even more pronounced cord, work another row of slip stitches over the sc.
This produces the raised rope-like lines visible in the runner.
Repeating the Diamond Pattern
Continue alternating diagonal sections.
The basic sequence is:
diagonal from left to right → diagonal from right to left → crossing point → next diamond.
Keep the diamonds approximately equal in size.
The center should remain open and airy, with the solid diagonal bars forming the main decoration.
Continue until the lattice panel reaches the desired length.
Border Around the Center Panel
Once the center lattice is complete, work around all four sides.
Round 1
Using cream:
Work sc evenly around the entire center.
At each corner work:
3 sc in the same corner space.
Join with sl st.
Round 2
Ch 3 and work dc around.
At each corner work:
2 dc, ch 2, 2 dc
into the corner space.
Join.
This creates a firm rectangular frame around the open lattice.
Brown Accent Round
Change to brown yarn.
Work one round of sc around the center panel.
At each corner work:
sc, ch 2, sc
into the corner space.
The narrow brown line provides a strong contrast between the open center and the cream outer section.
Fasten off the brown yarn.
Cream Open Accent Round
Rejoin cream yarn.
Work:
dc in next st, ch 1, sk 1 st, dc in next st.
Repeat around.
At each corner work:
dc, ch 2, dc
into the corner space.
This creates the narrow ladder-like openwork visible beside the brown accent line.
Beginning the Wide Cream Frame
The large cream section surrounding the center is worked mainly in dc.
Round 1
Work dc around the entire runner.
At each corner increase sufficiently to keep the work flat.
A simple corner is:
2 dc, ch 2, 2 dc.
Round 2
Continue in dc.
The goal is to build a wide solid band before introducing the small decorative windows.
Small Window Motifs
The cream border is decorated with repeated groups of four small openings.
Each motif resembles a tiny four-pane window.
To create one window motif, work:
4 dc, ch 2, sk 2 sts, 2 dc, ch 2, sk 2 sts, 4 dc.
On the following row, work another pair of openings directly above the first pair.
This creates four openings arranged as:
□ □
□ □
Keep several solid dc stitches between each window motif.
Repeating the Windows
Continue around the runner with:
solid dc section → four-window motif → solid dc section → four-window motif.
Try to position the motifs evenly.
At the corners, keep the stitches mostly solid rather than forcing a window motif into the turn.
This will make the corners stronger and easier to shape.
Completing the Cream Frame
After the window motifs, work another 2–4 rounds of dc.
This creates a substantial cream frame around the center.
Check frequently that the runner lies flat.
If the corners begin pulling inward, add more stitches at each corner.
If they become wavy, reduce the number of corner increases.
Cream Scalloped Edge
Before adding the brown lace, create the rounded cream border.
Work:
sc in next st, sk 2 sts, 6 dc in next st, sk 2 sts, sc in next st.
Repeat around.
Depending on your stitch count, you may need to adjust the number of skipped stitches slightly.
At each corner, use a larger shell:
8 dc in the corner space.
The cream shells should form a continuous row of soft rounded scallops.
Preparing for the Brown Lace
Attach brown yarn behind or between the cream scallops.
Work:
sc, ch 5, sc into next suitable space.
Repeat around.
At the corners work:
sc, ch 7, sc.
This foundation provides the attachment points for the pointed brown lace.
Brown Lace Border
The outer brown border is made from repeating triangular lace motifs.
Into the first ch-5 space work:
sc, ch 3, 3 dc, ch 3, sc.
Move to the next space.
On the following round, increase the center of each motif.
Work:
sc, ch 3, dc, ch 3, tr, ch 3, dc, ch 3, sc.
This begins forming a pointed triangle.
Building the Lace Points
On the next round, work around each triangular section using chain spaces.
For example:
sc, ch 4, sc in next space, ch 4, sc in next space.
At the center point work:
sc, ch 5, sc.
Continue down the opposite side.
The center chain should be slightly longer so the motif naturally forms a point.
Final Brown Round
Work a final decorative round over each triangle.
A simple finish is:
sc in next ch-sp, ch 3, sc in same sp.
Continue to the next space.
At the very tip of each triangle work:
sc, ch 5, sl st into first ch, sc.
This creates a small picot at the point.
Repeat around the entire runner.
Corner Lace
The four corners require slightly larger motifs.
Instead of one triangular point, work a wider fan.
Begin with:
sc, ch 5, tr, ch 3, dtr, ch 3, tr, ch 5, sc.
On the next round, surround the fan with chain loops.
Finish the central tip with a ch-5 picot.
The larger corner motifs help the lace turn naturally without bunching.
Finishing
Fasten off both colors.
Use a yarn needle to weave the cream tails through cream stitches and the brown tails through brown stitches so they remain invisible.
Check the joining points between the lattice and frame carefully and reinforce any loose sections.
Blocking
Blocking is particularly important for the open center and pointed brown edging.
Gently wet the finished runner and press out excess water without twisting.
Lay it flat on a blocking surface.
First pin the four corners of the cream rectangle.
Next straighten the central lattice. Pull each diamond gently until the openings are approximately equal.
Pin the cream scallops around the perimeter.
Finally, pull each brown lace point outward and secure it with a blocking pin.
Make sure the brown triangles are evenly spaced and approximately the same size.
Leave the runner in place until completely dry.
Making the Runner Longer
To increase the length, do not change the outer border pattern.
Instead, add more lattice repeats to the center panel.
Each additional complete diamond adds another section to the runner.
For the most balanced appearance, finish the center only after completing a full diamond repeat.
Color Variations
The cream-and-brown combination creates a warm, natural appearance, but the same design can be made in many combinations.
White with dark green creates a traditional look, cream with burgundy gives the runner a richer appearance, and white with blue creates a lighter decorative style.
It can also be worked entirely in one color. In that case, the contrast will come from the difference between the solid filet frame, open lattice center, scallops, and pointed lace edging rather than from the yarn colors.