
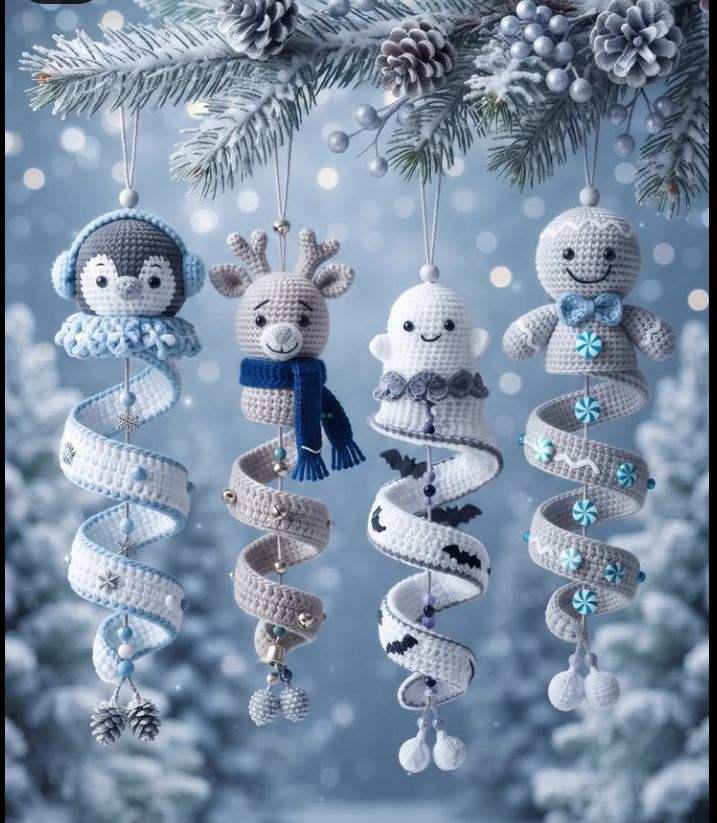
Important note: The reference photograph shows finished pieces only. Exact original stitch counts, yarn, measurements, and construction are not visible, so this is an original interpretation designed to achieve a similar look rather than a reproduction of an unseen source pattern.
Project Overview
Each ornament combines a small amigurumi-style winter character with a long crocheted corkscrew ribbon. Decorative beads, snowflakes, bells, peppermint-style accents, and dangling charms can be added after assembly. The four versions share the same basic spiral construction, while the character heads and finishing details change.
Materials
DK or light worsted yarn in white, pale gray, charcoal, navy, light blue, beige/taupe, and small accent colors
3.0-4.0 mm crochet hook, adjusted to yarn and tension
Polyester fiberfill for stuffed heads and small body pieces
Yarn needle, scissors, stitch marker, sewing thread
Small safety eyes or embroidered eyes; black embroidery thread for mouths and facial details
Optional beads, bells, snowflake charms, peppermint-style buttons, metallic cord, and hanging loops
Abbreviations – US Terms
| Abbreviation | Meaning |
| MR | magic ring |
| ch | chain |
| sl st | slip stitch |
| sc | single crochet |
| hdc | half double crochet |
| dc | double crochet |
| inc | 2 sc in same stitch |
| dec | single crochet decrease |
| BLO | back loop only |
| FO | fasten off |
Basic Long Spiral Ribbon
The photograph suggests a wide, flat ribbon arranged into a controlled helix rather than a very tight curly fringe. The following construction gives a similar hanging corkscrew effect.
Option A – Flat Strip Shaped Into a Spiral
Ch 70-95. Row 1: beginning in the 2nd ch from hook, sc across. Ch 1, turn. Rows 2-5: sc or hdc across, turning at the end of every row. FO. The finished strip should be approximately 3-5 cm wide. Twist the strip around a tube, dowel, or your fingers into a long helix, lightly steam if the fiber permits, and allow it to cool completely before removing. This produces the broad ribbon appearance seen in the reference.
Option B – Self-Curling Crochet Spiral
For a spiral that curls by itself, ch 65-85 and work 3 dc into each foundation chain. For a wider ribbon, first crochet 2-3 straight rows of sc, then work an increase row along one long edge. This method gives a denser, more dramatic corkscrew.
Spiral Decoration
Sew tiny snowflakes, beads, bells, contrasting appliques, or peppermint-style circles at intervals along the outer face. Keep embellishments lightweight and distribute them evenly so the ornament hangs vertically.
Basic Amigurumi Head
Use this sphere as a starting point for the reindeer, ghost, and snowman; change colors and add character-specific pieces.
Rnd 1: 6 sc in MR. (6)
Rnd 2: inc around. (12)
Rnd 3: (sc, inc) x 6. (18)
Rnd 4: (2 sc, inc) x 6. (24)
Rnd 5: (3 sc, inc) x 6. (30)
Rnds 6-10: sc around. (30)
Rnd 11: (3 sc, dec) x 6. (24)
Rnd 12: (2 sc, dec) x 6. (18). Insert eyes and begin stuffing.
Rnd 13: (sc, dec) x 6. (12)
Rnd 14: dec around. (6). FO, close opening, and weave in end.
Design 1 – Penguin With Earmuffs
Work the head mainly in charcoal or medium gray. Crochet or sew a white oval/heart-shaped face patch onto the front before final assembly. Add small black eyes, a tiny gray or orange beak, and optional cheek details.
Earmuffs
Make two small circles: 6 sc in MR; inc around for the second round; FO. Sew one to each side of the head. Crochet a short chain or narrow strip long enough to arch over the top of the head and attach it between the ear pads.
Ruffled Collar
Ch a length that fits around the neck area. Work 2-3 dc in each chain to create a soft ruffle. Join or sew the ends behind the head. Attach the white or pale-blue spiral directly beneath the collar. Add a central hanging strand with beads or a snowflake charm if desired.
Design 2 – Reindeer With Scarf
Work the head in pale taupe or light gray-beige. Add a lighter muzzle: crochet a small oval or circle, lightly stuff if desired, and sew to the lower front of the face. Embroider nostrils and a gentle mouth.
Ears and Antlers
For each ear, ch 5, work sc, hdc, dc, hdc along one side, then mirror the stitches on the other side of the chain; FO and shape into a leaf. For each antler, crochet a firm chain stem and add two or three short chain branches with slip stitches back to the stem. Make two and sew securely to the crown.
Scarf
Ch 45-60 and work 2-3 rows of sc in navy or another contrasting shade. Add short fringe at both ends. Wrap around the neck and tack in place. Attach a gray spiral below the head and finish the bottom with a bell or clustered beads.
Design 3 – Little Winter Ghost
Work the head/body in white. For a slightly elongated silhouette, repeat one or two additional even rounds before decreasing. Embroider a small smiling mouth and use black eyes.
Tiny Arms
Make two: 6 sc in MR, then sc around for 3-4 rounds. Lightly stuff only at the base if needed, flatten, and sew to the sides.
Gray Rosette Collar
Make several tiny rosettes by working 5-6 sc in a ring, then a small petal sequence around each ring. Sew the rosettes side by side around the lower edge of the character. Attach the white spiral beneath. Black bat-shaped appliques may be replaced with simple dark bow, star, or wing motifs if preferred.
Design 4 – Snowman With Bow Tie
Work a white spherical head. Add black eyes and embroider a curved smile. A tiny carrot nose can be embroidered or crocheted, although the photographed design appears especially simple and graphic.
Arms
Make two small rounded arms using 6 sc in MR, then 1-2 rounds of sc; lightly stuff, flatten the open edge, and sew at the sides.
Bow Tie
In light blue, ch 7. Work 4-5 short rows of sc to make a small rectangle. Wrap yarn tightly around the center several times to form a bow and secure at the back. Sew beneath the face.
Spiral and Peppermint Accents
Use a pale gray spiral. Sew small round blue-and-white accents along the front face of the ribbon. To crochet a simple round accent, make 6 sc in MR and increase once around; embroider radiating lines in a contrasting shade to suggest peppermint candy. Finish the lower end with two small white balls or pompoms.
Assembly
Complete and stuff the character before attaching the spiral.
Determine the top center of the spiral and sew it firmly to the underside of the character.
Add a vertical hanging cord through the center/top of the head. Reinforce the attachment so the ornament weight is carried by the cord rather than by facial pieces.
Arrange the spiral into an even helix. Tack selected turns together invisibly if the curl shifts too much.
Add beads and charms only after the main crochet is assembled, checking the balance as you work.
Sizing and Customization
A longer foundation chain makes a longer ornament; extra strip rows make a wider ribbon. Smaller hooks and firm cotton give crisp sculptural pieces, while acrylic creates a softer result. For a coordinated winter set, keep the characters within the same head size and use a shared palette of white, silver-gray, icy blue, navy, and small metallic accents.
Safety and Finishing Notes
If the ornaments will be accessible to young children or pets, embroider the eyes and omit beads, bells, safety eyes, and detachable charms. Weave in all ends thoroughly. Do not aggressively block the spiral; reshape it by hand and use only gentle steaming appropriate to the fiber.
Quick Construction Plan
1. Crochet the chosen character head and accessories. 2. Crochet a long ribbon or self-curling spiral. 3. Shape the helix. 4. Sew the character to the top. 5. Add the hanging loop. 6. Attach decorative beads, snowflakes, bells, candy motifs, or pompoms. 7. Check that the ornament hangs straight and adjust the spiral spacing.
Original image-inspired pattern guide. Reference photograph intentionally not embedded.