
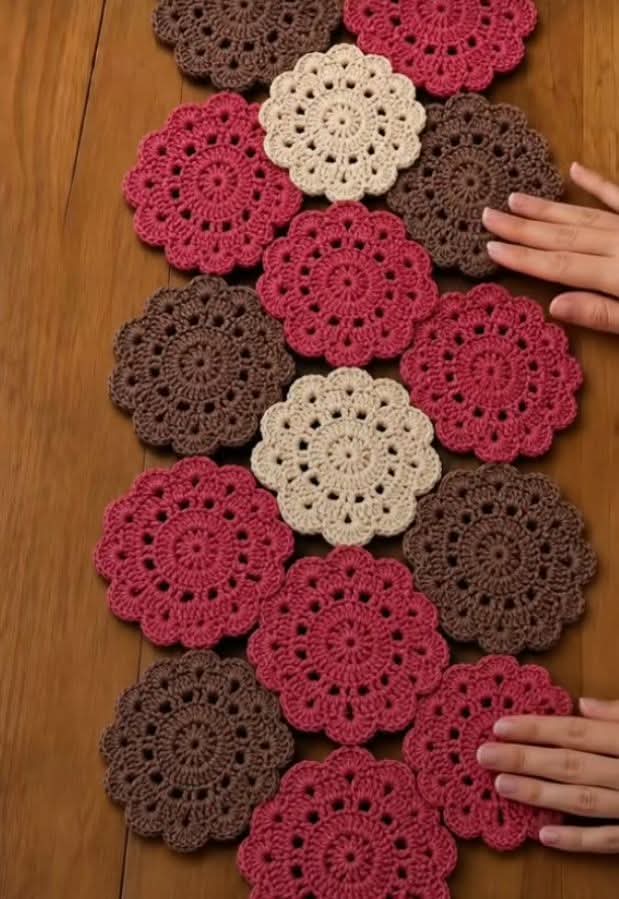
This pattern creates individual round floral motifs similar to the motifs shown in the reference image. The motifs can be made separately and joined together to create a table runner, placemat, decorative strip, or larger table covering.
The pattern is written in US crochet terminology.
Materials
Cotton crochet thread or fine cotton yarn
Crochet hook suitable for the yarn
Tapestry needle
Scissors
Optional blocking pins and blocking mat
Suggested colors
Dusty rose
Chocolate brown
Cream
For a result similar to the photograph, use the same yarn weight and hook size for all three colors.
Finished Motif
Each completed motif is approximately 15 to 18 cm in diameter when made with medium cotton yarn.
The final size depends on yarn weight, hook size, and tension.
Abbreviations
MR: magic ring
ch: chain
sl st: slip stitch
sc: single crochet
hdc: half double crochet
dc: double crochet
tr: treble crochet
inc: increase
st: stitch
sts: stitches
sp: space
FO: fasten off
Center
Use your chosen color.
Make a MR.
Round 1
Ch 3.
Work 15 dc into the ring.
Join with a sl st to the top of the beginning ch 3.
You should have 16 dc including the beginning chain.
Round 2
Ch 1.
Sc in the same stitch.
Work 2 sc in each stitch around.
Join with a sl st to the first sc.
You should have 32 sc.
Round 3
Ch 3.
Dc in the same stitch.
Work 2 dc in every second stitch around.
Continue the increase pattern evenly around the circle.
Join with a sl st to the top of the beginning ch 3.
Round 4
Ch 1.
Sc in each stitch around.
Join with a sl st.
This creates the raised central circle visible in the middle of the flower.
Decorative Center Ring
Round 5
Ch 3.
Skip 1 stitch.
Sc in the next stitch.
Ch 3.
Skip 1 stitch.
Sc in the next stitch.
Continue around.
Join with a sl st to the first sc.
You should have a regular ring of small chain spaces.
Round 6
Sl st into the first ch-3 space.
Ch 3.
Work 2 dc into the same space.
Ch 2.
Work 3 dc into the same space.
This forms the first decorative group.
In the next ch-3 space, work 3 dc, ch 2, 3 dc.
Repeat around.
Join with a sl st to the beginning ch 3.
The motif should now have small open spaces between the raised groups.
Openwork Ring
Round 7
Sl st into the next ch-2 space.
Ch 1.
Sc in the same space.
Ch 4.
Sc in the next ch-2 space.
Ch 4.
Continue around.
Join with a sl st to the first sc.
This creates the open ring surrounding the center.
Round 8
Sl st into the first ch-4 space.
Ch 3.
Work 4 dc into the same space.
Sc into the next ch-4 space.
Work 5 dc into the next ch-4 space.
Continue alternating 5 dc groups and sc stitches around.
Join with a sl st.
The repeated groups begin creating the rounded flower structure.
Petal Formation
Round 9
Sl st to the center of the first 5-dc group.
Ch 1.
Sc around the group.
Ch 5.
Sc around the next 5-dc group.
Ch 5.
Continue around.
Join with a sl st.
There should be a chain space between each petal section.
Round 10
Sl st into the first ch-5 space.
Ch 3.
Work 5 dc into the same space.
Ch 2.
Work 6 dc into the same space.
This forms one large petal.
Sc into the next ch-5 space.
In the following ch-5 space, work 6 dc, ch 2, 6 dc.
Repeat around.
Join with a sl st.
You should now have approximately 8 large rounded petals.
Petal Edging
Round 11
Sl st into the center ch-2 space of the first petal.
Ch 1.
Sc in the same space.
Work 7 dc around the outer edge of the petal.
Sc into the space between the next two petals.
Continue around each petal.
At each petal point, work approximately 7 to 9 dc to create the rounded scalloped edge.
Join with a sl st.
Outer Lace Ring
Round 12
Ch 1.
Sc in the first stitch.
Ch 3.
Skip 2 stitches.
Sc in the next stitch.
Ch 3.
Continue around the entire motif.
Adjust the skipped stitches slightly if necessary so that the lace spaces remain evenly distributed.
Join with a sl st.
Final Petal Edge
Round 13
Sl st into the first ch-3 space.
Ch 1.
Sc in the same space.
Work 5 dc into the same space.
Sc into the same space.
This creates the first scallop.
Sl st into the next ch-3 space.
Sc in the same space.
Work 5 dc into the same space.
Sc in the same space.
Continue around.
Join with a sl st.
FO.
Pull the yarn through the final loop and tighten.
Finishing the Motif
Weave the yarn ends through the back of the work.
Trim the excess yarn.
Gently stretch the motif into a circular shape.
Pin the motif flat.
Lightly dampen it.
Allow it to dry completely before removing the pins.
Blocking will open the lace spaces and make the flower shape much more defined.
Making the Motifs in Different Colors
Make the motifs individually.
Use dusty rose for the majority of the motifs.
Use chocolate brown for the darker motifs.
Use cream for the accent motifs.
The photograph uses contrasting motifs arranged so that the colors alternate rather than being placed in a strict repeating sequence.
Joining the Motifs
Place two finished motifs beside each other.
The scalloped edges should touch.
Use a tapestry needle and matching yarn.
Insert the needle through the corresponding outer stitches of both motifs.
Make a small whip stitch.
Continue along the touching scallops.
Keep the joining stitches loose enough that the motifs remain flat.
Repeat with the next motif.
Continue until the desired length is reached.
Joining Motifs Side by Side
For a wider runner, arrange the motifs in alternating rows.
Place the center of one motif beside the gap between two motifs in the next row.
This creates the overlapping floral arrangement visible in the reference image.
Join the motifs at every touching point.
Use the same color as one of the adjoining motifs or use cream yarn for a less visible join.
Suggested Arrangement
For a narrow runner, use approximately 3 motifs across and 6 to 8 motifs long.
For a wider runner, use approximately 4 motifs across and 7 to 10 motifs long.
For a table centerpiece, use approximately 5 to 7 motifs.
The exact number depends on the diameter of your finished motifs and the desired finished size.
Decorative Color Arrangement
A similar arrangement to the photograph can be made using approximately 70 percent dusty rose, 20 percent chocolate brown, and 10 percent cream.
Place the cream motifs at intervals rather than directly beside one another.
Place brown motifs between groups of rose motifs.
Rotate every second motif slightly before joining so the scalloped edges create a natural floral pattern.
Alternative Color Changes Within One Motif
For a multicolored flower, work the center in cream.
Change to dusty rose for the decorative center ring.
Change to chocolate brown for the openwork section.
Return to dusty rose for the outer petals.
Finish with cream on the final scalloped edge.
Larger Flower Motif
To make a larger motif, continue the center increases before beginning the openwork ring.
Work one additional round of dc increases.
Then create the chain-space ring.
Continue with the petal formation.
This produces a larger flower while maintaining the same overall design.
Smaller Flower Motif
Use a smaller crochet hook.
Use finer cotton thread.
Stop after the main petal round and add the final scalloped edging.
This produces a smaller flower suitable for coasters or small decorative pieces.
Crochet Placemat
Make 7 motifs.
Arrange one motif in the center.
Place six motifs around it.
Join all touching edges.
Add one final decorative border around the complete shape using sc.
Block the finished piece.
Crochet Table Runner
Make approximately 18 to 24 motifs.
Arrange them in staggered rows.
Join the motifs at all touching points.
Work a simple border around the outside edge.
Suggested border
Round 1
Attach yarn to any outer stitch.
Ch 1.
Sc evenly around the entire runner.
At every outer corner or sharp transition, work 3 sc in the same point.
Join with a sl st.
Round 2
Ch 1.
Sc in each stitch around.
At each corner, work 3 sc in the center stitch.
Join with a sl st.
FO.
Weave in all ends.
Final Blocking
Place the finished runner on a flat blocking surface.
Stretch each flower evenly.
Make sure the petals are symmetrical.
Pin the outer points.
Lightly dampen the entire piece.
Allow it to dry completely.
Remove the pins.
The finished piece should lie flat with the flower motifs clearly defined and the openwork sections visible.