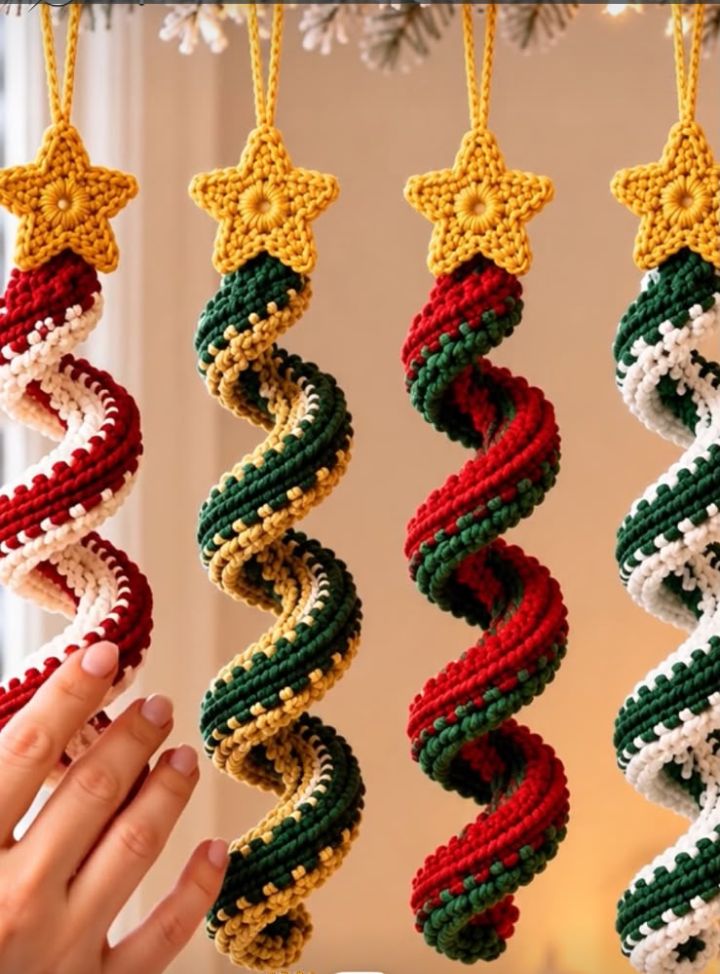
Skill Level: Easy to Intermediate
Finished Length: approximately 35–45 cm
Finished Spiral Width: approximately 7–10 cm
Hook: 3.0–3.5 mm crochet hook
Yarn: DK or light worsted weight yarn
US crochet terminology is used.
MATERIALS
3.0–3.5 mm crochet hook
DK or light worsted yarn in 3 or 4 colors
Gold or yellow yarn for the star and hanging loop
Tapestry needle
Scissors
Stitch marker
Optional small amount of stuffing
ABBREVIATIONS
MR: Magic Ring
ch: Chain
sc: Single Crochet
hdc: Half Double Crochet
dc: Double Crochet
tr: Treble Crochet
sl st: Slip Stitch
inc: Increase
st: Stitch
sts: Stitches
FO: Fasten Off
BLO: Back Loop Only
PART 1 – FIVE-POINT STAR
Round 1: Make a magic ring. Work 10 sc into the ring. Pull the ring closed and sl st into the first sc. 10 sts.
Round 2: Ch 1. Sc in the same stitch. Ch 4, skip the next stitch, sc in the next stitch. Repeat around. You should have 5 sc and 5 ch-4 spaces. Sl st to the first sc.
Round 3: Sl st into the first ch-4 space. In the same space work sc, hdc, dc, 2 tr, ch 3, sl st into the top of the last tr, tr, dc, hdc, sc. Sl st into the next ch-4 space and repeat the same sequence. Continue around until all 5 points are completed. Sl st to the beginning. FO and weave in the end.
PART 2 – STAR CENTER
With gold yarn, make a magic ring. Work 8 sc into the ring. Sl st to the first sc. Round 2: Work 2 sc in every stitch around. 16 sts. FO leaving a long sewing tail. Place the circle in the center of the star and sew securely. Alternatively, embroider a small spiral in the center.
PART 3 – HANGING LOOP
With gold yarn, ch 28. Sl st into the first chain to form a loop. Work one row of sc around the chain. FO leaving a long tail. Position the two ends behind the top point of the star and sew securely.
PART 4 – FIRST SPIRAL CORD
With the first color, ch 100. For a shorter ornament ch 80. For a longer ornament ch 120. Starting in the second chain from the hook, work 3 sc in every chain across. FO leaving a long tail.
PART 5 – SECOND SPIRAL CORD
With the second color, ch 100. Starting in the second chain from the hook, work 3 sc in every chain across. FO leaving a long tail.
PART 6 – THIRD SPIRAL CORD
With the third color, ch 100. Starting in the second chain from the hook, work 3 sc in every chain across. FO leaving a long tail.
PART 7 – FOURTH SPIRAL CORD
For a fuller ornament, make a fourth cord. Ch 100. Starting in the second chain from the hook, work 3 sc in every chain across. FO leaving a long tail.
PART 8 – FORMING THE SPIRAL
Place the completed cords together. Gently twist them so that they form one thick group. Wrap the group around a cylindrical object approximately 7–9 cm in diameter. Make approximately 3–4 complete turns. Keep the turns evenly spaced. The finished spiral should be approximately 35–40 cm long.
PART 9 – SECURING THE SPIRAL
Do not sew the entire spiral together. Secure the cords at approximately 5–7 points. At each point, bring all the cords together and make 2–3 small stitches through them with matching yarn. Pull gently and secure the yarn. Hide the knots inside the cords. Leave the spaces between the attachment points free so the ornament keeps its spring-like shape.
PART 10 – CENTER SUPPORT
For additional stability, make a center cord. Ch 100–120 and work sc across. Place the cord through the center of the spiral and secure the top and bottom. This is optional.
PART 11 – SHAPING THE SPIRAL
The top and bottom should be slightly narrower than the center. Keep the first 5–7 cm relatively narrow. Allow the middle section to open to approximately 7–10 cm. Gradually bring the final turns closer together. Do not make every turn exactly the same diameter.
PART 12 – ATTACHING THE STAR
Place the star at the top of the spiral. The top of the spiral should sit approximately 1–2 cm behind the star. Using gold or the main spiral color, sew through the top of the spiral and the back of the star several times. Pull firmly and secure the yarn. The star should face forward.
PART 13 – STAR-TO-SPIRAL CONNECTOR
With gold yarn, ch 8. Sl st back down the chain. FO leaving a long tail. Sew one end to the back of the star and the other end to the top of the spiral.
PART 14 – RED AND CREAM COLORWAY
Cord 1: Red
Cord 2: Cream
Cord 3: Red
Cord 4: Cream
Star: Gold
Hanging loop: Gold
PART 15 – GREEN AND GOLD COLORWAY
Cord 1: Dark green
Cord 2: Gold
Cord 3: Dark green
Cord 4: Cream or gold
Star: Gold
Hanging loop: Gold
PART 16 – RED AND GREEN COLORWAY
Cord 1: Red
Cord 2: Dark green
Cord 3: Red
Cord 4: Dark green
Star: Gold
Hanging loop: Gold
PART 17 – GREEN AND WHITE COLORWAY
Cord 1: Dark green
Cord 2: White
Cord 3: Dark green
Cord 4: White
Star: Gold
Hanging loop: Gold
PART 18 – FINISHING
Weave all yarn ends securely through the back of several stitches and trim the excess. Shape each point of the star so that all five points are approximately equal. Hang the ornament vertically and gently separate the cords to create an even spiral. If necessary, lightly dampen the ornament, shape it by hand and allow it to dry completely.
RECOMMENDED SIZE FOR THE PHOTO
Hook: 3.0 mm
Yarn: DK weight
Number of cords: 4
Chain per cord: 100
Curling: 3 sc in every chain
Spiral turns: 3½–4
Spiral diameter: approximately 8 cm
Star width: approximately 7–8 cm
Hanging loop: approximately 12 cm
Use firm tension to obtain the compact, thick appearance shown in the photograph.
SIZE ADJUSTMENT
Small ornament: 70–75 chains per cord
Medium ornament: 90–100 chains per cord
Large ornament: 115–125 chains per cord
Extra-large ornament: 140 or more chains per cord
The final appearance depends mainly on the number of spiral turns, the diameter of the spiral and the yarn thickness.
FULL CROCHET PATTERN – FESTIVE STAR SPIRAL ORNAMENT